background image

PAGE 20

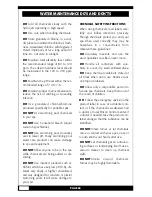
FILTER MAINTENANCE

Vita Spas are designed with the most effi-
cient top loading filtration system in the
industry. Filter maintenance is the most
critical factor in keeping your spa water
clean.

TO CLEAN THE F ILTER:

(NOTE: Never run the spa without a 
filter installed)

Remove the cartridge and spray it with a
garden hose. It will be necessary to rotate
the cartridge while spraying so as to thor-
oughly  remove  the  debris  lodged
between the filter pleats.

After allowing to dry, inspect the cartridge
for calcium deposit (scaling) or an oil
film. Rapid mineral build-up from hard
water, or oil build-up from the use of oil-
based water scent or body oil may coat
the filter cartridge. A filter cleaner to soak
the cartridge is available from your Vita

Spa dealer and should be used as part of
your spa maintenance. Use a rag to
remove any debris at the bottom of the
filter housing and inside the filter screen.
Replace the cartridge in the filter housing.
We recommend the use of a spare filter.
This way one can be soaking and clean-
ing while you continue to enjoy the use
of your spa.

DRAINING YOUR SPA

Detergent residues from bathing suits as
well as soap film from your body may

gradually accumulate in the water. Foam
inhibitors will suppress the foam but will
not remove the soap from the water.
Eventually, the soap build-up in the water
will  concentrate  enough  to  leave  an
unclean feeling on the user’s skin, caus-
ing sudsing and make the water impossi-
ble to clarify. Depending on the amount
of soap input, the spa water should last
between two and three months.

TO DRAIN YOUR SPA

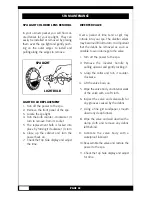
Turn the power off at the GFCI breaker.
Attach a garden hose to the bib located
in the base directly below the spa con-
trol. Pull out the cover cap from the base
and unscrew it from the bib. Route the
outlet of the hose to an appropriate
draining area. The spa will empty by grav-
ity. Siphon or scoop out the balance of
the water.

IMPORTANT

: Spa water with a high san-

itizer level may harm plants and grass. If
you are draining your spa for the winter,
be sure to fully drain water from the pipe
by disconnecting the two unions at the
gate valves found by each of the two
speed pumps and the two unions found
by the circulation pump. Drain the water
pumps by removing the pump plug.
Then reinstall the pump plugs. Remove
the filter and clean as required. Inspect
the spa shell and clean as required.

Refill the spa BE F O RE restoring power to it.

WINTERIZING YOUR SPA

S PA MAIN T E N A N C E

Your Vita Spa is manufactured with the highest quality and most durable mate-
rials available. A spa care and maintenance program is recommended to increase
your comfort, maintain the spa’s reliability, and protect your investment.

Summary of Contents for L100 SERIES

Page 1: ...h e a l t h a n d r e l a x a t i o n f o r l i f e L100 SERIES OWNER S MANUAL IMPORTANT SAFETY INSTRUCTIONS VITA INTERNATIONAL 2320 N W 147th Street Miami Florida 33054...

Page 2: ...PAGE 2 h e a l t h a n d r e l a x a t i o n f o r l i f e L100 SERIES OWNER S MANUAL IMPORTANT SAFETY INSTRUCTIONS VITA INTERNATIONAL 2320 N W 147th Street Miami Florida 33054...

Page 3: ...___________________________________ TELEPHONE ___________________________________________ SERIAL ______________________________________________ MODEL _____________________________________________ To c...

Page 4: ...Panel Lock 15 E Freeze Protection 15 F Flow Protection 16 G Overheat Protection 16 H Ozone Generator Monitor 16 Add Start Up Chemicals 16 Jet Operation 17 A Three Way PowerDiverter Valve 17 B Turbo M...

Page 5: ...intenance We suggest that you take some time to carefully review it Please keep this manual available for reference If you have any questions regarding your Vita Spa set up operations or maintenance p...

Page 6: ...ng with one rated less than the flow rate marked on the original suction fitting Install the spa so proper drainage is provided for the compartment containing electrical components DANGER RISK OF ELEC...

Page 7: ...GFCI pro tected circuit This GFCI is required by the National Electrical Code NEC and must be installed by licensed electrician Test the GFCI monthly DO Test the water with your hand before entering t...

Page 8: ...the spa 5 fetal damage in preg nant women and 6 unconsciousness resulting in a danger of drowning WARNING The use of alcohol drugs or medication can greatly increase the risk of fatal hyperthermia in...

Page 9: ...may pose obstruc tions to deliver the spa to its intended site MAINTENANCE Trees lawn placement surfaces etc can create extra work in keeping your spa area clean and safe Please be advised that placi...

Page 10: ...nding 2 TREE BRANCHES Clearance for spa passage 3 TIGHT CORNERS Make sure there is space to maneuver 4 STORAGE SHEDS DOG HOUSES WOOD PILES Remove out of the way 5 GATES CLEARANCE FOR PASSAGE OF SPA Do...

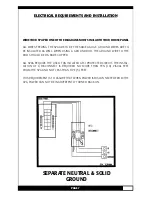
Page 11: ...TO THE ROD SHOULD BE 6 BARE COPPER ALL SPAS REQUIRE THE USE OF AN ISOLATED GFCI PROTECTED CIRCUIT THE INSTAL LATION OF A DISCONNECT IS REQUIRED NO MORE THAN TEN 10 VISUAL FEET FROM THE SPA AND NOT LES...

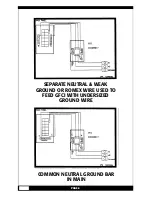
Page 12: ...PAGE 8 COMMON NEUTRAL GROUND BAR IN MAIN SEPARATE NEUTRAL WEAK GROUND OR ROMEX WIRE USED TO FEED GFCI WITH UNDERSIZED GROUND WIRE...

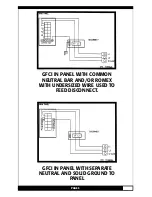
Page 13: ...PAGE 9 GFCI IN PANEL WITH SEPARATE NEUTRAL AND SOLID GROUND TO PANEL GFCI IN PANEL WITH COMMON NEUTRAL BAR AND OR ROMEX WITH UNDERSIZED WIRE USED TO FEED DISCONNECT...

Page 14: ...10 GFCI MOUNTED IN PANEL AND DISCONNECT MOUNTED INSIDE TO COMMON WALL WITH METAL STUDS OR WITH METAL MOUNTING BOX GFCI IN PANEL WITH WEAK GROUND OR ROMEX WITH UNDERSIZED GROUND WIRE USED TO FEED DISCO...

Page 15: ...s recommended The wire size for the distance of the wire run must conform to NEC and local electrical codes 5 To ensure proper connections use copper conductors only DO NOT USE ALUMINUM WIRE 6 The spa...

Page 16: ...own straps Utilizing the cover anytime the spa is not in use will reduce heat loss and thereby reduce the amount of running time required to make up that loss by the heating sys tem Keep cover fastene...

Page 17: ...d water OPERATING INSTRUCTIONS WATER LINE INITIAL START UP Your L100 Series spa has been factory programmed for your convenience Once properly connected the filtration pump and heater will automatical...

Page 18: ...ome on during pro grammed hours See Setting Filtration Hours Note that if at the end of filtra tion cycle the water is not at the chosen temperature the pump and heater will not continue to run until...

Page 19: ...s will turn on and run for at least one minute The display will show ICE After one minute if the water is still below 50 degrees F 10 degrees Celsius the heater will turn on and raise the water temper...

Page 20: ...utton for 5 seconds while in time display mode If the HILI message returns call for service H OZONE GENERATOR MONITOR If your spa is equipped with a Vitazone ozone generator the ozone bulb is mon itor...

Page 21: ...g the valve to the left water will be diverted to A jet s giving that zone the maximum output Rotating the valve to the right will give B jet s the maximum output When turned to the center both A and...

Page 22: ...py The water pressure can be adjusted in both jets by rotating the outer rim of the jet clockwise for minimum pressure and counter clockwise for maximum pressure Water pressure can also be varied by o...

Page 23: ...to increase open jet pressure or decrease close jet pressure as desired F CLUSTER JETS These jets work as a team that s why they re usually found in groups of two or more They can deliver vigorous pi...

Page 24: ...ss the foam but will not remove the soap from the water Eventually the soap build up in the water will concentrate enough to leave an unclean feeling on the user s skin caus ing sudsing and make the w...

Page 25: ...ub lightly in circular motion Then rinse it thoroughly with plenty of water Condition the vinyl after cleaning by applying a thin film of vinyl conditioner NOTE To remove tree saps use lighter fluid n...

Page 26: ...eriod of time sand or grit may intrude into your spa The diverter valves may become difficult to turn It is important that the debris be removed as soon as possible to avoid damage to the valve 1 Turn...

Page 27: ...troy bacteria and organic compounds in the spa water a sanitizer must be used regularly The use of ozone as an oxidizer has proven to be an effective method to help maintain water cleanliness but a re...

Page 28: ...event calcium build up Calcium hardness 120 to 250 ppm Spray filter element to remove loose particles MONTHLY Four to six weeks Two to three months Inspect and clean the spa filter cartridge It is imp...

Page 29: ...ded type of sanitizer Sodium dichlor dissolves easily and has a neutral pH which minimizes the effect that the addition of a sani tizer has on a pH balance Trichlor compounds are not recommended becau...

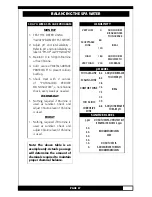
Page 30: ...d 29 Please read WATER MAINTENANCE then follow these easy steps 1 Fill your spa until the water level is 1 inch above the highest jet It is NOT advisable to use softened water in your spa as may becom...

Page 31: ...sanitizer Check and adjust Chlorine level if Chlorine is used BALANCING THE SPA WATER 3 DAY A WEEK SPA CARE PROGRAM Note The above table is an example only Actual spa usage will determine the amount o...

Page 32: ...s solves very slowly is highly concentrated and was designed for concrete or plaster swimming pools It will cause damage to your spa CHEMICAL SAFETY INSTRUCTIONS When using chemicals read labels care...

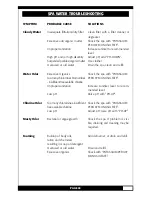
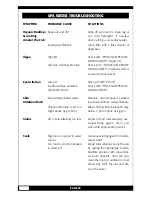
Page 33: ...wth Buildup of body oils lotion and chemicals resulting in soap or detergent Overused or old water Excessive organics SOLUTIONS Clean filter with a filter cleaner or degreaser Shock the spa with POTAS...

Page 34: ...r with a filter cleaner or degreaser Shock with POTASSIUM PEROXY MONOSULFATE adjust pH Shock with POTASSIUM PEROXY MONOSULFATE maintain sanitizer at recommended level Raise pH with PH UP Shock with PO...

Page 35: ...sible unlock by depressing the UP button for 5 seconds Normal system operation for one minute each day at 10 AM and at 6 PM Remove filter and check for debris in filter and filter adapter If FLO remai...

Page 36: ...on Flashing Temperature Adjustment Mode Still Heater adjustment is locked Flashing Panel lock All buttons are deactivated Still Filter is On Flashing Filter adjustment Mode ICON MEANING LCD DISPLAY G...

Page 37: ...VED DM Industries Ltd 2320 Northwest 147th Street Miami Florida 33054 Phone 305 685 2063 or 305 908 8187 Toll Free 877 240 9457 FAX 305 685 9794 MIAMI FLORIDA Vita International Division of Is a Regis...

Reviews: