FOR FOREHEAD USE
WHY MEASURE ON THE FOREHEAD?
While taking in-ear temperatures can be a little more accurate, contactless
readings taken on the forehead are a great way of taking your child’s
temperature without disturbing or distressing them. Built-in Artery
Scan function uses infrared technology to ensure the most accurate
contactless reading possible (when used in accordance with the below user
instructions).
STEP 1
Ensure the protective cap is attached (see figure 1A) and press the
START button to turn the thermometer on. The thermometer will perform
a start-up test, during which the screen will light up green and all display
features will show for approx. 2 seconds. See figure 2.
STEP 2
After the start-up test is complete, the thermometer will display
the last temperature measurement taken in forehead or ear mode,
whichever was used most recently, for 3 seconds. See figure 3A and 3B.
Temperatures stored in the memory are indicated by an “M” at the bottom
of the display.
STEP 3
The thermometer will then “beep” once and the screen will dim
– this means it has entered standby mode. During standby mode, you
can change the measurement unit between °C and °F by pressing and
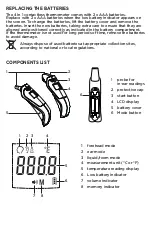
holding the “mode” button, located underneath the battery cover. See
“Components List”
STEP 4
Once in standby mode, ensure that the symbol is shown at
the top of the screen. If so, the temperature can then be taken. Hold the
thermometer close to the forehead (approx. 1cm) and press and hold the
start button while simultaneously scanning the forehead side to side. See
Figure 4. You will hear 6 long “beeps”, followed by either 1 or 3 quick
“beeps”, after which the temperature measurement will be displayed on
the screen. If you heard 1 quick “beep”, this means that the temperature
measured is normal. If you heard 3 quick “beeps”, the temperature
measured is abnormal.
To take another forehead temperature, repeat the above instructions.
FOR IN-EAR USE
WHY MEASURE IN THE EAR?
While forehead readings are a great way of taking initial temperatures
without disturbing or distressing your child, taking temperature readings
in the ear can more accurately reflect the core body temperature (the
temperature of vital organs in the body), as the ear drum shares the same
blood supply as the temperature-controlling part of our brains.
STEP 1
Remove the protective cap (see figure 1B) and press the START
button to turn the thermometer on. The thermometer will perform a start-
up test, during which the screen will light up green and all display features
will show for approx. 2 seconds. See figure 2.
STEP 2
After the start-up test is complete, the thermometer will display
the last temperature measurement taken in ear mode, whichever was used
most recently, for 3 seconds. See figure 3B. Temperatures stored in the
memory are indicated by an “M” at the bottom of the display.
STEP 3
The thermometer will then “beep” once and the screen will
dim – this means it has entered standby mode. During standby mode,


