you can change the measurement unit between °C and °F by pressing
and holding the “mode” button, located underneath the battery cover.
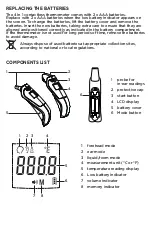
See “Components List”.
STEP 4
Once in standby mode, ensure that the symbol is shown at the
top of the screen. If so, the temperature can then be taken. If the person
whose temperature is being taken is more than one year old, pull the ear
up and back gently. If less than one year old, gently pull the ear back.
STEP 5
Insert the probe slowly into the ear canal and press the START
button once. 2 lines will flash 3 times on the display and, after either 1
or 3 quick “beeps”, the temperature measurement will be displayed on
the screen. If you heard 1 quick “beep”, this means that the temperature
measured is normal. If you heard 3 quick “beeps”, the temperature
measured is abnormal.
It is recommended to always take 3 temperature readings from the
ear and the highest one taken as the reading. To take another in-ear
temperature, repeat the above instructions.
FOR LIQUID USE
WHY MEASURE LIQUID TEMPERATURE?
Bath water for your baby should be just above 37°C (98.6°F) to prevent
chilling or burning them. Breast milk is naturally body temperature, so
babies often like to have this at around 37°C (98.6°F) – it’s important to
make sure that it’s not hotter than this, to prevent burning them.
STEP 1
Ensure the protective cap is attached (see figure 1A) and press
the START button to turn the thermometer on. The thermometer will
perform a start-up test, during which the screen will light up green and all
display features will show for approx. 2 seconds. See figure 2.
STEP 2
After the start-up test is complete, the thermometer will display
the last temperature measurement taken in forehead or ear mode for
3 seconds. See figure 3A and 3B. Temperatures stored in the memory are
indicated by an “M” at the bottom of the display.
STEP 3
The thermometer will then “beep” once and the screen will dim
– this means it has entered standby mode. During standby mode, you can
change the measurement unit between °C and °F by pressing and holding
the “mode” button, located underneath the battery cover. You can also
change the temperature taking mode by quick-pressing this button.
See figure 1.
STEP 4
Once in standby mode, ensure that the symbol is shown at the
top of the screen. If so, the temperature can then be taken. Hover the
thermometer closely (approx. 1-2cm) over the liquid, taking extra not to
get the thermometer wet, and press the START button once. You will hear
4 “beeps”, after which the temperature measurement will be displayed on
the screen.
To take another liquid temperature, repeat the above instructions.
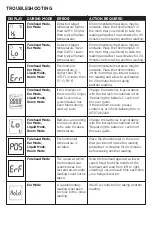
CAUTION: The tri-colour fever alert system does not operate in liquid/
room mode. Please pay extra attention to the thermometer reading when
measuring liquid or room temperature. If the temperature is lower or
higher than the thermometer is able to read, the screen will show “LO”
or “HI”. In this case, place the thermometer in the room that you intend
to take the reading and allow to climatize for 20 minutes before taking
another reading.


