background image

Wi-Fi Setup Guide

1. Plug the hub into a power source. The hub will show a red/green light when it is ready 
for setup.

2. On your computer, look at the available Wi-Fi networks and connect to the network 
named “Vitalhub.” Enter password  “hubadmin.” If you do not see the network “Vitalhub,” 
then reboot the hub by unplugging and re-plugging into the power source.

3. Next on your computer, go to the website 

http://192.168.10.1

(You must use Google 

Chrome for this step.)

4. Once it loads, you will be taken to a Wi-Fi configuration portal. This screen will allow 
you to setup the Wi-Fi connection that the VitalHub will use.

*If your Wi-Fi router does not have open port or your router is not in a 

central location to the main living space use the Wi-Fi set up.

6

Summary of Contents for VitalBand

Page 1: ...User Manual When you fall it calls...

Page 2: ...ofile To set up your unique VitalBand profile please call our customer service center at 1 800 385 0549 To expedite this process please have your VitalBand Components Manual on hand Please call us at...

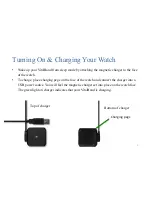
Page 3: ...e face of the watch To charge place charging pegs on the face of the watch and connect the charger into a USB power source You will feel the magnetic charger set into place on the watch face The green...

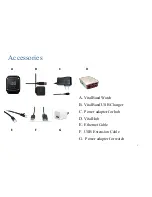
Page 4: ...Accessories A VitalBand Watch B VitalBand USB Charger C Power adapter for hub D VitalHub E Ethernet Cable F USB Extension Cable G Power adapter for watch D E A B C F 4 G...

Page 5: ...n the home follow the instructions below If you do not have access follow the directions for Wi Fi set up on page 6 Step 1 Plug power adapter into VitalHub Step 2 Plug ethernet cable into VitalHub Ste...

Page 6: ...Vitalhub then reboot the hub by unplugging and re plugging into the power source 3 Next on your computer go to the website http 192 168 10 1 You must use Google Chrome for this step 4 Once it loads yo...

Page 7: ...ted from the hub If so wait one minute connect to VitalHub again and refresh the page 7 Once the connection is finished you should see a Connection Successful popup or you will see text at the top lef...

Page 8: ...display the time Press the button again to view your heart rate Press the button again to view your respiration rate Press the button again to view your daily step count Press the button again to view...

Page 9: ...a red bar line will show on the bottom of the watch At this time launch your app on your phone or tablet Location services must be turned on to get continuous coverage Your VitalBand requires Bluetoo...

Page 10: ...larm will be automatically dismissed You will then need to send a manual alert To send a manual SOS alert tap the blue dotted button once to wake it then press and hold the button until it shows Are Y...

Page 11: ...rge Charging time 1 hour Charging temperature 0 45 32 113 Environmental operation conditions Temperature 17 60 1 4 40 Humidity 90 RH Environmental transport and storage conditions Temperature for less...

Page 12: ...vertu des r glements de la FCC et IC Note This equipment has been tested and found to comply with the limits for a Class B digital device pursuant to Part 15 of the FCC Rules and ICES 003 of Industry...

Page 13: ...rmation please call technical support at 1 800 385 0549 Sensogram Technologies 2745 Dallas Pkwy STE 560 Plano TX 75093 www vitalband com Follow us on social media D VitalBand C VitalBand J VitalBand S...

Reviews: