background image

7

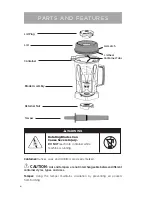
PARTS AND FEATURES

2-Part Lid: 

Always use the lid and the lid plug when the machine is in operation. 

Snap the lid onto the container and leave in place for a few minutes. Once the lid 
has been left on the container, it will be much easier to lock or remove.

Lid Plug: 

Insert through the lid and secure by turning clockwise. Remove the lid 

plug to use the tamper or add ingredients.

To Lock the Lid in Place: 

On one side of the container, position the lid latch under 

the container tab. Push down and apply pressure to the opposite side of the lid 
until the lid latch fully seats under the opposite tab on the container.  An audible 
“click” will be heard. 

Never operate the blender without checking to make sure 

the lid is securely locked in place.

To Remove the Lid Plug: 

Rotate the lid plug counterclockwise from the “locked” 

to “unlocked” position and lift out.

To Remove the Lid: 

1. 

If working with hot liquids, rotate the lid plug counterclockwise from the 
“locked” to the “unlocked” position and slowly lift out to vent steam from  
the container.

2. 

Above one of the container tabs, firmly press in on the lid and lift up  
to release.

3. 

If the lid won’t release, insert the handle of a spoon into the container spout 
and lift up until the lid releases from the container. 

Retainer Nut Loosening

In the event that the retainer nut at the bottom of your container loosens and no 
longer securely holds the blade assembly in place, 

do not continue to use the 

container

. Call Vitamix Customer Service at 1.800.848.2649 or 1.440.235.4840, or 

your local dealer immediately for instructions.

Summary of Contents for 3600 Container

Page 1: ...Use and Care Manual Read and save these instructions Vita Mix Corporation 8615 Usher Road Cleveland OH 44138 2103 U S A 1 800 848 2649 1 440 235 4840 vitamix com 3600 4000 CONTAINER ...

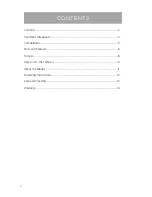
Page 2: ...2 Contents 2 Important safeguards 3 Compatibility 5 Parts and Features 6 Tamper 8 How to Use the Tamper 10 About the Blades 11 Operating Instructions 12 Care and Cleaning 13 Warranty 14 CONTENTS ...

Page 3: ...rical or mechanical adjustment If purchased outside the U S A or Canada contact your local Vitamix dealer 7 Alteration or modification of any part of the blender base or container including the use of any part or parts that are not genuine authorized Vitamix parts may cause fire electric shock or injury 8 The use of attachments not expressly authorized or sold by Vitamix for use with this blender ...

Page 4: ...ury To reduce the risk of injury never place a blade assembly on the motor base unless assembled to the Vitamix container 15 Do not leave foreign objects such as spoons forks knives or the lid plug in the container as this will damage the blades and other components when starting the machine and may cause injury 16 Never attempt to operate with damaged blades 17 Always operate blender with lid and...

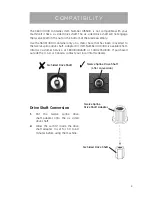
Page 5: ... motor base that has been converted to the twelve spline drive shaft Adapter Kit Item Number 000400 is available from Vitamix Customer Service at 1 800 848 2649 or 1 440 235 4840 If purchased outside the U S A or Canada contact your local Vitamix dealer Drive Shaft Conversion 1 Put the twelve spline drive shaft adapter onto the six sided drive shaft 2 Allow the Loctite inside the drive shaft adapt...

Page 6: ...y marked CAUTION Lids and tampers are not interchangeable between different container styles types and sizes Tamper Using the tamper maintains circulation by preventing air pockets from forming WARNING Rotating Blades Can Cause Severe Injury DO NOT reach into container while machine is running Lid Latch Lid Seal Container Tabs ...

Page 7: ...t checking to make sure the lid is securely locked in place To Remove the Lid Plug Rotate the lid plug counterclockwise from the locked to unlocked position and lift out To Remove the Lid 1 If working with hot liquids rotate the lid plug counterclockwise from the locked to the unlocked position and slowly lift out to vent steam from the container 2 Above one of the container tabs firmly press in o...

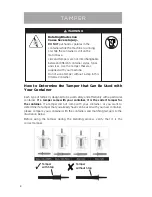
Page 8: ...ase compare your container with the containers and matching tampers to the illustration below Before using the tamper during the blending process verify that it is the correct tamper WARNING Rotating Blades Can Cause Severe Injury DO NOT put hands spatulas in the container while the machine is running or while the container is still on the motor base Lids and tampers are not interchangeable betwee...

Page 9: ...lid plug and insert the tamper If it is the correct tamper it should easily fit into the opening but will not come in contact with the blades no matter how you move the tamper inside the container IF THE TAMPER TOUCHES THE BLADES AT ANY ANGLE DO NOT USE THE TAMPER WITH YOUR CONTAINER If you do not have the correct tamper for your container call Vitamix Customer service at 1 800 848 2649 or 1 440 2...

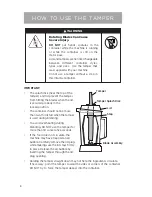
Page 10: ...ng sure the lid stays firmly in place Release the air bubble by inserting the tamper through the lid plug opening HOW TO USE THE TAMPER WARNING Rotating Blades Can Cause Severe Injury DO NOT put hands spatulas in the container while the machine is running or while the container is still on the motor base Lidsandtampersarenotinterchangeable between different container styles types and sizes Use the...

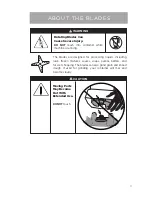
Page 11: ...unning The blades are designed for processing liquids including juice frozen mixtures sauces soups purees batters and for wet chopping The blades can also grind grain and knead dough If used for grinding your container will mar and become cloudy D W Moving Parts May Become Hot With Extended Use DO NOT touch CAUTION ...

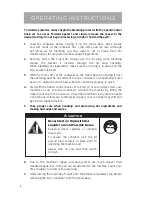
Page 12: ... operating motor base or to operate a motor base without a container properly in place 4 Start with the Speed Control Knob set to Start 1 or Low Always start your machine on Low or Forward Speed 1 Activate the machine by lifting the Impact Lever Up to the Forward On position and then slowly use the Speed Control Knob to increase to the desired speed Your container may shift and get into an aligned...

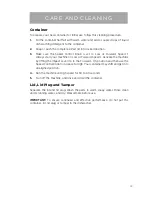
Page 13: ... Forward Speed 1 Activate the machine by lifting the Impact Lever Up to the Forward On position and then use the Speed Control Knob to increase to High Your container may shift and get into an aligned position 4 Run the machine on High speed for 30 to 60 seconds 5 Turn off the machine and rinse and drain the container Lid Lid Plug and Tamper Separate the lid and lid plug Wash the parts in warm soa...

Page 14: ...do not affect performance such as discoloration or the effects of the use of abrasives or cleaners or food build up This Warranty is only valid if the Container or container in which the Container Component is installed is used in accordance with the instructions warnings and safeguards contained in the owner s manual Vitamix will not be responsible for the cost of any unauthorized warranty repair...

Page 15: ...vided with a return authorization number up to date shipping instructions and a pre paid return pick up label Vitamix will pay standard shipping costs on the return of a Container or Container Component for warranty service and repair and for return shipment of the product to you after the warranty repair or replacement Purchaser is responsible for the costs of special shipping requests Within the...

Page 16: ...649 1 440 235 4840 vitamix com 2013 Vita Mix Corporation No part of this publication may be reproduced or transmitted in any form or by any means or stored in a database or retrieval system without the written permission of the Vita Mix Corporation Printed in the U S A 103955 4 13 Loctite is a registered trademark of the Loctite Corporation ...

Reviews: