


6
ENGLISH
Important information
Vertical steam is not recommended for syn-
thetic fabrics.
•
To avoid fabric melting, do not touch it with
the iron’s soleplate while steaming.
•
Never steam clothes on a person as the
steam temperature is very high, use a
clothes hanger or a stand.
•
After you finish ironing, switch the unit off,
wait until it cools down completely, then
open the water inlet lid (2), turn over the iron
and drain the remaining water.
AUTOMATIC SWITCH OFF
This model is provided with 2 automatic switch
off modes.
1.
If the iron remains still for 30 seconds in
horizontal position, its heating element will
be switched off and the pilot lamp (5) will
be flashing.
2.
If the iron remains still for 8 minutes in ver-
tical position, its heating element will be
switched off and the pilot lamp (5) will be
flashing.
The unit will be switched on automatically once
you resume ironing.
STEAM CHAMBER CLEANING
To prolong service life of the iron we rec-
ommend cleaning the steam chamber regu-
larly, especially in the regions with hard tap
water.
•
Set the continuous steam supply knob (3)
to the position «
» (steam supply is off).
•
Pour the water up to the maximal mark (13)
and then close the lid (2) tight.
•
Place the iron on its base (8).
•
Insert the power plug into the mains socket.
•
Set the control knob (11) to the maximum
soleplate temperature «
MAX
», the indica-
tor (5) will light up.
•
When the iron soleplate (10) reaches the
set temperature, the indicator (5) will go
out and you can start cleaning the steam
chamber.
•
Unplug the unit.
•
Hold the iron above the sink horizontally,
press and hold down the «Self-clean» but-
ton (12).
•
Boiling water with scale will be released
from the iron soleplate (10) openings.
•
Slightly sway the iron back and forth, until
all the water leaves the water tank (9).
•
Place the iron on the base (8) and let it cool
down completely.
•
When the soleplate (10) cools down com-
pletely, wipe it with a dry cloth.
•
Before you take the iron away for stor-
age, make sure that there is no water in
the water tank (9) and that iron soleplate
(10) is dry.
CLEANING AND CARE
•
Before cleaning the iron, make sure that it
is unplugged and has cooled down com-
pletely.
•
Clean the iron body with a slightly damp
cloth and then wipe it dry.
•
Scale on the iron soleplate can be removed
with a cloth soaked in vinegar-water solu-
tion.
•
After removing scale, wipe the soleplate
surface with a dry cloth.
•
Do not use abrasives or solvents to clean
the iron soleplate and body.
•
Avoid contact of the iron soleplate with
sharp metal objects.
STORAGE
•
Before you take the iron away for storage,
clean it and drain all the remaining water
from the water tank (9).
•
Set the temperature control knob (11) to the
«
MIN
» position, and the continuous steam
supply knob (3) to the position «
» (steam
supply is off).
•
Wind the power cord on the base (8).
•
Store the iron vertically in a dry cool place
out of reach of children.
DELIVERY SET
Iron – 1 pc.
Beaker – 1pc.
Instruction manual – 1 pc.
TECHNICAL SPECIFICATIONS
Power supply: 220-240 V ~ 50 Hz
Maximal power: 2400 W
VT-1240_new.indd 6
19.12.2017 17:34:12
Summary of Contents for 138294
Page 1: ...1 VT 1240 BD 3 8 14 19 Iron VT 1240_new indd 1 19 12 2017 17 34 11...
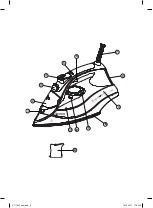
Page 2: ...1 2 3 4 5 7 8 9 10 11 12 13 14 6 VT 1240_new indd 2 19 12 2017 17 34 12...
Page 10: ...10 8 3 11 MAX 5 10 5 11 MIN 10 11 MAX 8 9 11 5 10 5 VT 1240_new indd 10 19 12 2017 17 34 13...
Page 15: ...15 3 10 1 1 1 2 11 MIN 3 2 14 9 2 MAX 13 2 10 9 VT 1240_new indd 15 19 12 2017 17 34 13...
Page 20: ...20 3 10 1 1 1 2 11 MIN 3 2 14 9 2 MAX 13 2 10 9 VT 1240_new indd 20 19 12 2017 17 34 14...


