OPERATION
Power'On
(Be sure to check the connections before you power on your system)
1. Plug the AC cord to AC socket.
2. Press ON/OFF switch to power on the system.
3. STANDBY LED lights on.
4. Press VOL + button on the remote control to Operation.
Volume and Tone Control
1. Master volume is for controlling the sound level. (Down) Low and (Up) High
2. Front volume is for controlling the front channel sound level, () Low and (+) High.
3. Center volume is for controlling the center channel sound level. () Low and (+) High
4. Surround volume is for controlling the surround sound level. () Low and (+) High
5. Subwoofer volume is for controlling the active subwoofer sound level () Low and (+) High
6. The Bass, Treble controller is for tone controlling of the front channel. ( Low and + high)
Mute and standby
When you press the MUTE button, the speaker will stop producing sound. Press the MUTE
button again, then the sound will come back immediately. When you press the STANDBY but
ton, the unit will be turned off. Press the STANDBY Button again, and then the system will be
turned on again.
TROUBLESHOOTING GUIDE
Problem
Possible Cause and Remedy
No sound and display.
Poor connection from power plug and socket.
The Power button is set "off" or standby.
Check the amplifier fuse.
No sound but with display
The Volume knob is set to Min.
Check RCA cable.
No sound from the front
Poor connection or speaker cable (positive & negative)
speakers
is connected to one point.
Check RCA cable for loose connection.
No sound from the center
MODE is not set correctly. Reset correctly.
speaker
Center Volume is set to Min.
The speaker cable (positive & negative) is connected to
one point.
No sound from the center
MODE is not set correctly. Reset correctly.
speaker
Surround Volume is set to Min.
The speaker cable (positive & negative) is connected to
one point.
No surround effects
The MODE is wrongly selected. The speaker cable (pos
itive & negative) is connected to one point.
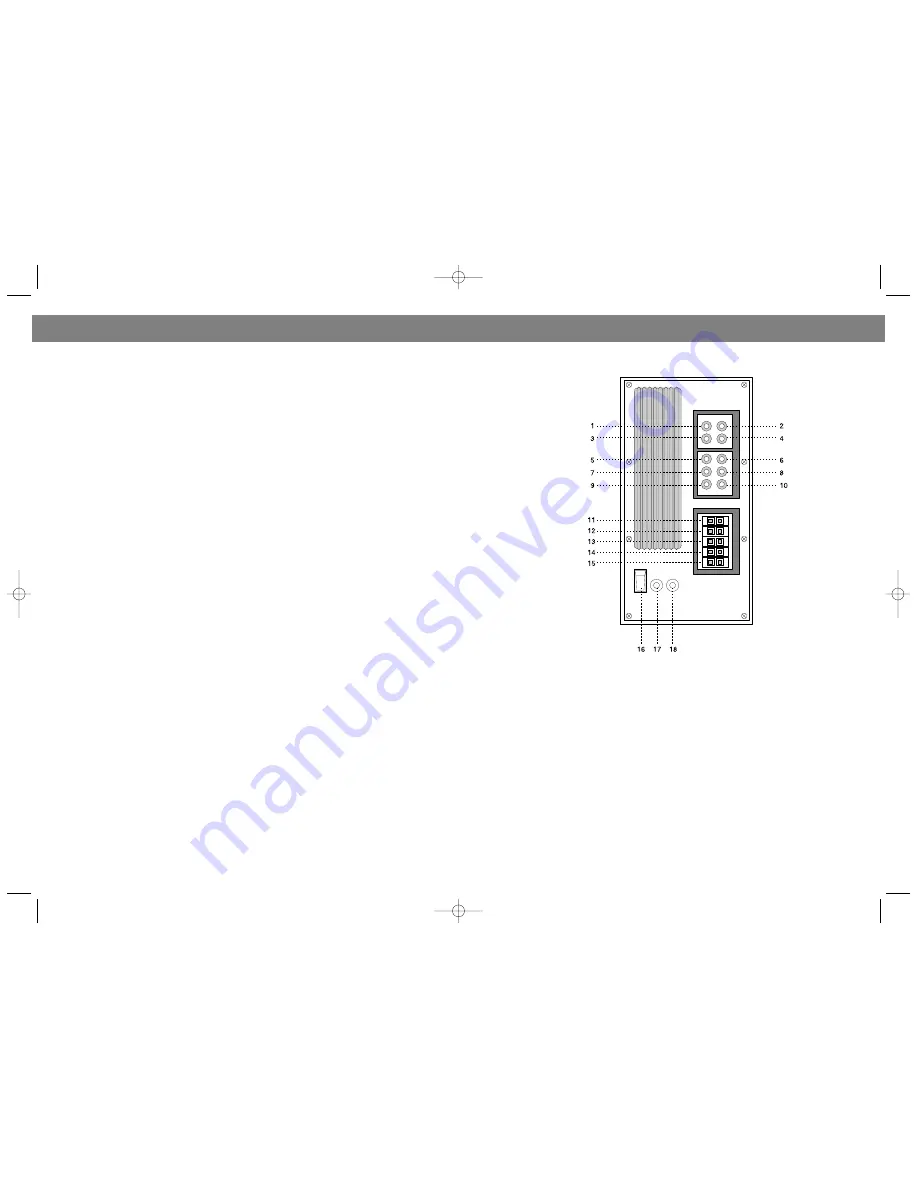
ЗАДНЯЯ ПАНЕЛЬ
1. ПРАВОЕ ГНЕЗДО ДЛЯ 1го ДОПОЛНИТЕЛЬНОГО ИСТОЧНИКА
2. ЛЕВОЕ ГНЕЗДО ДЛЯ 1го ДОПОЛНИТЕЛЬНОГО ИСТОЧНИКА
3. ПРАВОЕ ГНЕЗДО ДЛЯ 2го ДОПОЛНИТЕЛЬНОГО ИСТОЧНИКА
4. ЛЕВОЕ ГНЕЗДО ДЛЯ 2го ДОПОЛНИТЕЛЬНОГО ИСТОЧНИКА
5. ГНЕЗДО ДЛЯ ПРАВОГО 5.1 CH ДИНАМИКА ФРОНТАЛЬНОГО ЗВУКА
6. ГНЕЗДО ДЛЯ ЛЕВОГО 5.1 CH ДИНАМИКА ФРОНТАЛЬНОГО ЗВУКА
7. ГНЕЗДО ДЛЯ ПРАВОГО 5.1 CH ДИНАМИКА ОБЪЕМНОГО ЗВУКА
8. ГНЕЗДО ДЛЯ ЛЕВОГО 5.1 CH ДИНАМИКА ОБЪЕМНОГО ЗВУКА
9. ГНЕЗДО ДЛЯ 5.1 CH САБВУФЕРА
10. ГНЕЗДО ДЛЯ 5.1 CH ДИНАМИКА ЦЕНТРАЛЬНОГО ЗВУКА
11. ВЫХОД ЛЕВОГО ДИНАМИКА ФРОНТАЛЬНОГО ЗВУКА
12. ВЫХОД ПРАВОГО ДИНАМИКА ФРОНТАЛЬНОГО ЗВУКА
13. ВЫХОД ДИНАМИКА ЦЕНТРАЛЬНОГО ЗВУКА
14. ВЫХОД ЛЕВОГО ДИНАМИКА ОБЪЕМНОГО ЗВУКА
15. ВЫХОД ПРАВОГО ДИНАМИКА ОБЪЕМНОГО ЗВУКА
16. КНОПКА ВКЛЮЧЕНИЯ/ВЫКЛЮЧЕНИЯ ("СЕТЬ")
17. ГНЕЗДО ПРЕДОХРАНИТЕЛЯ
18. ШНУР ПИТАНИЯ
8
13
РУССКИЙ
ENGLISH
VT-4021.qxd 05.11.03 17:12 Page 16


