3
ENGLISH
THERMOPOT VT-1195
An electric thermopot is intended for boiling water
and maintaining the temperature of hot water.
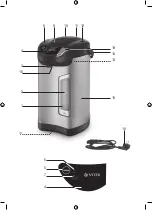
DESCRIPTION
1.
Minimal water level mark «MIN»
2.
Water level scale
3.
Spout for pouring water
4.
Control panel
5.
Reboil button «REBOIL»
6.
Boiling mode indicator «BOILING»
7.
Keep warm indicator «KEEP WARM»
8.
Lid
9.
Lid opening button
10.
Hand pump for water dispensing
11.
Steam release openings
12.
Hand pump mechanical lock « »
13.
Maximal water level mark «FULL»
14.
Carrying handle
15.
Body
16.
Manual water supply valve
17.
Rotary base
18.
Power cord
19.
Automatic water dispense button
ATTENTION!
For additional protection it is reasonable to install a
residual current device (RCD) with nominal opera-
tion current not exceeding 30 mA, to install RCD,
contact a specialist.
SAFETY MEASURES
•
Before using the electric thermopot, read this
instruction manual carefully.
•
Make sure that the operating voltage of the unit
corresponds to the voltage of your mains.
•
The power cord is equipped with a “euro plug”;
plug it into the socket with reliable grounding
contact.
•
To avoid fire, do not use adapters for plugging
the unit in.
•
Do not connect or disconnect the power cord
with wet hands, this may cause electric shock
or injuries.
•
When unplugging the unit, always pull the plug
but not the cord.
•
Never leave the operating unit unattended.
•
Do not switch the thermopot on if it is empty.
•
Do not drop or tilt the unit.
•
Use the thermopot only for water boiling;
it is prohibited to heat or boil other liquids in it.
•
Ensure that water level in the thermopot is not
below the «MIN» mark and not above the «FULL»
mark.
•
Do not fill the thermopot with water directly
from the faucet; to fill the thermopot use a suit-
able bowl.
•
Place the thermopot on a flat dry and stable
surface; do not place the thermopot on the
edge of the table.
•
Do not place the thermopot next to the walls or
close to the kitchen furniture. Place the ther-
mopot keeping at least 20 cm gap between the
thermopot body and the wall and at least 30 cm
gap above the thermopot.
•
Do not use the unit near heat sources or open
fire.
•
Do not let the power cord hang from the edge of
the table and make sure it does not touch hot or
sharp edges of furniture.
•
Do not open the lid and do not pour water out
during boiling.
•
Do not rotate the unit during water pouring.
•
Do not apply excessive effort when closing the
lid. When using the thermopot, make sure that
the lid is closed tightly.
•
Keep your hands away and do not bend over the
steam release openings, it may cause burns.
Do not block the steam release opening with
any objects.
•
Do not touch hot surfaces of the thermopot.
•
Be careful while carrying the thermopot filled
with boiling water.
•
Do not carry the thermopot holding it by the lid
opening button.
•
Be careful when pouring out hot water.
•
Remove the lid before draining the remaining
hot water from the thermopot flask.
•
To avoid risk of electric shock, do not immerse
the thermopot, the power cord and the power
plug of the unit into water or other liquids.
•
Unplug the unit, if you are not using it or before
cleaning.
•
Do not wash the thermopot in a dishwashing
machine.
•
Before taking the unit away for long storage or
before cleaning, unplug it, pour out water and
let the unit cool down and dry.
•
This unit is not intended for usage by children.
•
Place the unit out of reach of children during the
operation and cooling down.
•
Do not allow children to touch the unit body and
the power cord during the unit operation.
•
The unit is not intended to be used by people
with physical, sensory or mental disabilities
(including children) or by persons lacking expe-
rience or knowledge if they are not under super-
vision of a person who is responsible for their
safety or if they are not instructed by this person
on the usage of the unit.
Summary of Contents for VT-1195
Page 1: ...1 VT 1195 Thermopot 3 7 12 16 20 24...
Page 2: ...1 2 3 4 19 15 13 14 8 9 10 11 12 4 5 6 7 16 17 18...
Page 7: ...7 VT 1195 1 MIN 2 3 4 5 6 7 8 9 10 11 12 13 FULL 14 15 16 17 18 19 30 MIN FULL 20 30...
Page 8: ...8 www vitek ru 20 30 8 9...
Page 10: ...10 8 8 8 15 2 1 FULL 13 18 18 4 6 6 7 FULL 15 1 1 1 1 220 240 50 730 4 2...
Page 12: ...12 VT 1195 1 MIN 2 3 4 5 6 7 8 9 10 11 12 13 FULL 14 15 16 17 18 19 30 MIN FULL 20 30...
Page 13: ...13 www vitek ru 20 30 9 8 13 FULL 18 18 4 6 6 7 12 10 18 18 8...
Page 14: ...14 8 8 8 8 8 9 8 13 FULL 18 18 4 6 6 7 5 6 7 3 12 3 19 3 10 16 12 18 18 8 8 8 8 8 8 8 8 15...
Page 16: ...16 VT 1195 1 MIN 2 3 4 5 6 7 8 9 10 11 12 13 FULL 14 P 15 16 17 18 19 30 MIN FULL 20 30...
Page 17: ...17 www vitek ru 20 30 8 9 13 FULL 18 18 4 6 6 7 12 10 18 18 8 8 8...
Page 19: ...19 18 18 4 6 6 7 FULL 15 1 1 1 1 220 240 50 730 4 2 info vitek ru 3...
Page 20: ...20 VT 1195 1 MIN 2 3 4 5 6 7 8 9 10 11 12 13 FULL 14 15 16 17 18 19 30 MIN FULL 20 30...
Page 21: ...21 www vitek ru 3 20 30 9 8 FULL 13 18 16 18 4 6 6 7 12 10 18 18 8 8 8 8 8...
Page 23: ...23 FULL 15 1 1 1 1 220 240 50 730 4 2 info vitek ru 3...


