background image

17

HINTS FOR IRONING

1. Sort  out  the  articles  to  be  ironed  according  to  the  type  of  fabric.

This will minimize the frequency of temperature adjustment for dif&
ferent garments.

2. Test ironing a small area on the backside or inside the garment if

you are unsure about the type of fabric. Start with a low tempera&
ture and increase gradually.

3. Wait for about three minutes before ironing heat sensitive fabrics.

Temperature adjustment needs certain time to reach the required
level no matter it is higher or lower.

4. Delicate fabrics such as silk, wool, velour, etc. are best ironed with

an ironing cloth to prevent shine marks.

5. You may need a few times of press to activate the spray, burst and

vertically burst function.

HOW TO FILL WATER

1. Disconnect  the  iron  from  mains  supply

outlet.

2. Move  the  Steam  Control/Self&Cleaning

Knob to position: 

3. Fill water through the water inlet hole. 

(See figure 2)

4. Fill  up  to  the  'Max'  level  marked  on  the

side of water tank.

Note:

For  best  result,  it  is  advisable  to  use  demineralised  water  or  distilled
water. Do not use chemically descaled water or any other liquids.           

FIRST TIME IRONING   

1. Remove any protective films or stickers from the sole plate and the

cabinet.

2. Unwind and straighten the power cord.
3. Fill the water tank with demineralised water or distilled water. 

(See How To Fill Water)

4. Connect the iron to a suitable mains supply outlet.
5. Turn the Temperature Dial in clockwise direction to maximum posi&

4

FIGURE 2

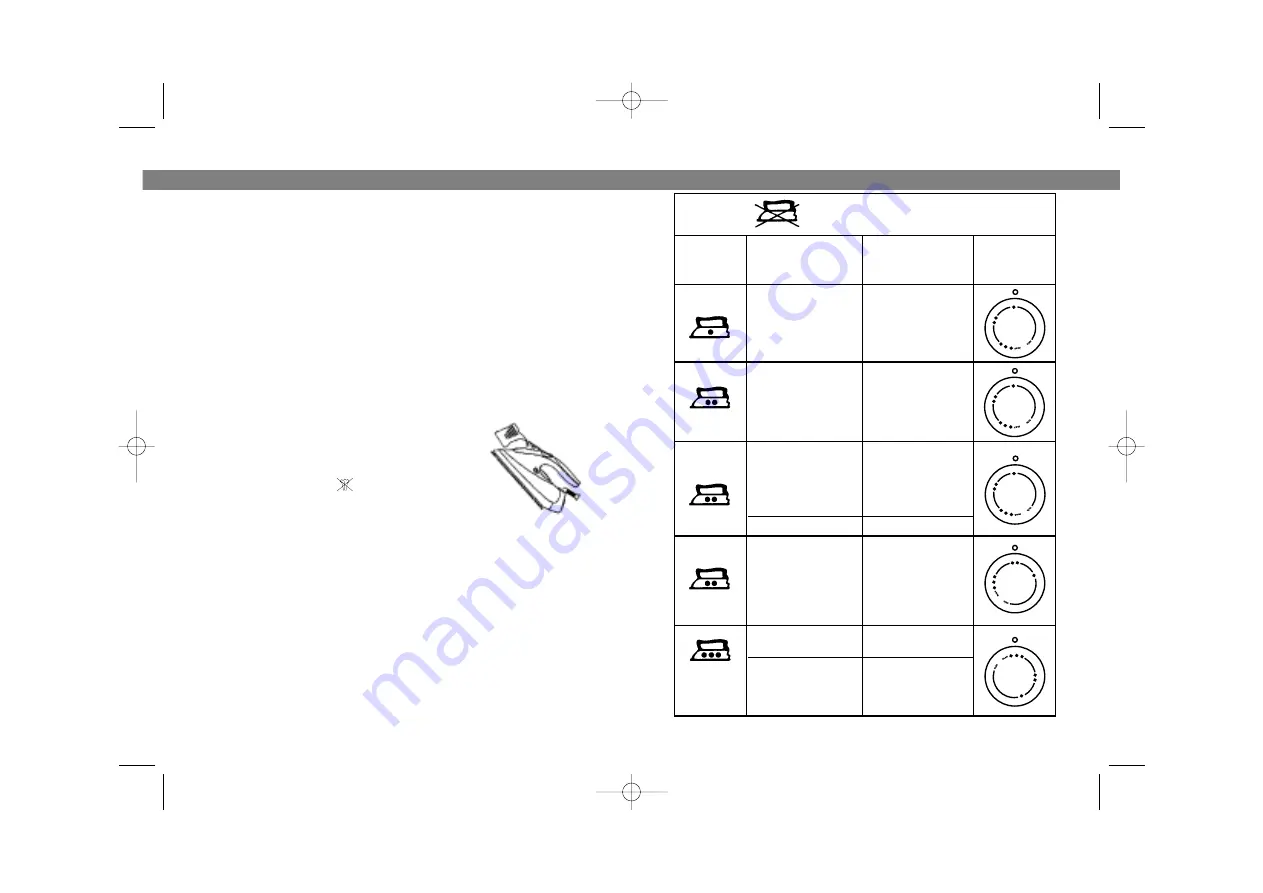
На ярлыке означает: изделие нельзя гладить!

(например, эластик)

Примечание:

вид ткани

синтетика

синтетика

ацетатволокно

триацетат

с люрексом

полиамид

(нейлон)

полиэстер

вискоза

шелк

шерсть

шерсть

хлопок

хлопок

лен

лен

синтетика

акрил

полипропилен

полиэтан

волокно

позиция

терморегулятора

ярлык

шелк

ENGLISH

РУССКИЙ

1215.qxd  03.07.03  16:52  Page 8

Summary of Contents for VT-1215

Page 1: ...MANUAL INSTRUCTION VT 1215 STEAM IRON 1215 qxd 03 07 03 16 52 Page 2...

Page 2: ...y moving the steam control knob to position when it is not in use even for a short period of time 10 If the supply cord is damaged it must be replaced by the manu facturer or its service agent or simi...

Page 3: ...Sole Plate 2 Self Clean Button 3 Temperature Dial Knob 4 Pilot Light 5 Spray Nozzle 6 Water Inlet Cover 7 Variable Steam Control Knob 8 Burst Of Steam Button 9 Spray Button 18 ENGLISH FIGURE 1 1215 q...

Page 4: ...s of press to activate the spray burst and vertically burst function HOW TO FILL WATER 1 Disconnect the iron from mains supply outlet 2 Move the Steam Control Self Cleaning Knob to position 3 Fill wat...

Page 5: ...art this func tion DRY IRONING 1 Connect the iron to a suitable mains supply outlet 2 Turn the Temperature Dial in clockwise direction select 1 dot 2 dots or 3 dots according to the recommendation of...

Page 6: ...ace Note Set the Steam Control Knob to with position after use BURST OF STEAM This function provides extra amount of steam to remove stubborn wrinkles 1 Fill the iron as described in the section of Ho...

Page 7: ...indicating the iron is switch on 4 Pilot light goes off when the required tem perature is reached The iron is now ready for use 5 Hold the iron between 15 and 30 centime ters away from the garment 6 P...

Page 8: ...aning button 12 Steam and boiling hot water will drain from the holes on the sole plate washing away the scales and minerals that have built up inside the Steam Chamber 13 Gently move the iron back an...

Page 9: ...oning This will prolong the working life of your iron Note That the anti scale cartridge will not completely stop the natural process of limescale build up CLEANING THE IRON 1 Disconnect the iron from...

Page 10: ...1 7 2 MAX 10 11 1 2 3 4 5 6 7 8 9 1215 qxd 03 07 03 16 52 Page 20...

Reviews: