background image

have been given supervision or instruction 
concerning use of the appliance by a person 
responsible for their safety

•  Children should be supervised to ensure that 

they do not play with the appliance

BEFORE USAGE

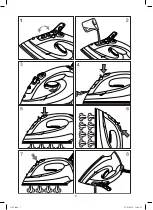
•  Take out the iron from the package and re-

move the protective cartoon covering from 
the iron sole (12).

•  Make sure that the electrical supply voltage 

corresponds to the iron’s operating voltage. 

Note:
The iron’s heating element is broken in 
during the first use; it is normal for a small 
amount of smoke to be released.

CHOICE OF WATER

To fill the water tank use regular tap water. If the 
water is hard then it is recommended to mix it 
with distilled water at a ratio of 1:1, if the water 
is very hard, mix it with distilled water at a ratio 
of 1:2 or use only distilled water. 

Note:
Do not fill the water tank (11) with scented 
liquids, vinegar, starch solutions, descal-
ing reagents, chemical substances etc. 

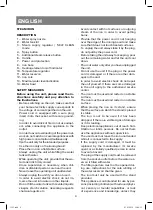
FILLING THE WATER TANK (pic. 1, 2)

Make sure that the iron is disconnected from 
electrical power before filling it with water. 
Set the steam release regulator (3) to the Off 
position.
•  Open the water tank lid (2).
•  Fill it with water using the water bowl (14). 

Close the lid (2). 

Note:
•  Do not fill it with water above MAX. indi-

cation.

•  If you need to refill the water tank during 

ironing, turn off the iron and unplug the 
power cord from the outlet. 

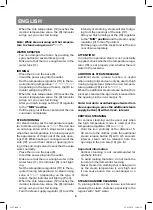
•  After you finish ironing, open the water 

tank lid (2) and drain the remaining water 
(pic.8).

IRONING TEMPERATURE

Before operating test the heated iron on the old 

cloth to be sure that the iron sole (12) and the 
water tank (11) are clean. 
•  Always check the recommended iron tem-

perature indicated on the tag before ironing. 

•  If the tag does not list the recommended 

ironing temperature, but you know the type 
of fabric, then use the following table to de-
termine the proper temperature.

Signs Fabric type/temperature

Synthetics, nylon, acryl, polyester 

(low temperature)

••

Silk/wool (medium temperature)

•••

Cotton/flax (high temperature)

• 


This table is only for smooth materials. 
Fabrics of other types (crimped, raised etc.) 
are best ironed at low temperature. 

•  First sort items by ironing temperature: wool 

with wool, cotton with cotton etc. 

•  The iron heats up faster than is cools down. 

For this reason it is recommended to begin 
ironing at low temperature (for instance syn-
thetic fabrics). After that, move to higher tem-
perature ironing. Cotton and linens should be 
ironed last. 

•  If an item is made from a mix of fabrics, then 

the iron should be set for the fabric with 
the lowest ironing (for instance if an item is 
made from 60% polyester and 40% cotton, it 
should be ironed at the temperature used for 
ironing polyester “

”).

•  If you cannot define the fabric the item is 

made from, find a place on it that is hidden 
while wearing and, on practice select the 
ironing temperature (always start at the low-
est and gradually raise it until you get the de-
sired result.)

•  Corduroy and other fabrics that start glossy 

quickly should be ironed strictly in one direc-
tion (along the lines) with slight pressure. 

•  To avoid appearance of glossy spots on the 

synthetic and silk fabrics, iron them back-
side. 

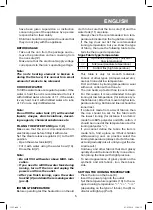
SETTING THE IRONING TEMPERATURE

•  Place the iron on the base (8).
•  Insert the power plug into the outlet.
•  Set the temperature regulator (10) to the re-

quired ironing temperature: “

”, “

••

”, “

•••

” 

(depending on the type of fabric), the (9) in-
dicator will light up (Pic.3). 

5


              ENGLISH         

1255.indd   5

1255.indd   5

03.03.2010   15:40:15

03.03.2010   15:40:15

Summary of Contents for VT-1255

Page 1: ...1255 indd 1 1255 indd 1 03 03 2010 15 40 13 03 03 2010 15 40 13...

Page 2: ...2 1255 indd 2 1255 indd 2 03 03 2010 15 40 15 03 03 2010 15 40 15...

Page 3: ...3 1255 indd 3 1255 indd 3 03 03 2010 15 40 15 03 03 2010 15 40 15...

Page 4: ...ting burns Provide that the power cord is not hanging over the edge of the ironing board and make sure that it does not touch heated surfaces To unplug the unit always take it by the plug do not pull...

Page 5: ...ron tem perature indicated on the tag before ironing If the tag does not list the recommended ironing temperature but you know the type of fabric then use the following table to de termine the proper...

Page 6: ...ator will go out you can start ironing Turn the steam supply regulator 3 to set the intensity of steaming steam will start outgo ing from the openings of the sole 12 After you finish ironing set the 1...

Page 7: ...h a damp cloth and then wipe dry Sediment on the iron sole can be removed with a cloth soaked in vinegar water solu tion After removing sediment polish the sole with a dry cloth Do not use abrasive su...

Page 8: ...hen des B geleisens oder mit dem rausgehenden Dampf in Ber hrung kommen sonst kann es zu den Verbrennungen f hren Achten Sie darauf dass das Netzkabel au er die R nder der B geltischplatte nicht herun...

Page 9: ...en Sie den Stecker aus der Steckdose aus Wenn Sie mit dem B geln fertig sind schalten Sie das B geleisen aus warten Sie bis es v l lig kalt wird wonach machen Sie das Deckel der F ll ffnung 2 auf kipp...

Page 10: ...tecker in die Steckdose Vergewissern Sie sich dass es im Beh lter 11 ge nug Wasser gibt der Anzeiger 9 leuchtet nicht Durch das Drehen der Reglers 10 stellen Sie die gew nschte B geltemperatur ein In...

Page 11: ...UND REINIGUNG Vor der Reinigung des B geleisens vergewissern Sie sich dass es vom Netz getrennt ist und schon kalt ist Wischen Sie den K rper des B geleisens mit einem feuchten Tuch danach wischen Si...

Page 12: ...12 1 2 3 SELF CLEAN 4 5 6 7 8 9 10 11 12 13 14 12 1255 indd 12 1255 indd 12 03 03 2010 15 40 16 03 03 2010 15 40 16...

Page 13: ...13 1 1 1 2 11 1 2 3 2 14 2 MAX 2 8 12 11 60 40 8 10 9 3 12 9 4 4 1255 indd 13 1255 indd 13 03 03 2010 15 40 16 03 03 2010 15 40 16...

Page 14: ...14 11 8 10 9 3 12 9 10 MIN 12 12 8 11 9 10 9 3 12 9 3 12 10 MIN 3 10 10 5 5 5 4 5 10 15 30 5 4 5 12 6 3 11 MAX 13 8 1255 indd 14 1255 indd 14 03 03 2010 15 40 16 03 03 2010 15 40 16...

Page 15: ...15 10 9 3 12 9 10 MIN 3 SELF CLEAN 7 12 11 8 12 11 12 10 MIN 3 2 11 8 2 1 1 220 240 50 60 1680 2000 3 38 7 1070 1255 indd 15 1255 indd 15 03 03 2010 15 40 16 03 03 2010 15 40 16...

Page 16: ...16 1 2 3 SELF CLEAN 4 5 6 7 8 9 10 11 12 13 14 16 1255 indd 16 1255 indd 16 03 03 2010 15 40 16 03 03 2010 15 40 16...

Page 17: ...17 12 1 1 1 2 11 1 2 3 2 14 2 MAX 2 8 12 11 60 40 8 1255 indd 17 1255 indd 17 03 03 2010 15 40 16 03 03 2010 15 40 16...

Page 18: ...18 10 9 3 12 9 4 4 11 8 10 9 3 12 9 10 MIN 12 12 8 11 10 9 3 12 9 3 12 10 MIN 3 10 10 5 5 5 4 5 10 15 30 5 4 5 12 6 1255 indd 18 1255 indd 18 03 03 2010 15 40 16 03 03 2010 15 40 16...

Page 19: ...12 9 10 MIN 3 SELF CLEAN 7 12 11 8 12 11 12 10 MIN 3 2 11 8 2 1 1 2 1 220 240 50 60 1680 2000 3 i i i i i i i i i i i i i i i i 89 336 EEC i i i i i i 73 23 EEC 1255 indd 19 1255 indd 19 03 03 2010 15...

Page 20: ...auna deconecta i erul de c lcat de la re ea atunci c nd nu l utiliza i Pentru a evita riscul electrocut rii nu scufun da i erul de c lcat n ap sau n alte lichide Nu turna i n rezervorul pentru ap lich...

Page 21: ...sorta i lucrurile dup temperatura lor de c lcare separa i articolele din es turi sin tetice cele din l n cele din bumbac etc Fierul de c lcat se nc lzeste mai repede de c t se r ceste De aceea se reco...

Page 22: ...torul de livrare continu a aburilor 3 n pozi ia livrarea aburilor este dezactivat Extrage i sa cablului electric din priz si l sa i erul de c lcat s se r ceasc complet ATEN IE Dac n timpul lucrului nu...

Page 23: ...olu ie de ap si o et Dup nl turarea depunerilor lustrui i suprafa a t lpii erului de c lcat cu o bucat de es tu r uscat Nu utiliza i pentru cur area t lpii si a carcasei erului de c lcat substan e abr...

Page 24: ...s hork mi povrchy ehli ky nebo vych zej c p rou aby se vyhnout z sk n sp lenin Pozorujte aby s ov ra ne skl n la s okra ji ehl c mi desky a tak ne t kala se tepl ch povrch P i odpojen ehli ky od elekt...

Page 25: ...mkn te v ko lic ho otvoru 2 obra te ehli ku i sce te poz statky vody obr 8 TEPLOTA EHLEN P ed zah jen m provozov n protestujte zah tou ehli ku na kusu tkaniny aby p esv d it se v tom e podlo ka ehli k...

Page 26: ...n pr ce s p rou nebo p itom vzplane indik tor 9 obr 3 Kdy teplota podlo ky ehli ky 12 dos hne nastaven teploty indik tor 9 zhasne lze p istupovat ke ehlen Regul torem st le dod vky p ry 3 vlo te po ad...

Page 27: ...vlhkou l t kou nato propas rujte jeho do sucha Usazeniny na podlo ce ehli ky m ou byt odstran n l tkou namo enou v octov m vod n m roztoku Za odstran n usazeniny vyle t te povrch pod lo ky suchou l tk...

Page 28: ...1 2 3 SELF CLEAN 4 5 6 7 8 9 10 11 12 13 14 28 1255 indd 28 1255 indd 28 03 03 2010 15 40 17 03 03 2010 15 40 17...

Page 29: ...29 12 1 1 1 2 11 1 2 3 2 14 2 MAX 2 8 12 11 60 40 1255 indd 29 1255 indd 29 03 03 2010 15 40 17 03 03 2010 15 40 17...

Page 30: ...30 8 10 9 3 12 9 4 4 11 8 10 9 3 12 9 10 MIN 12 12 8 11 9 10 9 3 12 9 3 12 10 MIN 3 10 10 5 5 5 4 5 10 15 30 5 4 5 12 6 1255 indd 30 1255 indd 30 03 03 2010 15 40 17 03 03 2010 15 40 17...

Page 31: ...31 3 11 MAX 13 8 10 9 3 12 9 10 MIN 3 SELF CLEAN 7 12 11 8 12 11 10 MIN 3 2 11 8 2 1 1 2 1 220 240 50 60 1680 2000 3 89 336 73 23 1255 indd 31 1255 indd 31 03 03 2010 15 40 17 03 03 2010 15 40 17...

Page 32: ...I 32 1 2 3 SELF CLEAN 4 5 6 7 8 9 10 11 12 13 14 32 1255 indd 32 1255 indd 32 03 03 2010 15 40 17 03 03 2010 15 40 17...

Page 33: ...33 I 12 1 1 1 2 11 1 2 3 2 14 2 MAX 2 8 12 11 60 40 o 1255 indd 33 1255 indd 33 03 03 2010 15 40 17 03 03 2010 15 40 17...

Page 34: ...I 34 8 10 9 3 12 9 4 4 11 8 10 9 3 12 9 10 MIN 12 12 8 11 9 10 9 3 12 9 3 12 10 MIN 3 10 10 5 5 5 4 5 10 15 30 5 4 5 12 6 1255 indd 34 1255 indd 34 03 03 2010 15 40 18 03 03 2010 15 40 18...

Page 35: ...3 11 MAX 13 8 10 9 3 12 9 10 MIN 3 SELF CLEAN 7 12 11 8 12 11 12 10 MIN 3 2 11 8 2 1 1 220 240 50 60 1680 2000 3 i 89 336 i i i 73 23 EC 1255 indd 35 1255 indd 35 03 03 2010 15 40 18 03 03 2010 15 40...

Page 36: ...ng qizig n j yl ri bil n bug d n ehtiyot bo ling El ktr shnuri d zm l t t ch tid n silib turm g ni v d zm lning issiq j yl rig t gm yotg nig q r b turing D zm lni el ktrd n shnurid n em s vilk sid n u...

Page 37: ...i 11 t z ek nligini t kshirib ko ring D zm ll shd n ldin lb tt kiyim yorlig id gi d zm ll sh h r r tini ko rib ling g r kiyimd d zm ll sh h r r ti ko rs tilg n yorlig bo lm s l kin kiyim tikilg n m t...

Page 38: ...ko rs t dig n chir q yon di 9 3 r sm D zm l sti 12 h r r ti k r kli d r j g y tg nd ko rs tish chir g i 9 o ch di shund d zm l qilishni b shl sh mumkin Bug chiq rish murv tini 3 k r kli bug chiq r di...

Page 39: ...n k ying uni quruq m t bil n rtib ling D zm lni lib qo yishd n ldin idishid 11 suv yo qligi d zm l sti 12 es quruq ek nligini t kshirib ko ring T Z L SH V TUTISH Q ID L RI D zm lni t z l shd n ldin u...

Page 40: ...xxxxx dass die Ware im Juni der sechste Monat 2006 hergestellt wurde RUS 0606 2006 KZ 0606 2006 RO Data fabric rii este indicat n num rul de serie pe tabelul cu datele tehnice Num rul de serie reprezi...

Reviews: