8
ENGLISH
•
Insert the power plug into the mains socket.
•
Switch the kitchen machine on by turning the
operation mode switch (11), set the required
operation speed from 3 to 6.
Note:
- maximal continuous operation time of the
kitchen machine with the meat grinder attachment is
no more than 3 minutes. Make at least a 10-15 minute
break before switching the unit on again.
•
After you finish operating, set the operation
mode switch (11) to the position «0» and unplug
the unit; only after that you can disassemble the
meat grinder attachment.
•
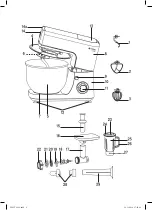
To disassemble the meat grinder head, unscrew
the nut (22) and take out the installed plate (20
or 21), the cross knife (19) and the screw con-
veyor (18) from the meat grinder head body.
•
To remove the meat grinder head (17), press
the lock button (14a), turn the meat grinder
head (17) clockwise and remove it.
•
Wash the parts (15, 16, 17, 18, 19, 20 or 21, 22)
with warm water and neutral detergent, rinse
them and dry.
•
Install the lid (14) back to its place.
MAKING SAUSAGES
•
Prepare minced meat.
•
Install the meat grinder head (17) into the instal-
lation place and turn it counterclockwise until
fixing “ ”.
•
Install the screw conveyor (18) into the meat
grinder head (17) body, set the cross knife (19),
one of the plates (20 or 21) on the screw con-
veyor (18), insert the sausage filling attachment
(29) into the nut (22), holding the attachment,
wind the nut (22) on the meat grinder head (17),
tighten the nut (22) (pic. 4).
•
Install the food tray (16) (pic. 5).
•
Put the minced meat on the food tray (16).
•
Use natural sausage casing for sausage making,
having put it beforehand into a bowl with warm
water for 10-15 minutes.
•
Pull softened casing on the attachment (29) and
make a knot on the tip.
•
Insert the power plug into the mains socket.
•
Switch the kitchen machine on by turning the
operation mode switch (11), set the required
operation speed from “1 to 6”.
•
Use the pusher (15) to feed minced meat; as the
casing is filled, slide it off the attachment (29),
and wet it as the casing dries.
•
After you finish operating, set the operation mode
switch (11) to the position «0» and unplug the unit;
only after that you can start disassembling.
•
To disassemble the meat grinder head, unscrew
the nut (22) and take out the installed plate (20
or 21), the cross knife (19) and the screw con-
veyor (18).
•
To remove the meat grinder head (17), press
the lock button (14a), turn the meat grinder
head (17) clockwise and remove it.
•
Wash the parts (15, 16, 17, 18, 19, 20 or 21,
22, 29) with warm water and neutral detergent,
rinse them and dry.
•
Install the lid (14) back to its place.
USING THE “KEBBE” ATTACHMENT
“Kebbe” is a traditional Middle East dish cooked
of lamb meat, wheat flour and spices chopped
together to prepare the base for hollow rolls. The
rolls are filled and deep fried.
You can make different delicacies trying various
fillings.
Prepare the casing base (see the recipe).
•
Install the meat grinder head (17) into the instal-
lation place and turn it counterclockwise until
fixing “ ”.
•
Insert the screw conveyor (18) into the meat
grinder head body (17), install the kebbe attach-
ments (28) on the screw conveyor; make sure
that the ledges on the attachment match the
grooves on the meat grinder head body (17) and
tighten the nut (22) (pic. 6).
•
Install the food tray (16) (pic. 7).
•
Put the prepared casing base on the food
tray (16).
•
Insert the power plug into the mains socket.
•
Switch the kitchen machine on by turning the
operation mode switch (11), set the required
operation speed from “1 to 6”.
•
Use the pusher (15) to feed the base for casing.
•
Cut off rolls of required length.
•
After you finish operating, set the operation
mode switch (11) to the position «0» and unplug
the unit; only after that you can start disassem-
bling it.
•
To disassemble the meat grinder head, unscrew
the nut (22) and remove the attachment (28),
the screw conveyor (18) from the meat grinder
head body.
•
To remove the meat grinder head (17), press
the lock button (14a), turn the meat grinder
head (17) clockwise and remove it.
•
Wash the parts (15, 16, 17, 18, 22, 28) with
warm water and neutral detergent, rinse them
and dry.
•
Install the lid (14) back to its place.
IM VT-1439.indd 8
29.11.2018 17:22:10


