background image

4

 ENGLISH

– 

Before switching on the humidifier make sure 
that  the  voltage  of  electric  network  corre-
sponds to the unit operating voltage.

Usage of the unit

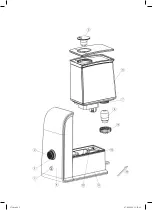
1.  Remove the lid (5) from the water tank (6).
2.  Remove the water tank (6) from the unit body.
3.  Turn over the tank (6), open the lid (9) rotating 

it counterclockwise.

4.  Fill  the  tank  (6)  with  necessary  amount  of 

water, close the lid (9) rotating it clockwise.

5.  Place the filled water tank (6) on the unit body. 
6.  Insert the plug into the socket. 
7.  Switch on the humidifier, turning the knob (2) 

clockwise,  the  operation  indicator  (12)  will 
become blue.

8.  Set the mist release intensity turning the knob 

(2).

9.  You can switch on the illumination (3) by pressing 

the button (1), for example, at night-time. 

10. If  the  water  tank  (6)  is  empty,  the  indicator 

(12) will become red.

11. In this case switch off the unit by setting the 

knob (2) to «OFF» position, the indicator (12) 
will go out, then unplug the unit. Fill the tank 
(6) with water, install it to its place and switch 
on the unit.

12. After the humidifier finishes operation, switch 

it off by setting the knob (2) to «OFF» position, 
the indicator (12) will go out.

Cleaning and care

Attention! Always switch off and unplug the 
unit before cleaning.

• 

Hard water causes the appearance of mineral 
scale on the sprayer, on the inner parts of the 
body and in the water tank; it leads to improp-
er  operation  of  the  humidifier  and  appear-
ance of white deposits on interior objects.

• 

To  avoid  this  it  is  necessary  to  clean  the 
sprayer weekly and change water as often as 
possible, as well as to perform cleaning of the 
filter-cartridge. 

• 

If you are not going to use the humidifier for 
a long time, pour out water from the tank and 
the  operating  chamber  of  the  sprayer,  wash 
the water tank, wash and clean the operating 

chamber of the sprayer and the sprayer itself, 
dry the unit and take it away for storage.

Weekly care

1.  Once  a  week  wash  the  water  tank  (6)  and 

the  operating  chamber  under  the  tank  (6) 
carefully with a neutral detergent solution.

2.  Then carefully rinse them with water.
3.  Add 5-10 drops of the detergent on the sprayer 

(10);  wait  about  2-5  minutes.  Remove  the 
deposit from the sprayer (10) with a brush (13).

Note:  As  a  cleaning  agent  for  the  sprayer  you 
can use scale removal substances for kettles.

• 

Do  not  immerse  the  humidifier  body  into 
water or other liquids.

Filter cleaning

1.  Clean the filter (8) after passing of about 500 l 

water through it, and more often, if using hard 
water or a white deposits appear on furniture,.

2.  Remove the lid (5) from the water tank (6) and 

remove the tank (6) from the unit body (11).

3.  Turn over the tank (6), open the lid (9) rotating 

it  counterclockwise,  remove  the  filter-
cartridge (8), rotating it counterclockwise.

4.  Put  the  filter-cartridge  (8)  into  a  container 

with  vinegar  for  10  minutes,  then  take  it  out 
and rinse with running water.

5.  Install the filter-cartridge (8) back into the lid 

(9), rotating it clockwise.

Storage

• 

If you are not going to use the humidifier for 
a  long  time,  make  sure  that  all  its  parts  are 
dry,  including  the  operating  chamber  of  the 
sprayer.

• 

Do not store the unit with water in the water 
tank  and  in  the  operating  chamber  of  the 
sprayer.

• 

Clean and dry the filter-cartridge before tak-
ing  it  away  for  storage.  Keep  the  filter-car-
tridge in a cool darkened place.

Keep the humidifier away from children in a dry 
cool place.

Troubleshooting

Failure 

Possible causes

Troubleshooting

The  operation  indicator 

doesn’t light up, no mist 

release

No 

voltage, 

no 

power supply

Connect the unit to the mains.
Plug another, certainly operating appliance to 

the socket to make sure that the socket works 

properly.

1760.indd   4

07.06.2012   11:47:06

Summary of Contents for VT-1760 W

Page 1: ...1 VT 1760 W Air humidifier 3 6 10 14 18 21 24 28 32 1760 indd 1 07 06 2012 11 47 06...

Page 2: ...1760 indd 2 07 06 2012 11 47 06...

Page 3: ...essary instructions by a person who is responsible for their safety on safety mea sures and information about danger that can be caused by improper usage of the unit Do not switch on the humidifier wi...

Page 4: ...sh the water tank wash and clean the operating chamber of the sprayer and the sprayer itself dry the unit and take it away for storage Weekly care 1 Once a week wash the water tank 6 and the operating...

Page 5: ...ined from the dealer from whom the appli ance was purchased The bill of sale or receipt must be produced when making any claim under the terms of this guarantee This product conforms to the EMC Requir...

Page 6: ...t an einem f r Kinder unzug nglichen Ort auf Es ist nicht gestattet das Ger t den Kindern als Spielzeug zu geben Dieses Ger t darf von Kindern und behinderten Personen nicht genutzt werden au er wenn...

Page 7: ...Position OFF stellen dabei erlischt die Kontrolleuchte 12 dann ziehen Sie den Netzstecker aus der Steckdose F llen Sie den Wasserbeh lter 6 mit Wasser ein stellen Sie ihn zur ck auf und schalten Sie d...

Page 8: ...Sie es Bewahren Sie das Patronenfilter 8 an einem k hlen und dunklen Ort auf Bewahren Sie das Ger t an einem trockenen k hlen und f r Kinder unzug nglichen Ort auf St rungsbeseitigung St rung M glich...

Page 9: ...z Aufnahmeleistung 30 W Fassungsverm gen des Wasserbeh lters 3 l Wasserverbrauch 250 ml Stunde Befeuchtungsfl che bis 25 m Der Hersteller beh lt sich das Recht vor Design und technische Eigenschaften...

Page 10: ...10 10 1 2 OFF ON 3 4 5 6 7 8 9 10 11 12 13 15 1760 indd 10 07 06 2012 11 47 07...

Page 11: ...11 30 5 40 80 40 1 5 6 2 6 3 6 9 4 6 9 5 6 6 7 2 12 8 2 9 1 3 10 6 12 11 2 OFF 12 6 12 2 OFF 12 1 6 6 2 3 5 10 10 2 5 13 10 1760 indd 11 07 06 2012 11 47 07...

Page 12: ...12 1 8 500 2 5 6 6 11 3 6 9 8 4 8 10 8 5 8 9 12 1760 indd 12 07 06 2012 11 47 07...

Page 13: ...13 1 1 1 1 1 1 1 220 240 50 30 3 250 25 5 38 7 1070 1760 indd 13 07 06 2012 11 47 07...

Page 14: ...14 1 2 OFF ON 3 4 5 6 7 8 9 10 11 12 13 15 1760 indd 14 07 06 2012 11 47 07...

Page 15: ...15 30 5 80 40 1 5 6 2 6 3 6 9 4 6 9 5 6 6 7 2 12 8 2 9 1 3 10 6 12 11 2 OFF 12 6 12 2 OFF 12 1 6 6 2 3 5 10 10 2 5 13 10 1760 indd 15 07 06 2012 11 47 07...

Page 16: ...16 1 8 500 2 5 6 6 8 3 6 9 8 4 1 8 10 8 5 8 9 12 1760 indd 16 07 06 2012 11 47 07...

Page 17: ...17 1 1 1 1 1 1 1 220 240 50 30 3 250 25 5 i i i i i i i i i i i i i i i i 89 336 EEC i i i i i i 73 23 EEC 1760 indd 17 07 06 2012 11 47 07...

Page 18: ...tru a nu se juca cu aparatul Acest aparat nu este destinat pentru folosi re de c tre copii sau persoane cu dizabilit i dec t n cazul n care li se dau instruc iuni corespunz toare i clare de c tre pers...

Page 19: ...or albe pe obiectele de interior Pentru a preveni acest lucru este necesar c cur a i s pt m nal pulverizatorul i s schim ba i c t mai des apa precum i s cur a i filtrul cartu Dac inten iona i s nu fol...

Page 20: ...de garan ie se realizeaz cu condi ia pre zent rii bonului de plat sau a oric rui alt document financiar care confirm cump rarea produsului dat Acest produs corespunde cerin elor EMC ntocmite n conform...

Page 21: ...dovolujte d tem aby si s p strojem hr ly Tento p stroj by nem ly pou vat d t a osoby se sn en mi schopnostmi pokud osoba odpov dn za jej ch bezpe nost jim ned odpov daj c a srozumiteln pokyny k bezpe...

Page 22: ...du co zp sobuje zhor en fungov n zvlh ova e a objeven b l ho n nosu na p edm tech interi ru Aby se tomu zabr nilo je t eba ka d t den istit trysku a co mo n nej ast ji m nit vodu a tak istit filtr kar...

Page 23: ...st n na nerovn m nebo nestabiln m povrchu Odpojte p stroj od s t a narovnejte z kladnu p stroje nebo p eneste zvlh ova na jin m sto Pozn mka Pokud se nedodr uj pravidla i t n trysky od miner ln ch us...

Page 24: ...24 1 2 OFF ON 3 4 5 6 7 8 9 10 11 12 13 15 24 1760 indd 24 07 06 2012 11 47 08...

Page 25: ...25 30 5 40 80 40 1 5 6 2 6 3 6 9 4 6 9 5 6 6 7 2 12 8 2 9 1 3 10 6 12 11 2 OFF 12 6 12 2 OFF 12 1 6 6 2 3 5 10 10 2 5 13 10 1 8 500 2 5 6 6 11 3 6 9 1760 indd 25 07 06 2012 11 47 08...

Page 26: ...26 8 4 8 10 8 5 8 9 12 1 1 1 1 1 1 1 220 240 50 30 3 250 25 1760 indd 26 07 06 2012 11 47 08...

Page 27: ...27 5 89 336 73 23 1760 indd 27 07 06 2012 11 47 08...

Page 28: ...28 i 1 2 OFF ON 3 4 5 6 7 8 9 10 11 12 13 15 28 1760 indd 28 07 06 2012 11 47 08...

Page 29: ...29 i 30 5 40 80 40 1 5 6 2 6 3 6 9 4 6 9 5 6 6 7 2 12 8 2 9 1 3 10 6 12 11 2 OFF 12 6 12 2 OFF 12 1 6 6 2 3 5 10 10 2 5 13 10 1760 indd 29 07 06 2012 11 47 08...

Page 30: ...30 i 1 8 500 2 5 6 6 11 3 6 9 8 4 8 10 8 5 8 9 12 1760 indd 30 07 06 2012 11 47 08...

Page 31: ...31 i 1 1 1 1 1 1 1 220 240 50 30 3 250 25 2 5 i 89 336 i i i 73 23 EC 1760 indd 31 07 06 2012 11 47 08...
Page 32: ...m ng Bo g ilish vfi b r Jih zni b l l rning qo li y tm ydig n j yg qo ying B l l r jih zni o yinch q qilib o yn shl rig ru s t b rm ng Jih z b l l r bil n imk niyati ch kl ng n ins nl rning ishl tishi...

Page 33: ...jr tib qo ying Q ttiq suvd n jih z purk gichid k rpusid suv idishid quyq to pl nib n ml gich ishl shi yom nl sh di uy jih zl ri ustid q g ub r p yd bo l di SHund y bo lm sligi uchun h r ft purk gichni...

Page 34: ...at qiling Kassa cheki yoki xaridni tasdiqlaydigan boshqa bir moliyaviy hujjat kafolat xizmatini berish sharti hisoblanadi Ushbu jihoz 89 336 YAES Ko rsatmasi asosida belgilangan va Quvvat kuchini belg...

Page 35: ...n num rul de serie pe tabelul cu datele tehnice Num rul de serie reprezint un num r din unsprezece cifre primele patru cifre indic nd data fabric rii De exemplu dac num rul de serie este 0606xxxxxxx...

Page 36: ...1760 indd 36 07 06 2012 11 47 08...
Reviews: