background image

5

ENGLISH          

– 

After you finish using the unit, take the power 
plug out of the socket and remove the blender 
attachment (1), turning it counterclockwise.

Attention!

– 

Do not remove the blender attachment (1) 
during operation.

– 

To avoid damaging the blades, do not pro-
cess  too  hard  products  such  as  cereals, 
rice,  spices,  coffee  beans,  cheese,  fro-
zen food and other hard products.

– 

If the foodstuffs are hard to chop with the 
blender  attachment,  add  some  water  if 
possible.

USING THE WHISK

Use  the  whisk  attachment  (10)  only  to  beat 
cream,  make  biscuit  dough  or  for  mixing  ready 
desserts.

WARNING:  Before  assembling  make  sure 
that  the  power  plug  is  not  inserted  into  the 
mains socket.

 •

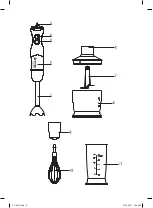
Insert the whisk (10) into the gear (9).

 •

Insert the whisk gear (9) into the motor unit (2), 
preliminary matching the corresponding marks, 
and turn it counterclockwise until locking.

 •

Insert the power plug into the mains socket.

 •

Sink  the  whisk  (10)  into  the  bowl  with  prod-
ucts.

 •

Set  the  required  operation  speed  using  the 
control knob (5).

 •

To switch the unit on, press and hold down the 
ON button «I» (4). Use this operation mode for 
mixing liquid products.

 •

If  you  press  and  hold  down  the  turbo  mode 
button  «TURBO»  (3),  the  unit  will  operate  at 
maximum rotation speed.

 •

After you finish using the unit, take the power 
plug out of the socket, disconnect the whisk 
(10) from the gear (9) and disconnect the gear 
(9) from the motor unit (2) by turning it coun-
terclockwise.

Attention!

– 

Do not use the whisk (10) to make tight dough.

– 

Put  products  into  the  bowl  before  switching 
the unit on.

USING THE MINI-CHOPPER

The  chopper  is  used  to  chop  meat,  cheese, 
onion,  herbs,  walnuts,  almond,  vegetables  and 
fruit.

Attention!

Do  not  chop  very  hard  products,  such  as  nut-
megs, coffee beans, cereals, ice and other hard 
products.

Before you start chopping:

– 

cut  meat,  cheese,  onions,  vegetables  and 
fruit into cubes approximately 2x2 cm in size;

– 

remove stems of herbs, shell nuts;

– 

  remove  bones,  sinews  and  cartilage  from 
meat.

– 

To achieve the best results, refer to the table 
below.

Product type

Weight, 
g.

Approximate 
processing time, 
seconds

Onions (cut into 
several pieces)

60

4-8

Soft fruits

100

10–12

Garlic

50

4-8

Bread (rusks)

15

12-15

Cheese

30

12-15

Nuts

30

12-15

Eggs

80

8-10

Meat 

80

8–12

Chopping

Caution: the knife is very sharp! Always hold 
the knife by the upper plastic end.

 •

Place  the  chopper  bowl  (6)  on  a  flat  stable 
surface.

 •

Carefully remove the plastic protective cover 
from the chopping knife (7).

 •

Set the chopping knife (7) on the axis inside 
the chopper bowl (6).

 •

Put the food into the chopper bowl (6).

Note:
–  Do  not  switch  the  unit  on  when  the  chopper 
bowl (6) is empty.

 •

Place the geared lid (8) on the chopper bowl 
(6), having matched the ledges on the lid with 
the grooves on the bowl, and rotate it clock-
wise until locking.

 •

Install the motor unit (2) on the lid (8) feeding 
chute. Install the motor unit evenly and strictly 
in vertical position, allowing no gaps. 

– 

To  connect  the  unit  to  the  mains,  insert  the 
power cord plug into the mains socket.

– 

Set the required speed with the control knob 
(5).

– 

To switch the unit on, press and hold down the 
ON button «I» (4).

VT-3411.indd   5

31.10.2017   16:48:28

Summary of Contents for VT-3411 ST

Page 1: ...1 VT 3411 ST 3 7 12 17 22 Blender set VT 3411 indd 1 31 10 2017 16 48 27...

Page 2: ...VT 3411 indd 2 31 10 2017 16 48 28...

Page 3: ...se the unit outdoors Do not place the chopper bowl and the mea suring cup into a microwave oven Use only the attachments supplied Before using the unit for the first time thor oughly wash all the remo...

Page 4: ...perature before switching on Wash the attachments that will contact prod ucts with warm water and a neutral detergent and dry them thoroughly before use Wipe the motor unit 2 whisk gear 9 and geared l...

Page 5: ...e tight dough Put products into the bowl before switching the unit on USING THE MINI CHOPPER The chopper is used to chop meat cheese onion herbs walnuts almond vegetables and fruit Attention Do not ch...

Page 6: ...red wipe the attachments or bowls with a cloth dampened in vegetable oil 5 Wash the attachments that will contact prod ucts with warm water and a neutral detergent and dry them thoroughly after use No...

Page 7: ...erungsbeh lter nicht bersteigen Die Intervalle zwischen den Betriebszyklen sollen nicht weniger als zwei Minuten betragen LassenSiehei eNahrungsmittelvorderNutzung abk hlen die Nahrungsmitteltemperatu...

Page 8: ...ermeiden transportieren Sie das Ger t nur in der Fabrikverpackung Tauchen Sie nie das Geh use des Ger ts das Netzkabel oder den Netzstecker ins Wasser oder andere Fl ssigkeiten um Stromschlag und Bran...

Page 9: ...atz 1 w hrend des Betriebs des Ger ts abzu nehmen Um Besch digung der Klingen zu vermei den bearbeitenSiezuharteNahrungsmittel wieGr tzen Reis Gew rze Kaffeebohnen K se eingefrorene Nahrungsmittel und...

Page 10: ...im Beh lter zusammenfallen lassen und dre hen Sie ihn im Uhrzeigersinn bis zum Einrasten Stellen Sie den Motorblock 2 am F llrohr des Deckels 8 auf Stellen Sie den Motorblock 2 streng senkrecht ohne...

Page 11: ...g ab Wickeln Sie das Netzkabel um den Motorblock nicht auf Bewahren Sie das Stabmixer Set an einem trockenen k hlen und f r Kinder unzug ng lichen Ort auf LIEFERUMFANG Motorblock 1 St Stabmixeraufsatz...

Page 12: ...12 VT 3411 ST 1 2 3 TURBO 4 I 5 6 7 8 9 10 11 30 1 20 30 70 VT 3411 indd 12 31 10 2017 16 48 29...

Page 13: ...13 8 8 8 8 8 www vitek ru 2 9 8 2 9 8 VT 3411 indd 13 31 10 2017 16 48 29...

Page 14: ...14 1 20 30 15 1 2 1 I 4 5 TURBO 3 2 3 2 2 1 1 10 10 9 9 2 10 5 I 4 TURBO 3 10 9 9 2 VT 3411 indd 14 31 10 2017 16 48 29...

Page 15: ...15 10 2 2 60 4 8 100 10 12 50 4 8 15 12 15 30 12 15 30 12 15 80 8 10 80 8 12 6 7 7 6 6 6 8 6 2 8 5 I 4 TURBO 3 2 6 7 2 8 8 7 6 7 7 1 2 2 8 9 VT 3411 indd 15 31 10 2017 16 48 29...

Page 16: ...16 3 7 4 5 2 7 8 1 1 1 1 1 1 1 1 1 220 240 50 60 400 800 3 38 7 1070 email anderproduct gmail com www vitek ru 7 495 921 01 70 VT 3411 indd 16 31 10 2017 16 48 29...

Page 17: ...17 VT 3411 ST 1 2 3 TURBO 4 I 5 6 7 8 9 10 11 30 1 20 30 70 VT 3411 indd 17 31 10 2017 16 48 29...

Page 18: ...18 8 8 8 8 8 www vitek ru 2 9 8 2 9 8 VT 3411 indd 18 31 10 2017 16 48 29...

Page 19: ...19 1 20 30 15 1 2 1 I 4 5 TURBO 3 2 3 2 2 1 1 10 10 9 9 2 10 5 I 4 TURBO 3 10 9 9 2 10 VT 3411 indd 19 31 10 2017 16 48 29...

Page 20: ...20 2 2 60 4 8 100 10 12 50 4 8 15 12 15 30 12 15 30 12 15 80 8 10 80 8 12 6 7 7 6 6 6 8 6 2 8 5 I 4 TURBO 3 2 6 7 2 8 8 7 6 7 7 1 2 2 8 9 3 7 4 VT 3411 indd 20 31 10 2017 16 48 30...

Page 21: ...21 5 2 7 8 1 1 1 1 1 1 1 1 1 220 240 50 60 400 800 3 i i i i i i i i i i i i VT 3411 indd 21 31 10 2017 16 48 30...

Page 22: ...22 VT 3411 ST 1 2 3 TURBO 4 I 5 6 7 8 9 10 11 30 1 20 30 70 VT 3411 indd 22 31 10 2017 16 48 30...

Page 23: ...23 8 8 8 8 8 www vitek ru 2 9 8 2 9 8 VT 3411 indd 23 31 10 2017 16 48 30...

Page 24: ...24 1 9 20 30 15 1 2 1 I 4 5 TURBO 3 2 3 2 2 1 1 10 10 9 9 2 10 5 I 4 TURBO 3 10 9 9 2 10 VT 3411 indd 24 31 10 2017 16 48 30...
Page 25: ...25 2 2 60 4 8 100 10 12 50 4 8 15 12 15 30 12 15 30 12 15 80 8 10 80 8 12 6 7 7 6 6 6 8 6 2 8 5 I 4 TURBO 3 2 6 7 2 8 8 7 6 7 7 1 2 2 8 9 3 7 4 VT 3411 indd 25 31 10 2017 16 48 30...

Page 26: ...26 5 2 7 8 1 1 1 1 1 1 1 1 1 220 240 50 60 400 800 3 2004 108 2006 95 VT 3411 indd 26 31 10 2017 16 48 30...
Page 27: ...VT 3411 indd 27 31 10 2017 16 48 30...
Page 28: ...s manufactured in June the sixth month 2006 de Das Produktionsdatum ist in der Seriennummer auf dem Schild mit technischen Eigenschaften dargestellt Die Se riennummer stellt eine elfstellige Zahl dar...

Reviews: