background image

используется, необходимо отключить его от сети, вынув вилку из розетки.

РАДИОПРИЕМНИК

Установите функциональный переключатель в положение "RADIO".

Выберите нужный диапазон переключателем диапазонов BAND.

Найдите  нужную  передающую  станцию,  вращая  регулятор  настройки
радио TUNING.

Установите желаемую громкость, используя кнопки UP и DOWN.

Чтобы  отключить  радио,  установите  функциональный  переключатель  в
положение "OFF”.

Для  приема  стереофонической  передачи  FM  переведите  переключатель
FM  моно/стерео  в  положение  STEREO.  Загорится  индикатор  FM!стерео.
Если прием слаб, переведите  переключатель в положение MONO.  Хотя
прием становится монофоническим, звук воспринимается более четко.

АНТЕННА

Для  лучшего  приема  в  диапазоне  FM  сориентируйте  антенну  под  нужным
углом.

РЕЖИМ “BASS BOOST”

Чтобы усилить низкие частоты, нажмите кнопку BASS BOOST.

ПОДКЛЮЧЕНИЕ НАУШНИКОВ

Наушники    подключаются  в  гнездо  PHONES.  При  прослушивании  через
наушники динамики автоматически отключаются.

МАГНИТОФОН
Воспроизведение кассеты

Нажмите 

на 

клавишу 

"STOP/EJECT", 

чтобы 

открыть 

крышку

кассетоприемника.

Вставьте кассету с записью и закройте крышку.

Установите  функциональный  переключатель  в  положение  "TAPE".  Для
начала воспроизведения кассеты нажмите на клавишу "PLAY".

Установите  желаемый уровень громкости, используя кнопки UP и DOWN.

Чтобы остановить воспроизведение, нажмите клавишу "STOP/EJECT".

Система "Автостоп"

Магнитола  снабжена  механизмом  "Автостоп",  который  автоматически
выключает воспроизведение или запись, если кассета заканчивается.

Внимание: 

Чтобы  избежать  повреждений  кассетного  механизма  или  пленки,  между
операциями  нажимайте кнопку "STOP/EJECT".

РУССКИЙ

13

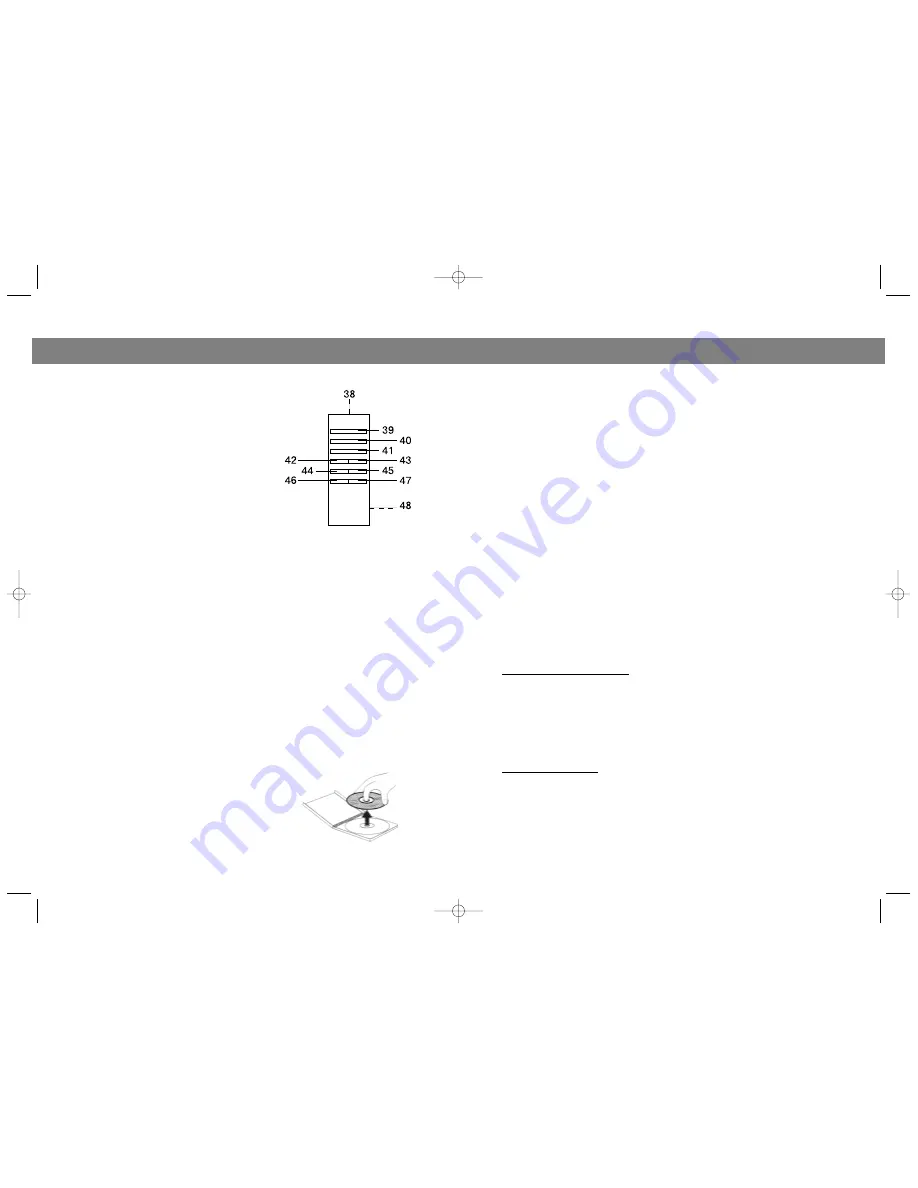
1. Power Button (39)

a) While  the  main  unit  is  in  operation,  press  the

Power  Button  (39)  once,  the  unit  will  go  to
Standby  Mode  and  Power/Standby  LED
Indicator (16) will turn from green to red color.

b) Press  the  Power  Button  (39)  again  and  it  will

resume to normal play function.

NOTE :

When the Power/Standby LED Indicator (16) is in
red color, the unit is only in Standby Mode. Press
the Power button (1) locates on the main unit to
turn off the unit completely.

2. Play/Pause Button (40)

Press to start play or pause temporarily in CD
Mode.

3. Stop Button (41)

Press to stop CD play.

4. Repeat Button (42)

Press to play one or all tracks repeatedly.

5. Mute Button (43)

Press to silent the sound output.

6. Skip/Search "" (44) / "+" (45)

Skip  or  Search  backward  /  forward  for  the  desired  track  or  passage  in  CD
mode.

7. Volume "" (46) / "+" (47)

Press to adjust the volume.

8. Battery Door (48)

Slide open the battery door, then insert two "AA" size or UM!3 batteries accord!
ing to the polarity diagram inside the battery compartment.

NOTE :

If the Remote Controller is not to be used for a long time, remove the batteries to
prevent possible damage through battery.
Do not mix different types of battery or old batteries with new ones.

GENERAL INFORMATION
CARE AND MAINTENANCE

Handle your compact discs, cassette tapes, and
tape deck carefully, and they will  last a long time.

Use a soft, clean cloth moistered with plain luke!
warm water to clean the exterior of the unit.

8

ENGLISH

3481.qxd  25.11.03  14:57  Page 14

Summary of Contents for VT-3481

Page 1: ...МОДЕЛЬ VT 3481 MINI SYSTEM WITH RADIO CASSETTE RECORDER МИНИСИСТЕМА C CD ПРОИГРЫВАТЕЛЕМ MANUAL INSTRUCTION ИНСТРУКЦИЯ ПО ЭКСПЛУАТАЦИИ 3481 qxd 25 11 03 14 57 Page 2 ...

Page 2: ... defeated Avoid direct exposure to beam ENGLISH 2 Гарантийный талон Сведения о покупке Модель Серийный Дата покупки Сведения о продавце Название и адрес продающей организации Телефон Подтверждаю получение исправного изделия с условиями гарантии ознакомлен Подпись покупателя Внимание Гарантийный талон действителен только при наличии печати продающей организации М П Купон 3 Модель Серийный Дата пост...

Page 3: ...CD Play Pause LED Indicator 17 CD Repeat LED Indicator 18 CD Program LED Indicator 19 FM Stereo LED Indicator 20 Cassette Compartment 21 Cassette Key Control Door 22 Mic Jack 23 Cassette Record Button 24 Cassette Play Button 25 Cassette Rewind Button 26 Cassette Fast Forward Button 27 Cassette Stop Eject Button 28 Cassette Pause Button 29 Stereo Headphone Jack 30 CD Door 31 Speaker Terminal L R 32...

Page 4: ...ических Стандартов питающих телекоммуникационных и кабельных сетей при выходе из строя деталей обладающих ограниченным сроком службы 5 Настоящая гарантия не ущемляет законных прав потребителя предоставленных ему действующим законодательством РУССКИЙ 17 AC OPERATION Before operating please check carefully that the voltage indicated on your set corresponds to the voltage of your local area 1 Plug th...

Page 5: ...nob to your desired listening level 6 To stop the tape depress the STOP EJECT button 7 Depress the STOP EJECT button again to open the cassette door Fast Forward and Rewind The tape can be fast forwarded or rewound by depressing the FAST FORWARD button or REWIND button respectively Pause Function During playback or recording the tape can be stopped temporarily by depressing the PAUSE button To con...

Page 6: ...by lifting the front of the CD DOOR Put a CD into the CD COMPARTMENT and close the CD DOOR Set the FUNCTION switch to CD position 2 When the CD DOOR is closed with a CD inside the total number of tracks on the disc will be shown on the CD LED DISPLAY and will go to STOP mode 3 If the CD DOOR is not closed or there is no disc inside the DISPLAY will show 00 and go to STOP mode Play Pause Mode 1 Whe...

Page 7: ...rack is displayed in the CD LED Display Press the PROGRAM but ton to store the desired track in memory 3 Repeat above STEP 2 procedure until all desired tracks have been pro grammed A total of 16 tracks can be stored in memory 4 To start the PROGRAMMED playback press the CD PLAY PAUSE BUTTON once 5 To cancel the PROGRAMMED play mode press the CD STOP button twice Recording From CD Player 1 Slide t...

Page 8: ...лючает воспроизведение или запись если кассета заканчивается Внимание Чтобы избежать повреждений кассетного механизма или пленки между операциями нажимайте кнопку STOP EJECT РУССКИЙ 13 1 Power Button 39 a While the main unit is in operation press the Power Button 39 once the unit will go to Standby Mode and Power Standby LED Indicator 16 will turn from green to red color b Press the Power Button 3...

Page 9: ...ировке прибора совпадает с напряжением в вашем доме Соедините каждый кабель динамика с гнездами на задней панели магнитолы Подключите сетевой шнур к розетке Нажмите кнопку POWER Загорится индикатор питания Примечание Когда магнитола находится в режиме STAND BY напряжение сети в приборе еще существует поддерживая работу часов Если центр долгое время не РУССКИЙ 12 Never use solvents such as benzene ...

Page 10: ...ия по эксплуатации содержит важные рекомендации которых следует придерживаться для вашей безопасности НЕ ОТКРЫВАТЬ Опасность лазерного излучения РУССКИЙ 10 ОСТОРОЖНО РИСК ЭЛЕКТРИЧЕСКОГО УДАРА НЕ ОТКРЫВАТЬ ВО ИЗБЕЖАНИЕ ПОРАЖЕНИЯ ЭЛЕКТРИЧЕСКИМ ТОКОМ НЕ СНИМАЙТЕ ЗАДНЮЮ КРЫШКУ ВНУТРИ АППАРАТА НЕТ ДЕТАЛЕЙ ТРЕБУЮЩИХ ОБСЛУЖИВАНИЯ ПОЛЬЗОВАТЕЛЕМ ОБСЛУЖИВАНИЕ ДОЛЖНО ВЫПОЛНЯТЬСЯ КВАЛИФИЦИРОВАННЫМИ СПЕЦИАЛИСТ...

Reviews: