7
ENGLISH
down of the time needed for the cooking to be fin-
ished will start on the display (3)).
Example:
If you set the cooking end time for 1 hour, and duration
of the selected program is 55 minutes, the unit will be
switched to the cooking mode in 5 minutes after the
settings are finished (the «KEEP WARM» indicator (14)
will go out, the «COOKING» indicator (13) will light up).
USING OF THE MULTICOOKER
1. Put the products into the bowl (12) following the
recommendations given in the recipe (see «Rec-
ipe book»).
Note
:
Make sure that the products and liquids level
does not exceed the level of maximal mark «10» and
is not lower than the level of minimal mark «4».
Max-
imal level mark for porridges (except rice) is «8».
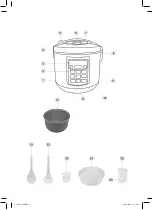
General example of loading porridges and required
amount of water (as example rice is considered).
–
Measure rice with the measuring cup (23) (one
measuring cup is equal to approximately 160 g of
rice), wash it and place in the casserole.
–
Add water using the scale with marks in cups (CUP).
Example: Put four measuring cups of rice, pour
water up to the graduating mark «4 CUP».
–
For cooking liquid milk porridges the recommended
proportion of rice and water is 1:3.
2. Make sure that the outer surface of the bowl (12) is
clean and dry, insert the bowl (12) into the process
chamber of the unit. The bowl should be placed
evenly and in secure contact with the heating ele-
ment (9) surface.
Note:
•
Do not use the bowl (12) for washing cereals
and do not chop products in it, this can damage
the non-stick coating;
•
Make sure that there are no foreign objects,
dirt or moisture in the process chamber and on
the bottom of the bowl (12).
•
Wipe the outer surface and the bottom of the
bowl (12) dry before use.
•
In the middle of the heating element (9) there
is a temperature sensor (10). Make sure that
free movement of the sensor (10) is not limited.
3. If you steam products, pour water into the bowl (12)
so that boiling water does not reach the bottom of
the basket (24). Put the basket (24) with food into
the bowl (12).
4. Close the lid (4) until click.
5. Insert the power cord jack into the connector (9) and
the power cord plug into the socket.
6. Select the cooking program by pressing once or
twice the corresponding button. See the «Cooking
program buttons (16)» section. Set the «Multicook»
program as it is described in the «Multicook» button
(17)» section.
7. Cooking time in each program is set by default but it
may be changed (except the «RICE» program»). To
set the cooking time, press or hold the buttons (15)
«-» and (20) «+».
Note
: Setting of cooking time is not available in the
«Rice» program, switch to the next step.
8. Set the delayed start function as described in the
«Delayed start» button (18)» section. If you want to
start cooking immediately, skip this step.
9. The multicooker will be automatically switched to
the cooking mode in 10 seconds upon termination
of settings, and the «COOKING» indicator (13) will
light up.
Attention!
•
The multicooker is automatically switched to
the operating mode in about 10 seconds after
you push one of the buttons (16), or change
program operating time with buttons (15) «-»/
(20)
«+» or set the delayed start time with
the «DELAYED START» button (18), while the
«COOKING» indicator (13) will light up.
•
To reset program settings or cancel the cook-
ing program, BE SURE to press the «STOP» but-
ton (19) (the «8888» symbols will light up on the
display).
•
Never leave the unit connected to the mains un-
attended!
10. Watch the cooking process, stir the products with
the plastic spatula (21) or plastic soup ladle (22). Do
not use metal objects that can scratch the non-stick
coating of the bowl (12).
11. If you want to stop cooking, press the «STOP» but-
ton (19).
Attention!
•
Never leave the operating unit unattended.
•
To avoid burns, be careful when opening the lid
(4). Do not bend over the steam valve (6) during
operation of the multicooker and do not place
open parts of your body above the bowl (12)!
•
During the first operation of the multicooker
some foreign smell from the heating element
can appear. It is normal.
12. Upon termination of the cooking program the multi-
cooker will be switched to the keep warm mode, and
the «KEEP WARM» indicator (14) will light up.
Notes:
•
Despite the unit keeps the ready dish warm for
24 hours, it is not recommended to leave the
cooked products in the bowl for a long time, be-
cause this may spoil the products.
•
Do not use the keep warm mode to heat up cold
products.
•
After steam cooking, do not remove products
with bare hands, use kitchen tools.
RECOMMENDATIONS
You can use the «Yogurt» and «Multicook» programs for
dough proofing.
Dough proofing is a stage of dough making that takes
place right before baking. During the proofing stage the
dough ferments intensively, restores its structure and
VT-4212_IM.indd 7
06.08.2013 12:38:36
Summary of Contents for VT-4212 BK
Page 1: ...1 VT 4212 BK Multicooker 4 9 15 21 27 32 37 43 49 VT 4212_IM indd 1 06 08 2013 12 38 35...
Page 2: ...VT 4212_IM indd 2 06 08 2013 12 38 36...
Page 3: ...3 VT 4212_IM indd 3 06 08 2013 12 38 36...
Page 16: ...16 12 12 12 9 12 12 12 12 21 22 12 12 12 12 20 30 40 VT 4212_IM indd 16 06 08 2013 12 38 37...
Page 44: ...44 12 12 12 9 12 12 12 12 21 22 12 12 12 12 20 30 40 VT 4212_IM indd 44 06 08 2013 12 38 40...

