background image

4

 ENGLISH

MULTICOOKER 

The  multicooker  is  intended  for  cooking  and  warming 
of food.

Description

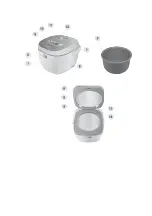
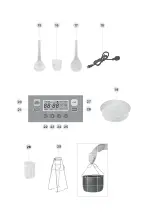
1.  Multicooker body
2.  Lid opening button
3.  Cooking bowl
4.  Protection screen clamps 
5.  Protection screen
6.  Multicooker lid 
7.  Carrying handle
8.  Power cord connector
9.  Display
10. Control panel
11. Steam valve
12. Steam release opening
13. Heating element
14. Temperature sensor
15. Soup ladle
16. Measuring cup
17. Spatula
18. Power cord
19. Basket for steam cooking

Control panel

20. «STOP/Keep warm» button 
21. «MULTICOOK» button
22. «TIME» button
23. Selected setting increase button «+»
24. Selected setting decrease button «-»
25. «DELAYED START» button
26. «MENU» button
27. «START» button

28. Additional accessories

Yogurt cups with lids

29. Bowl holder

Attention!
For additional protection it is reasonable to install 
a  residual  current  device  (RCD)  with  nominal  op-
eration current not exceeding 30 mA. To install the 
RCD contact a specialist.

SAFETY MEASURES
Before using multicooker read this instruction man-
ual carefully and keep it for future reference.

• 

Use the multicooker for intended purpose only, as it 
is stated in this instruction manual. Mishandling the 
unit can lead to its breakage and cause harm to the 
user or damage to his/her property. 

• 

Before  using  the  unit,  closely  examine  the  power 
cord and the power cord connector located on the 
unit body and make sure that they are not damaged. 
Never use the unit if the power cord or power cord 
jack is damaged.

• 

Before switching the unit on make sure that voltage 
of the mains corresponds to unit operating voltage.

• 

Power cord is equipped with “euro plug”; plug it into 
the socket with reliable grounding contact.

• 

Do not use adapters for plugging the unit in.

• 

Make sure that the power cord is properly inserted 
into  the  corresponding  connector  of  the  unit  body 
and the socket.

• 

Use  only  the  supplied  power  cord,  do  not  use  the 
power cord of other units.

• 

Use the supplied removable parts only.

• 

Place the unit on a flat heat-resistant surface away 
from sources of moisture, heat and open flame.

• 

Place the unit with free access to the mains socket.

• 

Use the unit in places with proper ventilation. 

• 

Do not expose the unit to direct sunlight.

• 

Do  not  place  the  unit  close  to  walls  and  furniture. 
Free space above the multicooker should be at least 
30-40 cm.

• 

Provide  that  the  power  cord  does  not  contact  with 
hot surfaces and sharp furniture edges. Avoid dam-
aging the isolation of the power cord.

• 

Do  not  touch  the  power  cord  or  power  plug  with 
wet hands.

• 

Do not immerse the unit, the power cord and power 
plug into water and other liquids.

• 

If the unit was dropped into water, unplug it imme-
diately,  and  only  then  take  it  out  of  water.  Apply  to 
the  authorized  service  center  for  the  further  use 
of the unit.

• 

Do  not  insert  foreign  objects  into  steam  release 
openings,  and  make  sure  that  foreign  objects  do 
not get between the lid and body of the multicooker.

• 

Do not leave the operating unit unattended, always 
switch  the  unit  off  and  unplug  it  when  you  are  not 
using it.

• 

To avoid injury, do not bend over the steam release 
openings or over the bowl when the multicooker lid 
is open. 

• 

Be  very  careful  when  opening  the  multicooker  lid 
during and after the cooking. 

Danger of burns by 

hot steam!

• 

When the unit is operating in «Roasting» mode, do 
not bend over the multicoooker bowl to avoid burns 
by splashing hot oil. 

• 

Keep the steam valve lid clean; clean it when it gets 
dirty. 

• 

Never  use  the  unit  without  the  installed  bowl,  pro-
tection  screen  and  steam  valve  lid.  Do  not  switch 
the  multicooker  on  without  products  and  sufficient 
amount of liquid in the cooking bowl.

• 

Do not use the multicooker if the silicone gasket on 
the protection screen is damaged. 

• 

Follow  the  recommendations  for  amount  of  dry 
products and liquids.

• 

Do not remove the bowl during operation.

• 

Do not cover the multicooker during operation.

• 

Attention! 

When  steam  cooking  food,  watch  the 

level of liquid in the bowl, add water to the bowl as 
needed. Do not leave the unit unattended.

• 

Do not carry the unit during operation. Use the car-
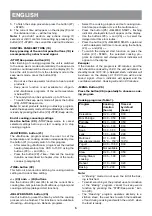
rying handle; unplug the unit, remove the bowl with 
products and let it cool down preliminary.

Summary of Contents for VT-4213 GY

Page 1: ...Vitek VT 4213 Grey...

Page 2: ...1...

Page 3: ......

Page 4: ......

Page 5: ...esistant surface away from sources of moisture heat and open flame Place the unit with free access to the mains socket Use the unit in places with proper ventilation Do not expose the unit to direct s...

Page 6: ...The bowl 3 is not intended for washing in the dishwashing machine BEFORE THE FIRST USE In case of unit transportation or storage at low tem perature it is necessary to keep it for at least two hours a...

Page 7: ...d 24 to set the current time cooking time temperature in Multicook program and cooking end time delayed start function DELAYED START button 25 Use this button to preset the time by which the cooking p...

Page 8: ...e connector 8 and the power cord plug 18 into the socket 6 To select the auto cooking program press the but ton 26 MENU consequently the flashing indi cators of cooking programs will be shown on the d...

Page 9: ...e the bowl 3 in the dishwashing ma chine Wipe the surface of the heating element 13 only when it is cold do not allow water to get inside the unit body Do not immerse the unit body 1 power cord 18 and...

Page 10: ...beim An schlie en des Ger ts an das Stromnetz Achten Sie darauf dass das Netzkabel in die An schlussstelle am Geh use des Ger ts und in die Steckdose fest gesteckt ist Benutzen Sie nur das mitgeliefe...

Page 11: ...ten Bewahren Sie das Ger t an einem trockenen k h len und f r Kinder unzug nglichen Ort auf DAS GER T IST NUR F R DEN GEBRAUCH IM HAUS HALT GEEIGNET VERWENDUNG DES BEH LTERS F R NAHRUNGSMITTELZUBEREIT...

Page 12: ...eigt und die Trennpunkte werden blinken Anmerkung Falls Sie innerhalb von 10 Sekunden die Zeit nicht eingestellt und die Zeiteinstellung durch das Dr cken der START Taste 27 nicht best tigt haben wird...

Page 13: ...der Produkte nach der Be endigung des Backen Programms zu vermeiden schalten Sie die Funktion der Tem peraturhaltung aus indem Sie die STOP Temperaturhaltung Taste 20 dr cken Das R sten Programm funk...

Page 14: ...ung wiederhergestellt wird wird der Betrieb automatisch fortgesetzt Falls die Dauer der Stromversorgungsunterbrechung 40 Minu ten bersteigt programmieren Sie das Ger t erneut 10 W hrend der Zubereitun...

Page 15: ...se des Ger ts 1 das Netzkabel 18 und den Netzstecker 18 ins Was ser oder andere Fl ssigkeiten Benutzen Sie abrasive und aggressive Waschmit tel f r die Reinigung des Ger ts und des Zubeh rs nicht AUFB...

Page 16: ...15 1 2 3 4 5 6 7 8 9 10 11 12 13 14 15 16 17 18 19 20 21 22 23 24 25 26 27 28 29 30 30 40...

Page 17: ...16 3 3 3 13 3 3 3 3 17 15 3 3 3 3 3...

Page 18: ...17 20 30 40 6 2 3 3 17 15 16 19 26 26 1 11 11 11 5 4 5 5 5 6 5 4 1 18 8 18 9 2 22 3 3 23 24 24 4 22 23 24 5 27 6 9 10 27 10 10 20 9 20 70 12 20 20 20 21 21 23 24 35 150 22 8 22...

Page 19: ...30 15 00 15 00 30 26 26 20 27 27 20 1 10 2 8 CUP 16 1 0 20 2 00 0 30 0 30 0 50 0 40 0 40 3 00 0 50 0 20 1 00 0 30 0 30 3 00 0 50 1 00 6 00 2 00 0 10 6 00 35 150 0 15 130 6 00 10 00 6 00 0 20 1 00 0 50...

Page 20: ...19 160 3 CUP 4 CUP 1 3 2 3 3 13 3 3 3 13 14 14 3 19 3 19 4 6 5 18 8 18 6 26 9 7 35 150 23 24 8 22 23 24 22 23 24 1 9 27 40 40 40 10 15 17 3 6 11 3 11 5 12 12 20 40 400 350...

Page 21: ...20 1 5 1 5 3 26 35 45 21 1 27 6 1 6 11 5 3 28 11 5 3 13 1 18 18 1 1 1 1 1 1 6 1 1 1 220 240 50 60 800 5 3 38 7 1070...

Page 22: ...21 1 2 3 4 5 6 7 8 9 10 11 12 13 14 15 16 17 18 19 20 21 22 23 24 25 26 27 28 29 30 30 40...

Page 23: ...22 3 3 3 13 3 3 3 3 17 15 3 3 3 3 3 20 30 40 2 6 3 3 17 15 16 19...

Page 24: ...23 26 26 1 11 11 11 5 4 5 5 5 6 5 4 1 18 8 18 9 2 22 3 3 23 24 24 4 22 23 24 5 27 6 9 10 27 10 10 20 9 20 70 12 20 20 20 21 21 23 24 35 150 22 8 22 23 24 23 24 25...

Page 25: ...1 0 20 2 00 0 30 0 30 0 50 0 40 0 40 3 00 0 50 0 20 1 00 0 30 0 30 3 00 0 50 1 00 6 00 2 00 0 10 6 00 35 150 0 15 130 6 00 10 00 6 00 0 20 1 00 0 50 0 05 1 00 0 20 0 10 0 40 0 20 0 25 2 00 0 50 20 27...

Page 26: ...25 3 3 13 14 14 3 19 19 3 4 6 5 18 8 18 6 26 9 7 35 150 23 24 8 22 23 24 22 23 24 1 9 27 40 40 40 10 15 17 3 6 11 3 11 5 12 12 20 40 400 350 1 5 1 5 3 26 35 45 21 1 27 6...

Page 27: ...26 1 6 11 5 3 28 5 11 3 13 1 18 18 1 1 1 1 1 1 6 1 1 1 220 240 50 60 800 5 3 i i i i i i i i i i i i i i i i 2004 108 i i i i i i 2006 95...

Page 28: ...i piese intermediare pentru conectarea aparatului la re eaua electric Ave i grij ca cablul de alimentare s fie introdus perfect n racordul de pe carcasa aparatului iar fi a cablului de alimentare s f...

Page 29: ...pela i la un centru service autorizat P stra i aparatul la un loc uscat r coros inaccesi bil pentru copii Transporta i aparatul numai n ambalajul produc torului APARATUL ESTE DESTINAT NUMAI UZULUI CAS...

Page 30: ...ece automat n regimul de men inere a tem peraturii pe display 9 va fi vizualizat num r toarea timpului de func ionare a regimului de nc lzire Pentru trecerea silit din regimul de a teptare n regimul d...

Page 31: ...P Men inere temperatur UTILIZAREA MULTICOOKER ULUI 1 A eza i alimentele necesare n bol Remarc Urm ri i ca ingredientele i lichidele s nu dep easc grada ia nivelului maxim 10 i s nu se situeze sub grad...

Page 32: ...comand s l sa i alimen tele preparate n bol pentru mult timp deoarece acest lucru poate duce la alterarea alimentelor Nu utiliza i regimul de men inere a temperaturii pen tru nc lzirea alimentelor rec...

Page 33: ...220 240 V 50 60 Hz Consum maxim de putere 800 W Capacitate bol 5 l Produc torul i rezerv dreptul s modifice designul i caracteristicile tehnice ale aparatelor f r preaviz Termenul de func ionare a apa...

Page 34: ...ejte jenom p slu enstv kter se dod v spolu s t mto spot ebi em Um s ujte p stroj na rovn m teplovzdorn m povr chu ve vzd lenosti od zdroj vody tepla a otev e n ho ohn Um s ujte p stroj tak aby elektri...

Page 35: ...m ch n potravin v n dob 3 nikdy nepou vejte kovov p edm ty kter by mohly po kodit nep il nav povlak n doby 3 Po va en j del s pou it m ko en a p sad je t eba um t n dobu 3 hned po ukon en va en Aby ne...

Page 36: ...programu Multikucha nastavte pomoc tla tek 23 a 24 po adovanou teplotu za h v n od 35 C do 150 C Stiskn te tla tko 22 as pak nastavte d lku p pravy jak je pops no v odstavci Pou it multifunk n ho hrnc...

Page 37: ...edn sti topn ho t lesa 13 je um st n teplotn sn ma 14 Dohl ejte na to aby pohybu sn ma e 14 v svisl ose nic nebr nilo 3 Pokud va te pokrm v p e dejte vlo ku s potra vinami 19 do n doby 3 do kter p ede...

Page 38: ...lici 6 vlhk m had kem pak ut ete do sucha V echny odn mateln sou stky v etn parn ho ventilu 11 ochrann clony 5 a n doby 3 ke l mk na jogurt 28 a jejich v ek umyjte teplou vo dou s neutr ln m myc m pro...

Page 39: ...38 1 2 3 4 5 6 7 8 9 10 11 12 13 14 15 16 17 1 18 19 20 21 22 23 24 25 26 27 28 29 30 30 40...

Page 40: ...39 3 3 3 13 3 3 3 3 17 15 3 3 3 3 3 20 30 40 6 2 3...

Page 41: ...40 3 17 15 16 19 26 26 1 11 11 11 5 4 5 5 5 6 5 4 1 18 8 18 9 2 22 3 3 23 24 24 4 22 23 24 5 27 6 9 10 27 10 10 20 9 20 70 12 20 20 20 21 21 23 24 35 150 22 8 22 23 24 23 24 25...

Page 42: ...1 0 20 2 00 0 30 0 30 0 50 0 40 0 40 3 00 0 50 0 20 1 00 0 30 0 30 3 00 0 50 1 00 6 00 2 00 0 10 6 00 35 150 0 15 130 6 00 10 00 6 00 0 20 1 00 0 50 0 05 1 00 0 20 0 10 0 40 0 20 0 25 2 00 0 50 20 27...

Page 43: ...42 3 13 14 14 3 19 3 19 4 6 5 18 8 18 6 26 9 7 35 15 0 23 24 8 22 23 24 22 23 24 1 9 27 40 40 40 10 15 17 3 6 11 3 11 5 12 12 20 40 400 350 1 5 1 5 3 26 35 45 21 1 27 6 1 6 11 5 3 28...

Page 44: ...43 11 5 3 13 1 18 18 1 1 1 1 1 1 6 1 1 1 220 240 50 60 800 5 3 2004 108 2006 95...

Page 45: ...44 1 2 3 4 5 6 7 8 9 10 11 12 13 14 15 16 17 18 19 20 21 22 23 24 25 26 27 28 29 30 30 40...

Page 46: ...45 3 3 3 13 3 3 3 3 17 15 3 3 3 3 3 20 30 40...

Page 47: ...46 6 2 3 3 17 15 16 19 26 26 1 11 11 11 5 4 5 5 5 6 5 4 1 18 8 18 9 2 22 3 3 23 24 24 4 22 23 24 5 27 6 9 10 27 10 10 20 9 20 70 12 20 20 20 21 21 23 24 35 150 22 8 22 23 24 23 24 25...

Page 48: ...26 1 0 20 2 00 0 30 0 30 0 50 0 40 0 40 3 00 0 50 0 20 1 00 0 30 0 30 3 00 0 50 1 00 6 00 2 00 0 10 6 00 35 150 0 15 130 6 00 10 00 6 00 0 20 1 00 0 50 0 05 1 00 0 20 0 10 0 40 0 20 0 25 2 00 0 50 20...

Page 49: ...48 13 3 3 3 13 14 14 3 19 3 19 4 6 5 18 8 18 6 26 9 7 35 150 23 24 8 22 23 24 22 23 24 1 9 27 40 40 40 10 15 17 3 6 11 3 11 5 12 12 20 40 400 350 1 5 1 5 3 26 35 45 21 1...

Page 50: ...49 27 6 1 6 11 5 3 28 11 5 3 13 1 18 18 1 1 1 1 1 1 6 1 1 1 220 240 50 60 800 5 3 i 2004 108 i i i 2006 95...

Page 51: ...ch ul ng n bo lishi k r k F q t jih zning o zig qo shib b ril dig n el ktr shnurini ishl ting b shq jih zl r el ktr shnurini ishl tm ng F q t jih zning o zig qo shib b ril dig n lin dig n qisml rni is...

Page 52: ...ql shg ishl tm ng Idishid 3 pish yotg n vq tni f q t o zig qo shib b ril dig n cho mich 17 yoki k ftgir 15 bil n r l shtiring buning uchun yog ch pl stik yoki silik n sh n sb bl ri h m ishl ts bo l di...

Page 53: ...hp z d sturi t nl ng nd n k yin 23 yoki 24 tugm sini b sib jih z ishl ydig n h r r tni t 35 C d r j d n 150 C d r j g ch b lgil b qo ying V QT tugm sini 22 b sing so ng Ko p il t m pishirgichni ishl t...

Page 54: ...n l pp kk 19 t gm ydig n qilib quyil di 4 Shiqill g n v z eshitilgunch ko p il t m pishirgich q pq g ini 6 yoping 5 El ktr shnur 18 ul gichini o rnig 8 biriktiring el ktr shnur 18 vilk sini es r z tk...

Page 55: ...vushini kutib turing Jih z k rpusi 1 bil n q pq g ini 6 n m m t bil n rting so ng quruq m t bil n rtib quriting lin dig n qisml rining h mm sini bug kl p nini 11 b rkitgich to siqni 5 idishini 3 y gur...

Page 56: ...ii este indicat n num rul de serie pe tabelul cu datele tehnice Num rul de serie reprezint un num r din unsprezece cifre primele patru cifre indic nd data fabric rii De exemplu dac num rul de serie es...

Page 57: ......

Page 58: ......
Reviews: