5
ENGLISH
•
The lid, the bowl and body parts heat up during op-
eration, do not touch them, if you need to take out
the hot bowl, use potholders.
•
Clean the unit regularly.
•
Never allow children to use the unit as a toy.
•
For children safety reasons do not leave polyethyl-
ene bags, used as a packaging, unattended.
•
Attention!
Do not allow children to play with poly-
ethylene bags or packaging film.
Danger of suf-
focation!
•
This unit is not intended for usage by children or
disabled persons unless they are given all the nec-
essary and understandable instructions by a person
who is responsible for their safety on safety mea-
sures and information about danger that can be
caused by improper usage of the unit.
•
Do not use the unit outdoors.
•
To avoid damages, transport the unit in original
package only.
•
Never pull the power cord, when disconnecting the
unit from the mains, take the power plug and care-
fully pull it out of the socket.
•
Never use the unit if the power cord or the power
plug is damaged, if the unit works improperly or af-
ter it was dropped. Do not try to repair the unit by
yourself. Contact an authorized service center for
all repair issues.
•
Keep the unit away from children in a dry cool place.
•
Transport the unit in original package only.
THE UNIT IS INTENDED FOR HOUSEHOLD USAGE ONLY
USING OF THE COOKING BOWL (3)
•
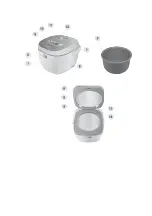
Use the multicooker and its removable parts for the
intended purposes only.
•
Do not use the bowl (3) with other heating units or
cooking surfaces.
•
Do not use other containers for cooking instead of
the bowl (3).
•
Always make sure that the heating element (13)
surface and the bottom of the bowl (3) are clean
and dry.
•
To avoid damage of the non-stick coating never
chop hard products in the bowl (3).
•
Never leave or keep any foreign objects in the bowl
(3).
•
During cooking stir the products in the bowl (3) only
with the spatula (17) or the soup ladle (15). You can
also use wooden, plastic or silicon accessories.
•
Do not stir the products in the bowl (3) with metal
objects which can scratch the non-stick coating of
the bowl (3).
•
After cooking dishes with spices and seasonings
wash the bowl (3) right after cooking.
•
To avoid damage of the non-stick coating do not put
the bowl (3) into cold water right after cooking, let it
cool down preliminary.
•
The bowl (3) is not intended for washing in the
dishwashing machine.
BEFORE THE FIRST USE
In case of unit transportation or storage at low tem-
perature it is necessary to keep it for at least two
hours at room temperature before switching on.
–
Unpack the unit, remove any stickers and package
materials that can prevent multicooker operation.
–
Place the multicooker on the flat, heat-resistant
surface away from all kitchen heat sources (gas
cooker, electric cooker or cooking unit).
–
Place the multicooker keeping at least 20 cm gap
between the multicooker body and the wall and 30-
40 cm gap above the unit.
–
Do not place the multicooker close to the objects
that can be damaged by the released steam of high
temperature.
Attention! Do not use the unit near bath tubs,
kitchen sinks or other containers filled with water.
–
Open the lid (6) by pressing the button (2) and re-
move the bowl (3).
–
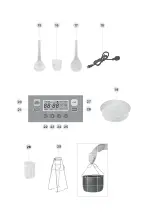
Wash all removable parts with warm water and neu-
tral detergent: the bowl (3), the spatula (17), the
soup ladle (15), the measuring cup (16) and the
steam cooking basket (19). Then rinse them under
running water and dry.
–
Before making yogurt wash the cups (26) and the
lids with warm water and neutral detergent.
–
Disinfect the cups (26) and the lids; to do this, scald
them.
–
Dry all the removable parts thoroughly.
–
Clean the unit body (1) with a damp cloth and then
wipe it dry.
–
Remove the steam valve (11), dismantle it by turning
its bottom part in the direction of the arrow «
».
Wash the valve with warm water and neutral deter-
gent. Assemble the valve (11) by turning the bottom
part in the direction of the arrow «
» and set the
valve (11) back to its place.
–
Remove the protection screen (5) by pressing the
clamps (4). Wash the protection screen (5) with
warm water and neutral detergent, dry it and set the
screen (5) back to its place: insert the upper part of
the protection screen (5) into the grooves on the lid
(6), press on the bottom part of the screen (5) until
the clamps (4) click.
CURRENT TIME SETTING
1. Insert the power cord (18) jack into the connector (8)
and connect the power cord (18) plug to the mains,
the display (9) illumination will light up and you will
hear a sound signal.
2. Press and hold the button (22) «TIME» for about 3
seconds, there will be a short sound signal, and digi-
tal «hours» value will be flashing.
3. Set the current «hours» (24 Hr) by pressing or hold-
ing the buttons (23) «+» or (24) «-» consequently.
4. Press the button (22) «TIME» again and then set the
current «minutes» value with the buttons (23) «+»
or (24) «-».
Summary of Contents for VT-4213 GY
Page 1: ...Vitek VT 4213 Grey...
Page 2: ...1...
Page 3: ......
Page 4: ......
Page 16: ...15 1 2 3 4 5 6 7 8 9 10 11 12 13 14 15 16 17 18 19 20 21 22 23 24 25 26 27 28 29 30 30 40...
Page 17: ...16 3 3 3 13 3 3 3 3 17 15 3 3 3 3 3...
Page 22: ...21 1 2 3 4 5 6 7 8 9 10 11 12 13 14 15 16 17 18 19 20 21 22 23 24 25 26 27 28 29 30 30 40...
Page 23: ...22 3 3 3 13 3 3 3 3 17 15 3 3 3 3 3 20 30 40 2 6 3 3 17 15 16 19...
Page 39: ...38 1 2 3 4 5 6 7 8 9 10 11 12 13 14 15 16 17 1 18 19 20 21 22 23 24 25 26 27 28 29 30 30 40...
Page 40: ...39 3 3 3 13 3 3 3 3 17 15 3 3 3 3 3 20 30 40 6 2 3...
Page 44: ...43 11 5 3 13 1 18 18 1 1 1 1 1 1 6 1 1 1 220 240 50 60 800 5 3 2004 108 2006 95...
Page 45: ...44 1 2 3 4 5 6 7 8 9 10 11 12 13 14 15 16 17 18 19 20 21 22 23 24 25 26 27 28 29 30 30 40...
Page 46: ...45 3 3 3 13 3 3 3 3 17 15 3 3 3 3 3 20 30 40...
Page 57: ......
Page 58: ......


