6
ENGLISH
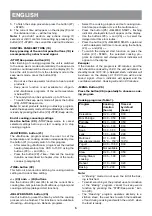
5. To finish the setup procedure press the button (27)
«START».
6. The current time will appear on the display (9) and
the divisional dots «:» will be flashing.
Note:
If you didn’t perform any actions during 10
seconds or didn’t confirm time setting by pressing the
button (27) «START», the current time will not be shown.
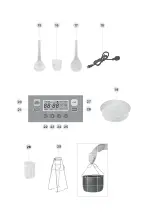
CONTROL PANEL BUTTONS (10)
Every pressing of the control panel buttons (10) is
accompanied by a short sound signal.
«STOP/Keep warm» button (20)
After finishing of cooking program the unit is switched
to the keep warm mode automatically, the keep warm
duration countdown will be shown on the display (9). To
force the unit to switch from the standby mode to the
keep warm mode, press the button (20).
Note
:
–
Do not use the keep warm function to heat up cold
products.
–
Keep warm function is not available for «Yogurt»
and «Multicook» programs (if the set temperature
is below70°С)
–
The ready dish can be kept warm up to 12 hours.
–
To switch the keep warm mode off press the button
(20) «STOP/Keep warm».
Note
: To avoid products burning in «Baking» program,
switch the keep warm mode off immediately after the dish
is ready by pressing the button (20) «STOP/Keep warm».
End of cooking/canceling settings
Use the button (20)
«STOP/Keep warm» to cancel
selected settings before you start cooking or to stop
cooking program.
«MULTICOOK» button (21)
The «Multicook» program allows the user to set the
temperature and cooking duration independently. Use
the button (21) to quickly switch to this program.
–
After selecting «Multicook» program set the desired
heating temperature from 35°С to 150°С using the
buttons (23) «+» and (24) «-».
–
Press the button (22) «Time», then set the cooking
duration as described in chapter «Use of the multi-
cooker» (paragraph 8).
«TIME» button (22)
This button is intended for switching to cooking duration
setting and current time setting.
«+» (23) and «-» (24) buttons
Use the buttons (23) and (24) to set the current time,
cooking time, temperature (in «Multicook» program) and
cooking end time (delayed start function).
«DELAYED START» button (25)
Use this button to preset the time by which the cooking
process is to be finished. This function is not available in
«Roasting», «Baking» and «Reheat» programs.
•
Select the cooking program and set cooking dura-
tion time (see chapter «Use of the multicooker»).
•
Press the button (25) «DELAYED START», flashing
indicator «Delayed start» will appear on the display.
•
Use the buttons (23) «+» and (24) «-» to select the
delayed start time in minutes.
•
Press the button (25) «DELAYED START» again and
set the delayed start time in hours using the buttons
(23) «+» and (24) «-».
•
To switch the delayed start function on press the
button (27) «START», the selected cooking pro-
gram, its duration and «Delayed start» indicator will
appear on the display.
Example:
If the duration of the program is 30 minutes, and the
dish should be cooked by 15:30, the unit will remain in
standby mode till 15:00, («Delayed start» indicator will
be shown on the display). At 15:00 there will be one
sound signal, «Timer» indicator will appear and the
countdown will start. Cooking will end in 30 minutes.
«MENU» Button (26)
Press the button (26) repeatedly to choose a cook-
ing program.
Cooking programs (Table 1).
Program
Cooking
duration
(hours)
Time set
by default
(hours)
Cereal/rice
0:20 – 2:00
0:30
Milk Porridge
0:30 – 0:50
0:40
Porridge
0:40 – 3:00
0:50
Pilau
0:20 – 1:00
0:30
Soup
0:30 - 3:00
0:50
Jelly
1:00 – 6:00
2:00
Multicook
(time/temperature)
0:10 – 6:00
35°С – 150°С
0:15
130°С
Yogurt
6:00 – 10:00
6:00
Roasting
Not available
Stew
0:20 – 1:00
0:50
Boiling/Steam
cooking
0:05 – 1:00
0:20
Reheat
0:10 – 0:40
0:20
Baking
0:25 -2:00
0:50
Note:
–
In “Baking” mode do not open the lid till the bak-
ing is finished.
–
To avoid scorching of the product upon termination
of the “Baking” program, cancel the keep warm
function by pressing the “STOP/Keep warm” but-
ton (20).
–
The “Roasting” program operates similarly to a
kitchen stove, the user has to watch the readiness
of food during cooking and switch the unit off, when
the food is ready.
Summary of Contents for VT-4213 GY
Page 1: ...Vitek VT 4213 Grey...
Page 2: ...1...
Page 3: ......
Page 4: ......
Page 16: ...15 1 2 3 4 5 6 7 8 9 10 11 12 13 14 15 16 17 18 19 20 21 22 23 24 25 26 27 28 29 30 30 40...
Page 17: ...16 3 3 3 13 3 3 3 3 17 15 3 3 3 3 3...
Page 22: ...21 1 2 3 4 5 6 7 8 9 10 11 12 13 14 15 16 17 18 19 20 21 22 23 24 25 26 27 28 29 30 30 40...
Page 23: ...22 3 3 3 13 3 3 3 3 17 15 3 3 3 3 3 20 30 40 2 6 3 3 17 15 16 19...
Page 39: ...38 1 2 3 4 5 6 7 8 9 10 11 12 13 14 15 16 17 1 18 19 20 21 22 23 24 25 26 27 28 29 30 30 40...
Page 40: ...39 3 3 3 13 3 3 3 3 17 15 3 3 3 3 3 20 30 40 6 2 3...
Page 44: ...43 11 5 3 13 1 18 18 1 1 1 1 1 1 6 1 1 1 220 240 50 60 800 5 3 2004 108 2006 95...
Page 45: ...44 1 2 3 4 5 6 7 8 9 10 11 12 13 14 15 16 17 18 19 20 21 22 23 24 25 26 27 28 29 30 30 40...
Page 46: ...45 3 3 3 13 3 3 3 3 17 15 3 3 3 3 3 20 30 40...
Page 57: ......
Page 58: ......


