7
ENGLISH
–
Do not use the keep warm mode to heat up cold
products.
–
See recipes of dishes in the recipe book (sup-
plied with the unit). All recipes are given for ref-
erence as the required amount and proportions
of the ingredients may vary depending on lo-
cal peculiarities of the food and altitude above
sea level.
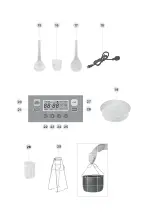
«START» Button (27)
Switch the selected cooking program on, pressing the
button (27) «START» once. After a cooking program is
finished the multicooker is switched to the keep warm
mode automatically (except «Yogurt» and «Multicook»
programs).
To switch the selected mode off press the “STOP/Keep
warm” button (20).
USE OF THE MULTICOOKER
1. Put the necessary products into the bowl.
Note
: Make sure that the products and liquids do not
exceed the maximal mark «10» level and are not below
the minimal level mark «2». The maximal mark for dif-
ferent porridges (except rice) - «8 CUP».
General example of loading cereals and required
amount of water (as example rice is considered):
–
Measure rice with the measuring cup (16) (one
measuring cup is equal to approximately 160 g of
rice), wash it and place in the casserole.
–
Add water, using the scale on the bowl (3) with
marks in cups (CUP). The scale has graduation,
marking proportions of rice and water.
For example:
–
After putting four measuring cups of rice, pour wa-
ter till «4 cups» mark on the «CUP» scale.
–
For cooking thin milk porridges the recommended
proportion of rice and water is 1:3.
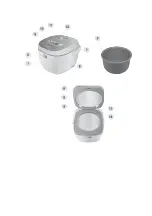
2. Place the bowl (3) in the process chamber. Make
sure that the bowl (3) is placed evenly and is in se-
cure contact with heating element (13) surface.
Note:
–
Do not use the bowl (3) for washing cereals and do
not chop products in it, this can damage the non-
stick coating;
–
Make sure that there are no foreign objects, dirt or
moisture in the process chamber and on the bottom
of the bowl (3);
–
Wipe the outer surface and the bottom of the bowl
(3) dry before use.
–
In the middle of the heating element (13) there is a
temperature sensor (14). Make sure that the verti-
cal movement of the sensor (14) is not hindered.
3. If you steam cook products, install the basket (19)
with products preliminary pouring water in the bowl
(3) so that boiling water doesn’t reach the bottom of
the basket (19).
4. Close the multicooker lid (6) until click.
5. Insert the power cord jack into the connector (8) and
the power cord plug (18) into the socket.
6. To select the auto cooking program, press the but-
ton (26) «MENU» consequently, the flashing indi-
cators of cooking programs will be shown on the
display (9).
7. In «Multicook» program you can set cooking temper-
ature from 35°С to 150°С. To do this use the buttons
(23) «+» and (24) «-» to set the required temperature.
8. Time in cooking programs is set by default, but it can
be changed. To change the cooking duration press
the button (22) «TIME» and then set necessary cook-
ing time in minutes with the buttons (23) «+» and (24)
«-». Press the button (22) «TIME» again and set the
cooking time in hours using the buttons (23) «+» and
(24) «-» (see table 1).
9. Press the button (27) «START» to start cooking.
Note:
If an emergency power cutoff happens during
cooking, the unit keeps the cooking program settings
for 40 minutes. If the power gets normal within 40 min-
utes after the cutoff, the unit will continue operating
automatically. If the emergency power cutoff lasts more
than 40 minutes, preset the unit again.
10. Watch the food during cooking and, if necessary, stir
the products with the plastic soup ladle (15) or spat-
ula (17).
Do not use metal objects that can scratch
the non-stick coating of the bowl (3).
Attention!
•
Never leave the operating unit unattended.
•
To avoid burns be very careful when opening the
lid (6), do not bend over the steam valve (11)
during multicooker operation and do not place
open parts of your body above the bowl (3)!
•
During the first operation of the multicooker
some foreign smell from the heating element
can appear. It is normal.
11. When the cooking is finished you will hear 5 sound
signals, and the unit will be switched to the keep
warm mode, operation time in keep warm mode will
be shown on the display.
Note:
–
Despite the unit keeps the ready dish warm for 12
hours, it is not recommended to leave the cooked
food in the bowl for a long time, because this may
spoil the food.
–
Do not use the keep warm mode to heat up cold
products.
–
After steam cooking do not remove the food with
bare hands, use kitchen tools.
12. If you need to stop the cooking program, press the
button (20) «STOP».
RECOMMENDATIONS
You can use «Yogurt» and «Multicook» programs for
dough proofing.
Dough proofing is a stage of dough making which
takes place right before baking. During the proofing the
dough ferments intensively, restores its structure and
grows in size significantly. One of the main conditions of
successful process is no draughts and maintenance of
Summary of Contents for VT-4213 GY
Page 1: ...Vitek VT 4213 Grey...
Page 2: ...1...
Page 3: ......
Page 4: ......
Page 16: ...15 1 2 3 4 5 6 7 8 9 10 11 12 13 14 15 16 17 18 19 20 21 22 23 24 25 26 27 28 29 30 30 40...
Page 17: ...16 3 3 3 13 3 3 3 3 17 15 3 3 3 3 3...
Page 22: ...21 1 2 3 4 5 6 7 8 9 10 11 12 13 14 15 16 17 18 19 20 21 22 23 24 25 26 27 28 29 30 30 40...
Page 23: ...22 3 3 3 13 3 3 3 3 17 15 3 3 3 3 3 20 30 40 2 6 3 3 17 15 16 19...
Page 39: ...38 1 2 3 4 5 6 7 8 9 10 11 12 13 14 15 16 17 1 18 19 20 21 22 23 24 25 26 27 28 29 30 30 40...
Page 40: ...39 3 3 3 13 3 3 3 3 17 15 3 3 3 3 3 20 30 40 6 2 3...
Page 44: ...43 11 5 3 13 1 18 18 1 1 1 1 1 1 6 1 1 1 220 240 50 60 800 5 3 2004 108 2006 95...
Page 45: ...44 1 2 3 4 5 6 7 8 9 10 11 12 13 14 15 16 17 18 19 20 21 22 23 24 25 26 27 28 29 30 30 40...
Page 46: ...45 3 3 3 13 3 3 3 3 17 15 3 3 3 3 3 20 30 40...
Page 57: ......
Page 58: ......


