6
ENGLISH
•
Do not place the multicooker close to the objects
that can be damaged by the released steam of
high temperature.
Attention! Do not place the unit near bath tubs,
kitchen sinks or other containers filled with wa-
ter.
•
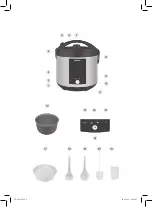
Open the lid (4) by pressing the button (5) and
pulling the handle (6).
•
Wash all removable parts with a soft sponge with
neutral detergent: bowl (12), steam cooking bas-
ket (17), soup ladle (18), spatula (19), measuring
cup (20) and cups with lids (21). Then rinse them
under running water and dry.
•
Clean the unit body with a damp cloth, then wipe
it dry.
USE OF THE MUL
TICOOKER
Put the food into the bowl (12) following the recom-
mendations given in the recipe (see “Recipe book”).
Note
:
Make sure that the ingredients and liquids
level does not exceed the maximal mark «1.8»
and is not lower than the minimal mark «0.6».
Maximal level mark for porridges (except rice)
is «1.4»
General example of loading products and wa-
ter (rice is considered as example)
Measure rice with the measuring cup (20) (one
measuring cup is equal to approximately 160
grams of rice), wash it and place in the casserole.
The level of water needed for a certain amount of
rice (measured in the cups «CUP») is indicated on
the scale inside the bowl (12). Pour water in up to
the corresponding mark.
Example
: Put four measuring cups of rice, pour
water up to the (cup) graduating mark «4 CUP».
For liquid porridges it is recommended to use rice
and water in the proportion 1:3.
Install the bowl (12) in the process chamber. Make
sure that the outer surface of the bowl is clean and
dry, and the bowl itself is installed evenly and is in
secure contact with heating element (10) surface.
Notes:
- do not use the bowl (12) for washing cereals
and do not chop products in it, this can dam-
age the non-stick coating.
- make sure that there are no foreign objects,
dirt or moisture in the process chamber and on
the bottom of the bowl (12).
- wipe the outer surface and the bottom of the
bowl (12) dry before use.
- in the middle of the heating element (10)
there is a temperature sensor (11). Make sure
that the movement of the sensor is not limited.
•
If you steam products, pour water into the bowl
(12) so that boiling water doesn’t reach the bot-
tom of the basket (17). Put the food into the bas-
ket (17) and install it in the bowl (12).
•
Close the lid (4) until click.
•
Insert the power cord jack into the connector (9)
and the power cord plug into the socket. You will
hear a sound signal, the «----» symbols will light
up on the display (3).
•
Switch the unit on by touching the button (16)
, the display will show the symbols “88:88”.
•
Touch the button (13) “MENU” to go to the menu
of auto-programs, the display (3) will show the
flashing “Rice” indicator.
•
Select the cooking program by touching the but-
tons (14) «-/+». The indicator of the selected pro-
gram will be flashing and the display (3) will show
the cooking time set by default.
•
Touch the button (16), the cooking time indica-
tions will be flashing.
•
Use the buttons (14) «-/+» to set the cooking
time.
Note: Setting of the cooking time is not avail-
able for the program “Rice.” Skip steps 9, 10.
To go to the delayed start setting, touch the button
(15) “DELAYED START”, the indicator
will appear
on the display.
Use the buttons (14) “+/-” to set the time after which
the cooking will finish.
Note:
If you want to start cooking immediately, skip
steps 11 and 12.
Delayed start function is not available for the
programs “Jam”, “Roasting”, “Jelly”, “Cottage
cheese”, “Baking”, “Baby food”, “Sauce”,
“Fondue” and “Yogurt”.
To save the settings and switch the cooking pro-
gram on, touch the button (16) , the display will
show the remaining time indication (for all programs
except the “Rice”). If you have activated the delayed
start function, the display will also show the symbol
and the countdown time remaining till the start of
the cooking program, when the unit switches to the
cooking of food, the symbol
will go out.
To switch the cooking off, press the button (16) and
hold it for 3 seconds.
Sound signals will notify on finishing of cooking, the
unit will be automatically switched to the keep warm
mode, the display (3) will show the symbol
, as
well as the multicooker operation time in the heating
mode (up to 24 hours).
Note: The keep warm function is not available
VT-4216.indd 6
18.12.2013 10:15:48
Summary of Contents for VT-4216 CM
Page 1: ...1 VT 4216 CM 3 9 16 22 29 35 41 47 53 Multicooker VT 4216 indd 1 18 12 2013 10 15 46...
Page 2: ...VT 4216 indd 2 18 12 2013 10 15 47...
Page 17: ...17 8 8 12 10 VT 4216 indd 17 18 12 2013 10 15 49...
Page 23: ...23 8 8 12 10 18 19 VT 4216 indd 23 18 12 2013 10 15 50...
Page 42: ...42 8 8 12 10 18 19 VT 4216 indd 42 18 12 2013 10 15 52...
Page 48: ...48 8 8 12 10 18 19 VT 4216 indd 48 18 12 2013 10 15 53...
Page 60: ...2013 GOLDER ELECTRONICS LLC 2013 VT 4216 indd 60 18 12 2013 10 15 54...

