background image

7

ENGLISH          

for  the  programs  “Reheat”,  “Jam”,  “Jelly”, 
“Roasting”, “Cottage cheese”, “Canning” and 
“Yogurt”.

 To cancel the keep warm mode, press and hold the 
button (16)  . 

Note:

– 

Despite the unit keeps the ready dish warm 
for 24 hours, it is not recommended to leave 
the cooked food in the bowl for a long time, 
because this may spoil the food.

– 

Do not use the keep warm function to reheat 
products.

Attention!


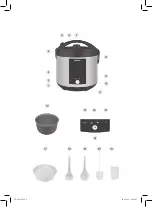
 Never leave the operating unit unattended.


 To avoid burns be very careful when opening the 
lid (4), do not bend over the steam valve (7) dur-
ing multicooker operation and do not place open 
parts of your body above the bowl (12)! 


  During  the  first  operation  of  the  multicooker 
some foreign smell from the heating element can 
appear. It is normal.


 Watch the food during cooking and, if necessary, 
stir the products with the plastic soup ladle (18) 
or spatula (19). Do not use metal objects that can 
scratch the non-stick coating of the bowl (12).


 Do not leave the lid of the unit during operation 
open  except  the  “Fondue”  and  “Roasting”  pro-
grams.


You may use holder on the unit body to keep 
the soup ladle (18) and spatula (19).

“YOGURT” PROGRAM


Pour leaven and milk into the cups (21) in the pro-
portion 1:10. 

Note

:  Use  natural  yogurt  with  minimum  shelf-life, 

free  of  additives  and  coloring  agents  as  a  leaven. 
You can make leaven by yourself from special bac-
teria leaven (you can find it in a drugstore or in health 
food stores) following the instructions attached.


Install the filled cups (21) without the lids into the 
bowl (12).


Install  the  bowl  (12)  into  the  process  chamber, 
select the “Yogurt” program and set the cooking 
time (see “Use of the multicooker”).


Attention! Do not move the multicooker dur-
ing operation in the “Yogurt” program.


Cover cups containing ready yogurt with lids and 
place  them  into  the  fridge  for  several  hours  to 
stop bacteria growth.


You  can  add  fruits,  jam  and  honey  to  the  ready 
natural yogurt. 

“FONDUE” PROGRAM

The unit is intended to cook the cheese fondue and 
fondue with broth or vegetable oil. This program al-
lows to select the heating temperature ranging from 
70°C  to  150°C.  The  recommended  temperature  for 
cheese fondue is from 70°C to 80°C.


You can preliminarily marinade meat, shrimps or 
fish. Cut the products into small pieces of equal 
size. 


Do not use frozen products for making fondue. 


Pick  the  shrimps,  pieces  of  meat,  fish  or  veg-
etables  with  the  special  metal  forks  for  fondue 
or skewers. 


Products, strung on the forks, dip in the heated 
broth/oil/cheese.

«MUL

TICOOK» PROGRAM

The “Multicook” program allows you to change the 
temperature and cooking time within the range from 
30°C  to  150°C  in  accordance  with  your  needs  and 
preferences. 

Use of the unit in the “Fondue” and “Multicook” 
programs


Open the lid (4).


Install the bowl (12) in the process chamber.


Put  the  food  into  the  bowl  (12)  (see  “Recipe 
book”).  The  volume  of  products  must  not  be 
above  the  maximum  mark  and  below  the  mini-
mum mark. 


If  you  are  cooking  in  the  “Multicook”  program, 
close the lid (4) tightly. If you are making fondue, 
leave the lid (4) open.


Switch the unit on by touching the button (16) 


Touch the «MENU» button (13).


By  touching  the  buttons  «-/+»  (14),  select  the 
«Fondue» or «Multicook» cooking program.


Touch  the  (16)  button 

,  the  display  will  show 

the  flashing  temperature  indication  “100°C”.  By 
touching the buttons (14) “-/+”, set the tempera-
ture of heating. 


Touch  the  (16)  button 

,  the  display  will  show 

the indications of the operation time.


Use  the  buttons  «-/+»  (14)  to  set  the  operation 
time.


Touch the button (16) 

 to launch the program.


If you are making fondue, wait until the cheese is 
melted and soup/oil heats up.

Note: 
If you are making fondue, regularly stir the mix-
ture of cheese and wine. Avoid vigorous boiling 
of liquids. If necessary, decrease the tempera-

VT-4216.indd   7

18.12.2013   10:15:48

Summary of Contents for VT-4216 CM

Page 1: ...1 VT 4216 CM 3 9 16 22 29 35 41 47 53 Multicooker VT 4216 indd 1 18 12 2013 10 15 46...

Page 2: ...VT 4216 indd 2 18 12 2013 10 15 47...

Page 3: ...ts To avoid fire do not use adapters for connecting the unit to the mains Place the unit on a flat heat resistant surface away from moisture and heat sources and open flame Place the unit with free ac...

Page 4: ...film Danger of suf focation To avoid damages transport the unit in original package only Never use the unit if the power cord or the plug is damaged the unit works improperly or after it was dropped D...

Page 5: ...storage at low tem perature it is necessary to keep it for at least two hours at room temperature before switching on Unpack the unit remove any stickers and pack age materials that can prevent multi...

Page 6: ...is a temperature sensor 11 Make sure that the movement of the sensor is not limited If you steam products pour water into the bowl 12 so that boiling water doesn t reach the bot tom of the basket 17 P...

Page 7: ...to the fridge for several hours to stop bacteria growth You can add fruits jam and honey to the ready natural yogurt FONDUE PROGRAM The unit is intended to cook the cheese fondue and fondue with broth...

Page 8: ...not immerse the unit body power cord and plug into water or any other liquids Do not use abrasive and aggressive detergents for washing of the unit and accessories STORAGE Unplug the unit and clean i...

Page 9: ...Sie keine Adapterstecker beim Anschlie en des Ger ts ans Stromnetz Achten Sie darauf dass das Netzkabel in die Anschlussstelle am Geh use des Ger ts und in die Steckdose fest gesteckt ist Benutzen Sie...

Page 10: ...Reinigen Sie das Ger t regelm ig Es ist nicht gestattet das Ger t drau en zu benut zen Lassen Sie Kinder das Ger tegeh use und das Netzkabel w hrend des Betriebs nicht ber hren Dieses Ger t ist nicht...

Page 11: ...ie Startr ckstellung Funktion ein STARTR CKSTELLUNG Taste 15 Sie k nnen die Zeit nach der das gew hlte Koch programm beginnt einstellen Die Zeit wird im Be reich von 1 Stunde bis 24 Stunden mit dem Sc...

Page 12: ...mit Wasser gef llten Beh ltern aufzustellen ffnen Sie den Deckel 4 indem Sie die Taste 5 dr cken und den Griff 6 ziehen Waschen Sie alle abnehmbaren Teile den Beh lter 12 die Schale f rs Dampfkochen 1...

Page 13: ...s Programm Falls Sie die Startr ckstellung Funktion aktiviert haben werden auch das Symbol und die zur ckgez hlte Zeit bis zum Start des Kochprogramms auf dem Bildschirm angezeigt wenn das Ger t zur N...

Page 14: ...Beh lter 12 ein siehe das Kochbuch Der Stand von Nahrungsmitteln soll nicht ber der Maximalmarke und nicht unter der Minimalmarke liegen Falls Sie im Multikoch Programm kochen machen Sie den Deckel 4...

Page 15: ...sanleitung 1 St TECHNISCHE EIGENSCHAFTEN Stromversorgung 220 240 V 50 60 Hz Maximale Aufnahmeleistung 900 W Fassungsverm gen des Beh lters 5 l Der Hersteller beh lt sich das Recht vor Design und techn...

Page 16: ...16 1 2 3 4 5 6 7 8 9 10 11 12 13 14 15 16 17 18 19 20 21 30 VT 4216 indd 16 18 12 2013 10 15 49...

Page 17: ...17 8 8 12 10 VT 4216 indd 17 18 12 2013 10 15 49...

Page 18: ...00 0 20 0 15 0 40 0 20 0 10 2 00 0 40 0 30 2 30 0 10 0 10 0 45 0 45 0 40 2 00 0 30 0 15 1 00 4 00 4 00 8 00 0 20 0 15 1 00 0 20 0 15 0 40 0 05 0 05 0 30 0 30 0 20 4 00 8 00 6 00 12 00 1 00 1 00 5 00...

Page 19: ...19 4 16 20 30 40 4 5 6 12 17 18 19 20 21 12 1 8 0 6 1 4 20 160 CUP 12 4 CUP 1 3 12 10 12 12 12 10 11 12 17 17 12 4 9 3 16 88 88 VT 4216 indd 19 18 12 2013 10 15 49...

Page 20: ...20 13 3 14 3 16 14 9 10 15 14 11 12 16 16 3 3 24 16 24 4 7 12 18 19 12 19 18 21 1 10 21 12 12 VT 4216 indd 20 18 12 2013 10 15 50...

Page 21: ...21 70 150 70 80 30 C 150 C 4 12 12 4 4 16 13 14 16 100 14 16 14 16 8 7 LOOSEN TIGHTEN 7 1 4 12 1 1 1 1 1 1 6 6 1 220 240 50 60 900 5 3 38 7 1070 VT 4216 indd 21 18 12 2013 10 15 50...

Page 22: ...22 1 2 3 4 5 6 7 8 9 10 11 12 13 14 15 16 17 18 19 20 21 30 VT 4216 indd 22 18 12 2013 10 15 50...

Page 23: ...23 8 8 12 10 18 19 VT 4216 indd 23 18 12 2013 10 15 50...

Page 24: ...0 20 0 15 0 40 0 20 0 10 2 00 0 40 0 30 2 30 0 10 0 10 0 45 0 45 0 40 2 00 0 30 0 15 1 00 4 00 4 00 8 00 0 20 0 15 1 00 0 20 0 15 0 40 0 05 0 05 0 30 0 30 0 20 4 00 8 00 6 00 12 00 1 00 1 00 5 00 0 3...

Page 25: ...25 4 16 20 30 40 5 6 4 12 17 18 19 20 21 12 1 8 0 6 1 4 20 160 CUP 12 4 CUP 1 3 12 10 12 12 12 10 11 12 17 17 12 VT 4216 indd 25 18 12 2013 10 15 50...

Page 26: ...26 4 9 3 16 88 88 13 3 14 3 16 14 9 10 15 14 11 12 16 16 3 3 24 16 24 4 7 12 18 19 12 19 18 21 1 10 21 12 VT 4216 indd 26 18 12 2013 10 15 50...

Page 27: ...27 12 70 150 70 80 30 C 150 C 4 12 12 4 4 16 13 14 16 100 14 16 14 16 8 7 LOOSEN TIGHTEN 7 1 4 12 VT 4216 indd 27 18 12 2013 10 15 51...

Page 28: ...28 1 1 1 1 1 1 6 6 1 220 240 50 60 900 5 3 i i i i i i i i i i i i VT 4216 indd 28 18 12 2013 10 15 51...

Page 29: ...mentare s fie introdus perfect n racordul de pe carcasa aparatului iar fi a cablului de alimentare s fie introdus n priza electric Utiliza i doar cablul de alimentare furnizat mpreun cu aparatul i nu...

Page 30: ...a aparatului i despre riscurile care pot ap rea n caz de folosire inadecvat Copiii trebuie supraveghea i pentru a nu se juca cu aparatul Din motive de siguran a copiilor nu l sa i pungile de polietile...

Page 31: ...ul de ndat ce alimentele vor fi gata Nu l sa i aparatul f r supraveghere Nu deschide i capacul 4 n timpul func ion rii n programul COPTURI Pentru ca alimentele s nu se ard dup ncheierea func ion rii...

Page 32: ...erioar a bolului este uscat i curat iar bolul este instalat f r nclin ri i ader etan la suprafa a elementului de nc lzire 10 Remarci nu utiliza i bolul 12 pentru sp larea crupelor i nu t ia i n acesta...

Page 33: ...l procura i n farmacii sau ma gazinele de alimenta ie s n toas urm nd instruc iu nile anexate Instala i p h ru ele 21 umplute f r capace n bol 12 Instala i bolul 12 n camera activ selecta i pro gramul...

Page 34: ...un material moale uscat nici ntr un caz nu permite i p trunderea apei n inte riorul carcasei aparatului Nu scufunda i carcasa aparatului cablul de alimen tare i fi a cablului de alimentare n ap sau a...

Page 35: ...Pou vejte jenom p vodn kabel jen je sou st balen nepou vejte p vodn kabel od jin ch p stroj Aby nedo lo k po ru nepou vejte adapt ry p i p ipojen p stroje k elektrick z suvce Um s ujte p stroj na rov...

Page 36: ...i balen Upozorn n Nedovolujte d tem aby si hr ly s igeli tov mi s ky a balic foli Nebezpe zadu en Aby nedo lo k po kozen p epravujte p stroj jenom v origin ln m obalu Nikdy nepou vejte p stroj s po ko...

Page 37: ...plot po dobu nejm n dvou hodin Vyndejte p stroj z obalu odstra te ve ker n lepky a obalov materi ly p ek ej c norm l n mu provozu multifunk n ho hrnce Um st te multifunk n hrnec na rovn m tep lovzdorn...

Page 38: ...7 a vlo te ji do n doby 12 Zav ete poklici 4 tak aby se ozvalo klapnut Zapojte konektor p vodn ho kabelu do p pojky 9 a vidlici p vodn ho kabelu zapojte do elektrick z suvky P itom se ozve zvukov t n...

Page 39: ...nakl dan maso krevety nebo ryby Nakr jejte potraviny na men kousky stejn velikosti Nikdy nepou vejte pro fondue zmrazen potra viny Krevety men kousky masa ryb nebo zeleniny nap chn te na speci ln kov...

Page 40: ...hladn m m st mimo dosah d t OBSAH BALEN Multifunk n parn hrnec 1 kus N doba 1 kus Vlo ka pro va en v p e 1 kus Nab ra ka 1 kus Obrace ka 1 kus Odm rka 1 kus Kel mky na jogurt 6 kus V ka kel mk 6 kus U...

Page 41: ...41 1 2 3 4 5 6 7 8 9 10 11 12 13 14 15 16 17 18 19 20 21 30 VT 4216 indd 41 18 12 2013 10 15 52...

Page 42: ...42 8 8 12 10 18 19 VT 4216 indd 42 18 12 2013 10 15 52...

Page 43: ...00 0 20 0 15 0 40 0 20 0 10 2 00 0 40 0 30 2 30 0 10 0 10 0 45 0 45 0 40 2 00 0 30 0 15 1 00 4 00 4 00 8 00 0 20 0 15 1 00 0 20 0 15 0 40 0 05 0 05 0 30 0 30 0 20 4 00 8 00 6 00 12 00 1 00 1 00 5 00...

Page 44: ...44 16 20 30 40 4 5 6 12 17 18 19 20 21 12 1 8 0 6 1 4 20 160 CUP 12 4 CUP 1 3 12 10 12 12 12 10 11 12 17 17 12 4 9 3 16 88 88 13 3 14 3 VT 4216 indd 44 18 12 2013 10 15 53...

Page 45: ...45 16 14 9 10 15 14 11 12 16 16 3 3 24 16 24 4 7 12 18 19 12 19 18 21 1 10 21 12 12 70 150 70 80 VT 4216 indd 45 18 12 2013 10 15 53...

Page 46: ...46 30 C 150 C 4 12 12 4 4 16 13 14 16 100 14 16 14 16 8 7 LOOSEN TIGHTEN 7 1 4 12 1 1 1 1 1 1 6 6 1 220 240 50 60 900 5 3 2004 108 2006 95 VT 4216 indd 46 18 12 2013 10 15 53...

Page 47: ...47 1 2 3 4 5 6 7 8 9 10 11 12 13 14 15 16 17 18 19 20 21 30 VT 4216 indd 47 18 12 2013 10 15 53...

Page 48: ...48 8 8 12 10 18 19 VT 4216 indd 48 18 12 2013 10 15 53...

Page 49: ...0 0 20 0 15 0 40 0 20 0 10 2 00 0 40 0 30 2 30 0 10 0 10 0 45 0 45 0 40 2 00 0 30 0 15 1 00 4 00 4 00 8 00 0 20 0 15 1 00 0 20 0 15 0 40 0 05 0 05 0 30 0 30 0 20 4 00 8 00 6 00 12 00 1 00 1 00 5 00 0...

Page 50: ...50 16 20 30 40 4 5 6 12 17 18 19 20 21 12 1 8 0 6 1 4 20 160 CUP 12 4 CUP 1 3 12 10 12 12 12 10 11 12 17 17 12 4 9 3 16 88 88 13 3 14 3 VT 4216 indd 50 18 12 2013 10 15 53...

Page 51: ...51 16 14 9 10 15 14 11 12 16 16 3 3 24 16 24 4 7 12 18 19 12 19 18 21 1 10 21 12 12 70 150 70 80 VT 4216 indd 51 18 12 2013 10 15 53...

Page 52: ...52 30 C 150 C 4 12 12 4 4 16 13 14 16 100 14 16 14 16 8 7 LOOSEN TIGHTEN 7 1 4 12 1 1 1 1 1 1 6 6 1 220 240 50 60 900 5 VT 4216 indd 52 18 12 2013 10 15 54...

Page 53: ...o lishi k r k F q t jih zning o zig qo shib b ril dig n el ktr shnurini ishl ting b shq jih z el ktr shnurini ishl tm ng Y ng in chiqm sligi uchun jih zni r z tk g ul g nd o tk zgich ishl tm ng Jih zn...

Page 54: ...zni ishl tish t qiql n di Jih zni o zingiz t mirl shg h r k t qilm ng Tuz ttirish k r k bo ls v k l tli izm t m rk zig lib b ring Jih zni quruq s lqin v b l l r bil n imk niyati ch kl ng n ins nl rnin...

Page 55: ...tishd n ldin Jih z s vuqd lib k ling n yoki turg n bo ls ishl tilishid n ldin k mid ikki s t n h r r tid turishi k r k Jih zni qutisid n ling ishl shig l qit b r dig n o r shg ishl tilg n shyol r y li...

Page 56: ...hi 11 qo yilg n Ko rs tgich jilishig bir r buyum l qit b rm sligig q r b turing g r vq t bug d pish dig n bo ls idishig 12 quyil dig n suv q yn g nd m s lliq s ling n l pp k stig 17 t gm ydig n bo lis...

Page 57: ...qo shilg n f ndyu pishirs bo l di D stur h r r tni 70 C d r j d n 150 C d r j g ch o zg rtirish imk nini b r di Pishl qli f ndyu pishirilg nd h r r tni 70 C d r j d n 80 C d r j g ch qo yish t vsiya...

Page 58: ...n yoki gr ssis v sit l r bil n t z l m ng S QL SH Jih zni o chiring t z l b ling Jih zni quruq s lqin v b l l rning qo li y tm ydig n j yg lib qo ying YIG M SI Ko p il t m pishirgich 1 d n Idish 1 d...

Page 59: ...n num rul de serie pe tabelul cu datele tehnice Num rul de serie reprezint un num r din unsprezece cifre primele patru cifre indic nd data fabric rii De exemplu dac num rul de serie este 0606xxxxxxx n...

Page 60: ...2013 GOLDER ELECTRONICS LLC 2013 VT 4216 indd 60 18 12 2013 10 15 54...

Reviews: