background image

ENGLISH

MULTICOOKER V T -4 2 2 0  SR

The  main  purpose  o f  the  multicooker  is  quick 
and quality food cooking.

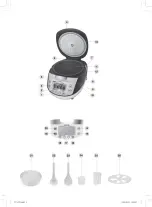
DESCRIPTION
1. Body
2. Control panel

3. Display
4. Lid

5. Lid opening button

6. Steam valve
7. Carrying handle
8. Power cord connection socket
9. Heating element

10. Temperature sensor
11. Bowl
12. Bowl  handles
13.  Removable protection screen

C o n tro l panel

14. «START» button
15. «MENU» button
16. «DELAYED START»  button
17.  Parameter setting buttons «-/+»
18. «TIME»  button
19. «MULTICOOK» button
20. «KEEP WARM/STOP» button

A c c e s s o rie s

21. Steam cooking basket
22. Soup ladle
23. Spatula
24. Measuring cup
25. Yogurt cups with lids
26. Cup holder

ATTENTION!

For additional protection it is reasonable to install 

a  residual  current  device  (RCD)  with  nominal 
operation current not exceeding 30 mA. To install 

RCD contact a specialist.

SAFETY MEASURES

Before using the  unit,  read this  instruction  m an­
ual carefully and keep it for future reference.
Use the unit for intended purposes only, as speci­

fied in this manual.  Mishandling the unit can lead 
to  its  breakage  and  cause  harm  to  the  user  or 
damage to his/her property.

•  Before using the unit, examine the power cord 

and the power cord connector located on the 
unit body closely and make sure that they are

not damaged.  Never use the unit if the power 

cord or power cord connector is damaged.

• 

Before  switching  the  unit on,  make  sure that 

voltage of the mains corresponds to unit oper­

ating voltage.

•  The  power  cord  is  equipped  with  a  “euro 

plug” ;  plug  it  into  the  socket  with  reliable 
grounding contact.

•  Do not use adapters for plugging the unit in.
•  Make  sure  that  the  power  cord  is  properly 

inserted into the corresponding connector on 

the unit body and into the mains socket.

• 

Use only the supplied power cord,  do not use 

the power cord of other units.

•  To avoid fire, do not use adapters for connect­

ing the unit to the mains.

• 

Place  the  unit  on  a  flat  heat-resistant  sur­

face away from sources of moisture,  heat and 
open flame.

•  Place the  unit with  free  access  to  the  mains 

socket.

• 

Use the unit in places with proper ventilation.

•  Do not expose the unit to direct sunlight.
•  Do  not  place the  unit  close  to  walls  and  fu r­

niture.

• 

Provide that the  power  cord  does  not  contact 

with  hot  surfaces  and  sharp  furniture  edges. 
Avoid damaging the isolation of the power cord.

• 

Do  not  touch  the  power  cord  or  power  plug 

with wet hands.

• 

Do not use the unit near containers filled with 

water, next to a kitchen sink, in wet basements 

or near a swimming pool.

•  Do not immerse the unit, the power cord and 

power plug into water and other liquids.

•  If  the  unit  is  dropped  into  water,  unplug  it 

immediately  by taking  the  power  plug  out  of 

the mains socket.  Do not put your hands into 
water!  Apply to  an  authorized  service  center 

for the further use o f the unit.

•  Do not insert foreign objects into the openings 

of the unit or between its parts.

•  Do not let foreign objects or edges of clothes 

get between the lid and unit body.

•  Use the supplied removable parts only.  Do not 

leave  the  operating  unit  unattended,  always 
switch the unit o ff and unplug it when you are 
not using it.

•  Never  pull  the  power  cord when  disconnect­

ing  the  unit  from  the  mains;  take  the  power 
plug  and  carefully  pull  it  out  of  the  mains 
socket.

3

V T-4220.indd  3

16.06.2014  11:40:07

Summary of Contents for VT-4220 SR

Page 1: ...V T 4 2 2 0 SR Multi cooker m Manual instruction 3 1 Die betriebsanweisung 12 ESS 22 32 1 1 42 www vitek ru VT 4220 indd 1 16 06 2014 11 40 06...

Page 2: ......

Page 3: ...o not use adapters for plugging the unit in Make sure that the power cord is properly inserted into the corresponding connector on the unit body and into the mains socket Use only the supplied power c...
Page 4: ...pervision of a person who is responsible for their safety and if they are given all the necessary and understandable instructions concerning the safe usage of the unit and information about danger tha...

Page 5: ...unit pass your finger smoothly from the TIME button 18 to the DELAYED START button 16 CURRENT TIME SETTING Insert the power cord connector into the con nection socket 8 and the power cord plug into th...

Page 6: ...on in the table Cooking programs Touch the button 20 to switch the keep warm mode on off Press and hold down the button 20 for 3 sec onds to stop the delayed start mode and the cooking program Attenti...

Page 7: ...afood 0 25 Vegetables 0 15 Stewing aS Beef 0 40 0 15 4 00 Lamb 0 40 Pork 0 40 Poultry 0 30 Seafood 0 30 Vegetables 0 15 LOWER PART OF THE MENU Cereal 0 25 0 20 1 10 Milk Porridge 0 30 0 20 1 10 Soup 0...

Page 8: ...Yogurt and Cottage cheese program The Multicook program is intended for advanced users with sufficient cooking expe rience See recipes of dishes in the recipe book supplied with the unit Allrecipes ar...

Page 9: ...of product using the but tons 17 beef jj lamb J i pork poul try seafood Q or vegetables The selected product icon will be flashing 9 9 Press the MENU button 15 and then use the buttons 17 to select a...

Page 10: ...nd do not place open parts of your body above the bowl 11 During the first operation of the multi cooker some foreign smell from the heat ing element can appear It is normal Watch the food during cook...

Page 11: ...with a soft dry cloth do not allow water to get inside the unit body Do not immerse the unit body power cord and plug into the water or other liquids Do not use abrasive and aggressive deter gents for...

Page 12: ...t zu benutzen wenn das Netzkabel oder die Anschlussstelle des Netzkabels beschadigt sind Vor dem Einschalten des Gerats vergewis sern Sie sich dass die Netzspannung und die Betriebsspannung des Gerats...

Page 13: ...Flussigkeit im Behalter gieBen Sie Wasser in den Behalter nach Bedarf zu Lassen Sie das Gerat nie unbeaufsichtigt Es ist nicht gestattet den Multikocher mit VT 4220 indd 13 der beschadigten Silikondic...

Page 14: ...der aufbewahrt wurde lassen Sie es bei derRaumtemperatur nicht weniger als zwei Stunden bleiben Nehmen Sie das Gerat aus der Verpackung heraus entfernen Sie alle Verpackungsmaterialien und Aufkleber d...

Page 15: ...es Produkttyps und der Programme im Ober und Unterteil des Menus siehe die Tabelle Kochprogramme STARTRUCKSTELLUNG Taste 16 Benutzen Sie die Taste zur Einstellung der Kochenende Zeit Sehen Sie die Lis...

Page 16: ...l 3 00 Meeresprodukte G 1 00 Gemiise 1 00 Kochen Rindfleisch 0 30 0 10 5 00 Hammelfleisch 0 30 Schweinefleisch 0 30 Gefliigel 0 25 0 10 2 00 Meeresprodukte 0 25 Gemiise 0 15 Dampfkochen Rindfleisch fi...

Page 17: ...20 1 10 Milchbrei 0 30 0 20 1 10 Suppe 0 30 0 30 4 00 Pasta 0 25 0 15 0 40 Pilaw 0 30 0 20 2 00 Aufwarmung 0 30 0 15 1 00 Julienne 0 20 0 15 01 00 Getranke 0 20 0 05 1 00 Kohlrouladen 0 20 0 15 1 00 S...

Page 18: ...eBen ans Stromnetz Anmerkungen Es ist nicht gestattet den Behalter 11 furs Waschen von Grutzen und Schneiden von Nahrungsmitteln zu benutzen das kann zur Beschadigung derAntihaftbeschichtung fuhren Ve...

Page 19: ...Stellen Sie die Kochdauer in Minuten mittels der Tasten 17 ein Einstellung der StartrUckstellung Funktion Anmerkungen Falls Sie die Zubereitung sofort begin nen mochten gehen Sie zum Punkt Kochbetrie...

Page 20: ...ers 11 zerkratzen konnen ZUSATZLICHE EMPFEHLUNGEN Joghurt Programm GieBen Sie Milch und Sauerteig in die Glaser 25 ein siehe das Kochbuch Anmerkung Als Sauerteig benutzen Sie Naturaljoghurt ohne Zusat...

Page 21: ...che des Heizelements nur wenn es abgekuhlt ist mit einem weichen trockenen Tuch ab lassen Sie das Wasser auf keinen Fall ins Gerategehause gelangen Tauchen Sie das Gerategehause das Netzkabel und den...

Page 22: ...VT 4220 SR 1 2 3 4 5 6 7 8 9 10 11 12 13 14 15 16 17 18 19 20 t CTOn 21 22 23 24 25 26 30 22 VT 4220 indd 22 16 06 2014 11 40 09...

Page 23: ...8 8 23 VT 4220 indd 23 16 06 2014 11 40 09...

Page 24: ...11 9 11 22 23 20 30 40 4 5 11 21 22 23 24 25 13 4 1 5 18 16 8 3 18 3 17 17 2 17 24 VT 4220 indd 24 16 06 2014 11 40 09...

Page 25: ...2 14 15 16 15 00 50 14 10 17 17 18 19 30 155 C 20 t 24 20 20 3 fib 4 00 1 00 6 00 4 00 4 00 3 00 25 VT 4220 indd 25 16 06 2014 11 40 09...

Page 26: ...t v fib 0 30 0 10 5 00 0 30 1 0 30 0 25 0 10 2 00 G 0 25 0 15 0 30 0 10 5 00 5 0 30 0 30 0 25 0 10 2 00 G 0 25 0 15 0 30 0 05 1 00 5 0 30 1 0 30 0 25 0 25 0 15 jb 0 40 0 15 4 00 5 0 40 26 VT 4220 indd...

Page 27: ...0 0 30 0 20 2 00 0 30 0 15 1 00 0 20 0 15 1 00 0 20 0 05 1 00 0 20 0 15 1 00 4 00 1 00 8 00 0 25 0 20 2 00 0 30 0 20 4 00 4 00 4 00 12 00 1 00 1 00 5 00 0 10 0 05 0 40 0 05 0 05 0 30 1 00 0 20 2 00 0...

Page 28: ...3 3 w 2 11 11 11 9 10 10 2 8 24 11 RICE CUP 4 CUP 4 1 3 1 11 2 11 9 3 11 21 21 11 4 4 5 8 6 7 3 28 VT 4220 indd 28 16 06 2014 11 40 10...

Page 29: ...8 17 Q 9 15 17 w jjg jff 10 11 15 12 17 13 18 17 14 18 17 15 16 3 17 16 16 17 17 14 0 0 3 18 3 20 19 20 t 20 20 t 21 22 3 23 20 24 25 4 5 11 12 29 VT 4220 indd 29 16 06 2014 11 40 10...

Page 30: ...24 4 6 11 22 23 11 25 25 26 11 11 1 19 2 17 3 18 17 4 18 17 6 30 VT 4220 indd 30 16 06 2014 11 40 10...

Page 31: ...Q 6 1 4 11 1 1 1 1 1 1 5 5 1 1 220 240 50 60 860 5 3 38 7 1070 31 VT 4220 indd 31 16 06 2014 11 40 10...

Page 32: ...roduktionsdatum ist in der Seriennummer auf dem Schild mit technischen Eigenschaften dargestellt Die Se riennummer stellt eine elfstellige Zahl dar die ersten vier Zahlen bedeuten dabei das Produktion...

Page 33: ...Vitek 4220 http www panatex com ua...

Reviews: