background image

ENGLISH

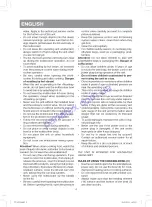
•  To avoid damage of the non-stick coating,  do 

not  use  the  bowl  (6)  for  washing  and  mixing 
products.  Never chop products in the bowl (6).

•  Never leave or keep any foreign objects in the 

bowl  (6).

•  When  cooking,  stir  the  products  in  the  bowl 

(6)  only  with  the  plastic  soup  ladle  (22)  or 
spatula (23).

•  Do  not  use  metal  objects  which  can  scratch 

the non-stick coating o f the bowl  (6).

•  When  cooking  dishes  with  a  lot  o f  spices 

and seasonings, wash the bowl  (6)  right after 
cooking.

•  To  avoid  damage o f the  bowl  (6)  coating,  do 

not  put the  bowl  under  cold water  right after 
cooking;  let it cool down preliminarily.

  The bowl (6) is not intended fo r washing in


the dishwashing  machine.

BEFORE THE FIRST USE

A fte r  unit  transportation  o r  storage  under

cold  (w inter)  conditions,  it  is  necessary  to
keep  it  fo r a t le a s t  two  hours  a t room   tem ­

p erature befo re switching on.

-   Unpack  the  unit,  remove  any  stickers  and

package  materials  that  can  prevent  m ulti­
cooker operation.

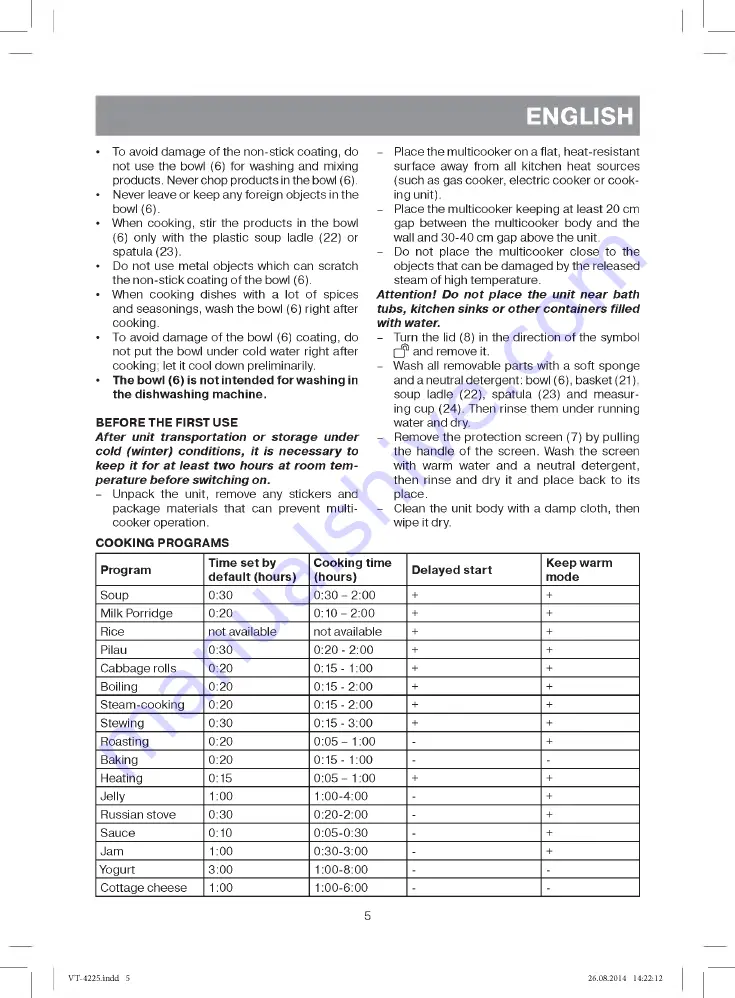
COOKING  PROGRAMS

-   Place the m ulticooker on a flat,  heat-resistant 

surface  away  from  all  kitchen  heat  sources 

(such as gas cooker, electric cooker or cook­
ing unit).

-   Place the multicooker keeping at least 20 cm 

gap  between  the  m ulticooker  body  and  the 

wall and 30-40 cm gap above the unit.

-   Do  not  place  the  multicooker  close  to  the 

objects that can be damaged by the released 
steam of high temperature.

Attention!  Do  n o t p la ce  the  unit  n e a r  bath

tubs,  kitchen sinks o r o th e r containers filled
with water.

-   Turn  the  lid  (8)  in  the direction  o f the  symbol 

□ f1 and  remove it.

-   Wash  all  removable  parts with  a soft  sponge 

and a neutral detergent: bowl (6), basket (21), 
soup  ladle  (22),  spatula  (23)  and  measur­
ing  cup  (24).  Then  rinse them  under  running 

water and dry.

-   Remove the  protection  screen  (7)  by pulling 

the  handle  o f  the  screen.  Wash  the  screen 
with  warm  water  and  a  neutral  detergent, 
then  rinse  and  dry  it  and  place  back  to  its 

place.

-   Clean  the  unit  body with  a  damp  cloth,  then 

wipe it dry.

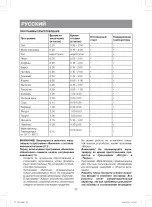
Program

Time set by


default (hours)

Cooking time


(hours)

Delayed start

Keep warm


mode

Soup

0:30

0:30 -  2:00

+

+

Milk Porridge

0:20

0:10 -  2:00

+

+

Rice

not available

not available

+

+

Pilau

0:30

0:20 -  2:00

+

+

Cabbage rolls

0:20

0:15 -  1:00

+

+

Boiling

0:20

0:15 -  2:00

+

+

Steam-cooking

0:20

0:15 -  2:00

+

+

Stewing

0:30

0:15 - 3:00

+

+

Roasting

0:20

0:05 -   1:00

-

+

Baking

0:20

0:15 -  1:00

-

-

Heating

0:15

0:05 -   1:00

+

+

Jelly

1:00

1:00-4:00

-

+

Russian stove

0:30

0:20-2:00

-

+

Sauce

0:10

0:05-0:30

-

+

Jam

1:00

0:30-3:00

-

+

Yogurt

3:00

1:00-8:00

-

-

Cottage cheese

1:00

1:00-6:00

-

-

5

V T -4 2 2 5 .in d d   5

2 6 .0 8 .2 0 1 4   1 4:22:12

Summary of Contents for VT-4225 CA

Page 1: ...VT 4225 CA Multi cooker with pressure cooker function Manual instruction 3 Die betriebsanweisung 10 19 27 35 V T 4225 in d d 1 26 08 2014 14 22 10...

Page 2: ......

Page 3: ...ocated on the unit body closely and make sure that they are not damaged Do not use the unit if the power cord or the power cord connector is damaged Before switching the unit on make sure that your ho...

Page 4: ...he unit taking it by the carrying handles Never carry the multicooker by the handle on the lid Be very careful when opening the multicooker lid Before opening the lid open the pressure ch cfh control...

Page 5: ...ng at least 20 cm gap between the multicooker body and the wall and 30 40 cm gap above the unit Do not place the multicooker close to the objects that can be damaged by the released steam of high temp...

Page 6: ...the ready dish warm for 24 hours it is not recommended to leave the cooked food in the bowl for a long time because this may spoil the food 6 Do not use the keep warm function for heating up foods 1...

Page 7: ...e flashing indications of cook ing time Use the buttons 17 to set the necessary cooking time ymbol e con 4 Setting the delayed start If you want to start cooking immediately skip this step The delayed...

Page 8: ...ine To clean the lid 8 fully perform the follow ing steps remove the protection screen 7 from the lid remove the silicone gasket from the pro tection screen and wash thoroughly pull up the valve 11 an...

Page 9: ...cone gasket The silicone gasket is damaged Replace the silicone gasket The lid 8 is not closed tightly Close the lid 8 tightly Air comes out through the blocking system valve 9 The valve 9 is dirty Sw...

Page 10: ...VT 4225 CA 1 2 3 4 5 6 7 8 9 10 11 12 13 14 15 16 17 18 19 20 21 c 22 23 24 30 20 30 40 19 V T 4225 in d d 19 26 08 2014 14 22 13...

Page 11: ...20 8 V T 4225 in d d 20 26 08 2014 14 22 13...

Page 12: ...8 8 8 6 6 6 14 6 6 6 6 21 6 22 23 6 6 6 6 20 30 40 8 6 21 22 23 24 7 V T 4225 in d d 21 26 08 2014 14 22 13...

Page 13: ...2 00 0 20 0 15 2 00 0 30 0 15 3 00 0 20 0 05 1 00 0 20 0 15 1 00 0 15 0 05 1 00 1 00 1 00 4 00 0 30 0 20 2 00 0 10 0 05 0 30 1 00 0 30 3 00 3 00 1 00 8 00 1 00 1 00 6 00 0 15 0 10 1 00 0 30 0 15 2 00...

Page 14: ...2 19 24 1 6 11 6 11 10 8 11 2 6 6 14 15 10 2 8 24 6 CUP 4 CUP 4 1 3 8 8 8 6 6 6 14 6 21 21 6 8 8 9 9 8 o f1 8 8 Q 23 V T 4225 in d d 23 26 08 2014 14 22 14...

Page 15: ...3 19 _ 3 88 88 3 16 17 3 19 3 17 19 3 17 4 2 00 50 1 10 18 17 18 17 5 19 3 Q 19 3 19 6 3 19 7 8 9 11 12 24 V T 4225 in d d 24 26 08 2014 14 22 14...

Page 16: ...8 5 6 25 25 6 6 20 1 8 6 8 7 11 8 8 9 11 1 1 1 1 1 1 1 1 220 240 50 60 900 5 3 25 V T 4225 in d d 25 26 08 2014 14 22 14...

Page 17: ...8 7 7 9 9 8 9 9 8 7 8 7 8 8 9 9 8 9 9 9 9 11 6 38 7 1070 26 V T 4225 in d d 26 26 08 2014 14 22 14...

Page 18: ...i i i i i i 1 2 3 4 5 i 6 7 8 9 10 11 12 13 14 i 15 i 16 17 i 18 19 20 21 1 22 23 24 i i i i 30 i ii ii i i ii i i 1 1 i ii i i i i i 1 1 i i i i i i 1 i i i i i i i i i i 20 1 1 30 40 35 V T 4225 in...

Page 19: ...i i i i ii i i i i i i i i is i i i i 1 i i i i i 1 i i i i i i i ii i i 36 i i i i i i i i i i i i ii i i i i i i i i ii i i i i i ii i i i i i i i i i i i i i i i i 8 V T 4225 in d d 36 26 08 2014...

Page 20: ...i i i i i i i i i i i i 1 6 i i 6 ii i 6 i 14 i 6 i 6 i i 6 i i 6 i 6 37 22 23 i 6 6 i i i 6 i i 6 i i i i i i i 1 1 20 i 30 40 i i i 1 i 8 i i i i ii i i i 10 21 22 23 i 24 i 7 i i V T 4225 in d d 37...

Page 21: ...5 2 00 0 30 0 15 3 00 0 20 0 05 1 00 0 20 0 15 1 00 i i 0 15 0 05 1 00 1 00 1 00 4 00 0 30 0 20 2 00 0 10 0 05 0 30 1 00 0 30 3 00 3 00 1 00 8 00 1 00 1 00 6 00 0 15 0 10 1 00 0 30 0 15 2 00 35 160 0...

Page 22: ...19 n i 24 i i i 1 i 6 10 6 i 11 i 10 8 1 11 2 1 1 i i 6 1 i i 6 i 14 15 1 10 i 1 1 1 2 1 8 1 24 i 1 1 6 CUP 1 1 1 4 CUP 4 i 1 3 8 8 8 6 i 6 6 6 i i 14 6 21 21 6 8 i 8 i 9 9 8 8 8 i Q 39 V T 4225 in d...

Page 23: ...88 88 3 16 17 i 3 19 1 17 i 19 3 i 17 i i 4 i i 2 00 50 i i 1 10 ii 18 1 5 17 40 18 1 17 5 19 i i i 3 i i i i i i 19 _ 2 i 3 i 19 1 6 i i i i i 3 i 19 1 i i i i 7 8 i 1 9 10 V T 4225 in d d 40 26 08 2...

Page 24: ...8 ii i i i i 6 1 1 25 i i i i i 25 6 6 i i i 20 1 i 8 i i i i 6 41 8 7 i i 11 i 8 8 9 i 11 i i i i i i i i i i i i i 1 i i i i 1 i 1 i 1 1 i 1 1 1 i 1 1 1 1 1 220 240 50 60 900 5 1 3 V T 4225 in d d 4...

Page 25: ...1 1 I i 8 7 i i 7 i i 9 9 i 8 9 i i 8 7 i i i 8 7 8 i 8 i 9 9 i i 8 i i 9 i 9 i i 9 9 11 i i i i i i i i i i i i 6 ii i ii i i i i f 2004 108 2006 95 42 V T 4225 in d d 42 26 08 2014 14 22 15...

Page 26: ...h 2006 DE Das Produktionsdatum ist in der Seriennummer auf dem Schild mit technischen Eigenschaften dargestellt Die Se riennummer stellt eine elfstellige Zahl dar die ersten vier Zahlen bedeuten dabei...

Page 27: ...2014 GOLDER ELECTRONICS LLC 2014 V T 4225 in d d 44 26 08 2014 14 22 15...

Page 28: ...Vitek 4225 http www panatex com ua...

Reviews: