background image

4

 ENGLISH


Do not touch the surface of the lid during mul-
ticooker operation, open the lid only by press-
ing the lid opening button.


To avoid burns by hot steam, be very careful 
when opening the multicooker lid.


Keep the steam release openings clean, and 
clean them when they get dirty.


Never use the unit without the installed bowl, 
do  not  switch  the  multicooker  on  without 
products and sufficient amount of liquid in the 
cooking bowl.


Do not use the multicooker if the silicone gas-
ket on the inner side of the lid is damaged.


Follow the recommendations as to amount of 
dry products and liquids.


Do not remove the bowl during the unit oper-
ation.


Do  not  cover  the  multicooker  during  opera-
tion.

Attention! 

When  steaming  food,  watch  the 

level  of  liquid  in  the  bowl,  add  water  into  the 
bowl  as  needed.  Do  not  leave  the  unit  unat-
tended!


Do not carry the unit during operation. Use the 
carrying  handle,  having  unplugged  the  unit, 
removed the bowl with food and let the multi-
cooker cool down preliminarily.


The lid, cooking bowl and body parts heat up 
strongly during operation, do not touch them, 
if you need to take out the hot bowl, use pot-
holders.


Clean the unit regularly.


For children safety reasons do not leave poly-
ethylene  bags  used  as  a  packaging  unat-
tended.


Attention! Do not allow children to play with 
polyethylene bags or packaging film. Danger 
of suffocation!


Do  not  allow  children  under  8  years  of  age 
to touch the unit body, the power cord or the 
power plug during operation of the unit.


Do  not  leave  children  unattended  to  prevent 
using the unit as a toy.


Close supervision is necessary when children 
under 8 years of age or disabled persons are 
near the operating unit.


This unit is not intended for usage by children 
under 8 years of age.


This unit is not intended for usage by people 
(including children over 8) with physical, neural 
and mental disorders or with insufficient expe-
rience  or  knowledge.  Such  persons  may  use 
this unit only if they are under supervision of a 

person who is responsible for their safety and 
if they are given all the necessary and under-
standable  instructions  concerning  the  safe 
usage of the unit and information about dan-
ger that can be caused by its improper usage.


To  avoid  damages,  transport  the  unit  in  the 
original package only.


Never  use  the  unit  if  the  power  cord  or  the 
power  plug  is  damaged,  if  the  unit  works 
improperly or after it was dropped.


Do not attempt to repair the unit. Do not disas-
semble the unit by yourself, if any malfunction 
is  detected  or  after  it  was  dropped,  unplug 
the  unit  and  apply  to  any  authorized  service 
center from the contact address list given in 
the  warranty  certificate  and  on  the  website 
www.vitek.ru.


Keep the unit in a dry cool place out of reach 
of children and disabled persons.

THIS  UNIT  IS  INTENDED  FOR  HOUSEHOLD 
USAGE ONLY

RULES OF USING OF THE COOKING BOWL (21)


Use  the  unit  and  its  parts  for  the  intended 
purposes only. Do not use the cooking bowl 
(21) by placing it on heating units or cooking 
surfaces.


Do  not  replace  the  bowl  (21)  with  another 
container.


Always  make  sure  that  the  heating  element 
surface  and  the  bottom  of  the  bowl  (21)  are 
clean and dry.


Do  not  use  the  bowl  (21)  as  a  container  for 
mixing products. Never chop products in the 
bowl  (21)  to  avoid  the  damage  of  the  non-
stick coating.


Do not use the bowl (21) if it is deformed or if 
the non-stick coating is damaged.


Never leave and keep any foreign objects in 
the bowl (21).


When cooking food in the bowl (21) stir it only 
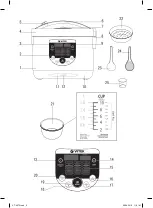
with the plastic soup ladle (23) or spatula (24).


Do not use metal objects that can damage the 
non-stick coating of the bowl (21).


After installing the bowl (21) into the multicooker 
body make sure it is installed properly by turning 
it in any direction. Before selecting the cooking 
mode make sure that the bowl is installed prop-
erly; otherwise do not start cooking.


After cooking dishes with spices and season-
ings it is recommended to wash the bowl (21) 
immediately.

VT-4272.indd   4

28.04.2016   11:01:42

Summary of Contents for VT-4272 BK

Page 1: ...1 VT 4272 BK 3 9 16 23 30 Multicooker VT 4272 indd 1 28 04 2016 11 01 41...

Page 2: ...VT 4272 indd 2 28 04 2016 11 01 41...

Page 3: ...pters for plugging the unit in Make sure that the power cord is properly inserted into the corresponding connector on the unit body and into the mains the socket Use only the supplied power cord do no...

Page 4: ...nt expe rience or knowledge Such persons may use this unit only if they are under supervision of a person who is responsible for their safety and if they are given all the necessary and under standabl...

Page 5: ...touch the upper lid 4 especially its transparen part during the multicooker operation Watch the food during cooking and if nec essary stir the products with the plastic soup ladle 23 or spatula 24 Do...

Page 6: ...To cancel the selected cooking program press and hold the button 13 for more than 2 seconds the symbols 00 00 will appear on the display 3 and the bowl bottom temperature will appear on the display 9...

Page 7: ...indications on the display 3 will start flashing Use the 17 and 19 buttons to set the delayed start time After you finish set ting the time press the START button 14 the countdown of remaining time wi...

Page 8: ...with a soft sponge and neutral detergent then rinse under run ning water Do not put the bowl 21 in the dishwashing machine Wipe the surface of the heating element only when it is cold do not allow wa...

Page 9: ...ls besch digt sind Vor dem Einschalten des Ger ts vergewis sern Sie sich dass die Netzspannung und die Ger tebetriebsspannung bereinstimmen Das Netzkabel ist mit einem Eurostecker ausgestattet stecken...

Page 10: ...u tragen Benutzen Sie den Tragegriff indem Sie das Ger t vorher vom Stromnetz abgetrennt den Beh lter mit Nahrungsmitteln herausgenommen und den Multikocher abk hlen lassen haben W hrend des Betriebs...

Page 11: ...h der Zubereitung abzuwa schen Nach der Beendigung der Nahrungsmittelzu bereitungstellenSiedenBeh lter 21 unterdas Kaltwassersofortnicht daeszurBesch digung der Antihaftbeschichtung f hren kann lassen...

Page 12: ...schirm 9 wird die Temperatur des Bodens des Beh lters angezeigt Das Ger t hat sich in den Wartezustand umgeschaltet und ist betriebsbereit 2 Wahl des Kochprogramms und sein Start Dr cken Sie die MEN T...

Page 13: ...ell zu beenden dabei erscheinen die Symbole 00 00 auf dem Bildschirm 3 und auf dem Bildschirm 9 wird die Temperatur des Bodens des Beh lters angezeigt Danach schal tet sich das Ger t in den Wartezusta...

Page 14: ...dem Bildschirm 3 wird die bis zum Anfang der Zubereitung gebliebene Zeit angezeigt nach dem Ablauf der eingestellten Zeit erlischt die Anzeige der Taste 20 der Multikocher beginnt die Zubereitung Im B...

Page 15: ...den Beh lter 21 in der Geschirrsp lmaschine zu waschen Wischen Sie die Oberfl che des Heizelements nur wenn es abgek hlt ist lassen Sie das Wasser auf keinen Fall innerhalb des Geh uses des Ger ts ei...

Page 16: ...16 VT 4272 BK 1 2 3 4 5 6 7 8 9 10 11 12 13 t 14 15 16 t 17 18 19 20 21 22 23 24 25 30 VT 4272 indd 16 28 04 2016 11 01 43...

Page 17: ...17 8 8 8 8 VT 4272 indd 17 28 04 2016 11 01 43...

Page 18: ...18 www vitek ru 21 21 21 21 21 21 21 21 21 23 24 21 21 21 21 21 20 30 40 4 5 6 21 22 23 24 25 VT 4272 indd 18 28 04 2016 11 01 43...

Page 19: ...19 4 7 21 4 23 24 21 23 24 23 24 1 3 00 00 9 2 18 15 14 3 17 19 14 3 17 19 100 15 C 100 110 1 1 4 105 110 20 15 1 10 100 105 110 30 20 2 105 110 20 15 40 VT 4272 indd 19 28 04 2016 11 01 43...

Page 20: ...130 140 20 15 2 120 30 15 1 100 110 4 2 8 100 15 10 2 105 30 20 4 39 40 8 6 12 65 70 1 1 5 105 30 15 2 90 50 30 1 30 30 160 30 5 10 3 13 t 13 2 3 00 00 9 4 5 3 00 00 9 13 2 3 00 00 9 5 13 13 3 00 00 2...

Page 21: ...21 24 13 t 2 13 3 00 00 9 13 t 3 00 00 6 2 3 16 t 3 17 19 14 3 17 19 7 2 20 3 17 19 14 3 24 5 20 3 20 13 t 2 8 9 16 t 9 17 19 14 30 C 150 C 5 10 2 9 3 16 t 6 VT 4272 indd 21 28 04 2016 11 01 43...

Page 22: ...22 8 14 25 160 CUP 21 CUP 4 CUP 4 1 3 21 8 8 8 1 4 21 1 1 1 1 1 1 1 220 240 50 60 770 900 5 3 38 7 1070 email anderproduct gmail com www vitek ru 7 495 921 01 70 VT 4272 indd 22 28 04 2016 11 01 43...

Page 23: ...23 VT 4272 BK 1 2 3 4 5 6 7 8 9 10 11 12 13 t 14 15 16 t 17 18 19 20 21 22 23 24 25 30 VT 4272 indd 23 28 04 2016 11 01 43...

Page 24: ...24 8 8 8 8 www vitek ru VT 4272 indd 24 28 04 2016 11 01 44...

Page 25: ...25 21 21 21 21 21 21 21 21 21 23 24 21 21 21 21 21 20 30 40 5 6 4 21 22 23 24 25 4 7 21 4 23 24 21 23 24 VT 4272 indd 25 28 04 2016 11 01 44...

Page 26: ...1 4 105 110 20 15 1 10 100 105 110 30 20 2 105 110 20 15 40 105 110 25 5 4 100 105 15 5 4 160 10 10 1 130 140 20 15 2 120 30 15 1 100 110 4 2 8 100 15 10 2 105 30 20 4 39 40 8 6 12 65 70 1 1 5 105 30...

Page 27: ...t 13 13 2 3 00 00 9 4 5 3 00 00 9 13 2 3 00 00 9 5 13 13 3 00 00 24 9 70 75 C 24 t 13 2 13 3 00 00 9 t 13 3 00 00 6 2 3 t 16 3 17 19 14 3 17 19 7 2 20 3 17 19 14 3 24 5 VT 4272 indd 27 28 04 2016 11 0...

Page 28: ...28 20 3 20 t 13 2 8 9 t 16 9 17 19 14 30 150 5 10 2 9 3 t 16 6 8 14 25 160 21 CUP CUP 4 CUP 4 1 3 21 8 8 8 1 4 21 VT 4272 indd 28 28 04 2016 11 01 44...

Page 29: ...29 1 1 1 1 1 1 1 220 240 50 60 770 900 5 3 i i i i i i i i i i i i VT 4272 indd 29 28 04 2016 11 01 44...

Page 30: ...30 VT 4272 BK 1 2 3 4 5 6 7 8 9 10 11 12 13 t 14 15 16 t 17 18 19 20 21 22 23 24 25 30 VT 4272 indd 30 28 04 2016 11 01 44...

Page 31: ...31 8 8 8 8 www vitek ru 21 21 21 21 VT 4272 indd 31 28 04 2016 11 01 44...

Page 32: ...32 21 21 21 21 21 23 24 21 21 21 21 21 20 30 40 4 5 6 21 22 23 24 25 4 7 21 4 23 24 21 23 24 23 24 1 3 VT 4272 indd 32 28 04 2016 11 01 44...
Page 33: ...5 1 10 100 105 110 30 20 2 105 110 20 15 40 105 110 25 5 4 100 105 15 5 4 160 10 10 1 130 140 20 15 2 120 30 15 1 100 110 4 2 8 100 15 10 2 105 30 20 4 39 40 8 6 12 65 70 1 1 5 105 30 15 2 90 50 30 1...

Page 34: ...5 3 00 00 9 13 2 3 00 00 9 5 13 13 3 00 00 24 9 70 75 C 24 13 t 2 13 3 00 00 9 13 t 3 00 00 6 2 3 16 t 3 17 19 14 3 17 19 7 2 20 3 17 19 14 3 24 5 20 3 20 13 t 2 8 9 16 VT 4272 indd 34 28 04 2016 11 0...

Page 35: ...35 t 9 17 19 14 30 C 150 C 5 10 2 9 3 16 t 6 8 14 25 160 CUP 21 CUP 4 CUP 4 1 3 21 8 8 8 1 4 21 1 1 1 1 1 1 1 220 240 50 60 770 900 5 3 2004 108 2006 95 VT 4272 indd 35 28 04 2016 11 01 44...
Page 36: ...s manufactured in June the sixth month 2006 de Das Produktionsdatum ist in der Seriennummer auf dem Schild mit technischen Eigenschaften dargestellt Die Se riennummer stellt eine elfstellige Zahl dar...

Reviews: