background image

10

 ENGLISH

«ROASTING»  cooking  program  has  additional 
functions  for  cooking  meat,  chicken  or  fish. 
Special cooking time and temperature are avail-
able for each function.

– 

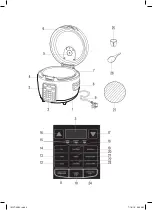
Put  the  products  into  the  bowl  (7),  do  not 
exceed  1/2  of  the  maximal  capacity  of  the 
bowl (7).

– 

Install  the  bowl  (7)  in  the  process  chamber. 
Make sure that the outer surface of the bowl 
is clean and dry, and the bowl itself is placed 
evenly and is in secure contact with the heat-
ing element surface.

– 

Do not close the lid (6).

– 

Plug  the  power  cord  into  the  mains  socket, 
you will hear a sound signal, the display (3) will 
show the sleep mode symbols «- - - -».

– 

Press the button (20) «ROASTING», the button 
(20)  illumination  will  be  flashing,  the  symbol 
(15) «MEAT» will light up, and the default time 
«0:35» will be shown on the display.

– 

Depending  on  the  added  ingredients,  press 
the  button  (20)  «ROASTING»  consequently, 
the symbols (15) «CHICKEN-FISH-MEAT» will 
alternately light up.

– 

For  each  product  there  is  a  default  cooking 
time (see the table «COOKING PROGRAMS»).

– 

If  necessary,  set  different  cooking  time  (see 
the  table  «COOKING  PROGRAMS»)  with  the 
buttons  (16-17),  the  set  cooking  time  will  be 
shown on the display (3).

– 

Switch  the  «ROASTING»  program  on  by 
pressing  the  button  (10)  «START/STOP», 
the  «ROASTING»  button  (20)  illumination  will 
glow  constantly,  the  digital  symbols  «HEAt» 
will  appear  on  the  display  (3),  and  after  the 
set  temperature  is  reached,  the  display  (3) 
will  show  the  remaining  operation  time  digi-
tal symbols.

Note: 

– 

the  «ROASTING»  program  operates  similarly 
to a kitchen stove, always watch the cooking 
process and stir the products during roasting 
with the plastic spatula (26);

– 

during  the  operation  of  the  «Roasting»  pro-
gram, do not bend over the multicooker bowl 
to avoid burns by splashing hot oil;

– 

after  the  «ROASTING»  program  is  finished, 
you  will  hear  sound  signals,  the  multicooker 
will  switch  to  the  sleep  mode,  the  symbols 
«- - - -» will appear on the display (3). Unplug 
the unit.

– 

If  you  need  to  switch  the  multicooker  off 
before  the  «ROASTING»  program  is  finished, 

press the button (10) «START/STOP», the mul-
ticooker  will  switch  to  the  sleep  mode,  the 
symbols «- - - -» will appear on the display (3). 
Unplug the unit.

– 

Remove  the  bowl  (7)  from  the  multicooker 
using the potholders.

– 

Remove  the  cooked  products  from  the 
bowl  (7).

– 

Wait  until  the  bowl  (7)  cools  down,  wash  it 
with warm water and neutral detergent, rinse 
and dry.

«STEWING» program (22)

«STEWING» cooking program has additional func-
tions  for  cooking  meat,  chicken  or  fish.  Special 
cooking  time  and  temperature  are  available  for 
each function.

– 

Put  the  required  ingredients  (see  the  Recipe 
book)  into  the  bowl  (7)  and  add  the  neces-
sary amount of water, do not exceed 4/5 of the 
maximal capacity of the bowl (7).

– 

Install  the  bowl  (7)  in  the  process  chamber. 
Make sure that the outer surface of the bowl 
is clean and dry, and the bowl itself is placed 
evenly and is in secure contact with the heat-
ing element surface.

– 

Close the lid (6) until the lock clicks.

– 

Plug  the  power  cord  into  the  mains  socket, 
you will hear a sound signal, the display (3) will 
show the sleep mode symbols «- - - -».

– 

Press the button (22) «STEWING», the button 
(22)  illumination  will  be  flashing,  the  symbol 
(15) «MEAT» will light up, and the default time 
«0:35» will be shown on the display.

– 

Depending  on  the  added  ingredients,  press 
the  button  (22)  «STEWING»  consequently, 
the symbols (15) «CHICKEN-FISH-MEAT» will 
alternately light up.

– 

For  each  product  there  is  a  default  cooking 
time (see the table «COOKING PROGRAMS»).

– 

If  necessary,  set  different  cooking  time  (see 
the  table  «COOKING  PROGRAMS»)  with  the 
buttons  (16-17),  the  set  cooking  time  will  be 
shown on the display (3).

– 

If necessary, press the button (24) «DELAYED 
START»  and  set  the  necessary  delayed  start 
time with the buttons (16 - 17) (see the table 
«COOKING PROGRAMS»).

Note: - if you set the «DELAYED START» program, 
then after the multicooker is switched on the dig-
ital symbols of the delayed start time will appear 
on the display (3). After the delayed start time is 
over, the «STEWING» cooking program will start.

IM VT-4284.indd   10

7/18/19   9:49 AM

Summary of Contents for VT-4284

Page 1: ...1 VT 4284 3 14 27 41 Multicooker 54 IM VT 4284 indd 1 7 18 19 9 49 AM...

Page 2: ...IM VT 4284 indd 2 7 18 19 9 49 AM...

Page 3: ...Do not use adapters for plugging the unit in Make sure that the power cord is properly inserted into the mains socket Place the unit on a flat heat resistant surface away from moisture heat sources an...

Page 4: ...t was dropped If the power cord is damaged it should be replaced by the manufacturer a maintenance service or similar qualified personnel to avoid danger Do not repair the unit by yourself Do not dis...

Page 5: ...ton illumination will be flashing and the flashing digital symbols of the cooking program will appear on the display 3 the cooking time is set by default see the table COOKING PROGRAMS After you selec...

Page 6: ...display 3 the multicooker will switch on and start cooking according to the preset program Attention Never leave the operating unit unattended COOKING PROGRAMS Program Products Default time Cooking ti...

Page 7: ...urface of the bowl 7 is clean and dry and the bowl itself 7 is placed evenly and is in secure con tact with the heating element surface Close the lid 6 until the lock clicks Insert the power plug into...

Page 8: ...ill be switched to the keep warm mode the KEEP WARM button 11 illumination will light up the display 3 will show the digital symbols of the operation time in the keep warm mode Switch the multicooker...

Page 9: ...ashing the symbol 15 MEAT will light up and the default time 1 00 will be shown on the display Depending on the added ingredients press the button 18 SLOW COOKING conse quently the symbols 15 CHICKEN...

Page 10: ...lug the unit If you need to switch the multicooker off before the ROASTING program is finished press the button 10 START STOP the mul ticooker will switch to the sleep mode the symbols will appear on...

Page 11: ...ct with the heat ing element surface Close the lid 6 until the lock clicks Plug the power cord into the mains socket you will hear a sound signal the display 3 will show the sleep mode symbols Press t...

Page 12: ...ation will light up the display 3 will show the digital symbols of the operation time in the keep warm mode Switch the multicooker off by pressing the but ton 10 START STOP the multicooker will switch...

Page 13: ...ker and the accessories STORAGE Unplug the unit and clean it Keep the unit in a dry cool place away from children and disabled persons DELIVERY SET Multicooker 1 pc Bowl 1 pc Steam rack 1 pc Spatula 1...

Page 14: ...14 VT 4284 1 2 3 4 5 6 7 8 9 10 11 12 13 14 15 16 17 18 19 20 21 22 23 24 25 26 27 30 IM VT 4284 indd 14 7 18 19 9 49 AM...

Page 15: ...15 www vitek ru IM VT 4284 indd 15 7 18 19 9 49 AM...

Page 16: ...16 6 5 6 5 7 26 7 7 20 30 40 6 4 7 7 27 26 25 1 6 7 7 7 7 7 7 7 26 7 7 7 7 7 2 2 10 9 3 IM VT 4284 indd 16 7 18 19 9 49 AM...

Page 17: ...17 3 10 3 10 3 11 11 3 10 11 11 3 4 00 16 17 10 11 12 13 14 18 15 19 20 21 22 23 3 16 17 16 17 3 24 16 17 24 24 3 1 00 16 17 10 24 3 3 0 IM VT 4284 indd 17 7 18 19 9 49 AM...

Page 18: ...18 30 30 2 20 15 1 10 1 35 6 35 31 35 30 20 30 35 31 1 30 21 30 15 5 20 35 31 4 30 21 30 15 5 20 45 25 2 30 5 2 30 15 2 4 30 4 1 1 15 6 6 7 7 7 7 IM VT 4284 indd 18 7 18 19 9 49 AM...

Page 19: ...19 7 14 Water Line 25 7 4 Water Line 25 180 7 7 7 7 6 3 14 14 24 16 17 3 10 14 3 3 5 11 3 10 3 4 6 26 7 7 IM VT 4284 indd 19 7 18 19 9 49 AM...

Page 20: ...20 7 13 7 7 6 3 13 13 3 0 30 16 17 3 24 16 17 3 10 13 3 5 11 3 10 3 4 6 7 7 7 12 7 2 3 7 7 6 3 12 12 3 0 20 16 17 3 24 16 17 IM VT 4284 indd 20 7 18 19 9 49 AM...

Page 21: ...21 3 10 12 3 HEAt 3 5 11 3 10 3 4 6 7 7 7 18 7 4 5 7 7 6 3 18 18 15 1 00 18 15 16 17 3 24 16 17 3 10 18 3 IM VT 4284 indd 21 7 18 19 9 49 AM...

Page 22: ...22 5 11 3 10 3 4 6 7 7 7 20 7 1 2 7 7 6 3 20 20 15 0 35 20 15 16 17 3 10 20 3 HEAt 3 26 3 10 3 7 7 7 IM VT 4284 indd 22 7 18 19 9 49 AM...

Page 23: ...23 22 7 4 5 7 7 6 3 22 22 15 0 35 22 15 16 17 3 24 16 17 3 10 22 3 HEAt 3 5 11 3 10 3 4 6 7 7 7 19 6 7 7 7 IM VT 4284 indd 23 7 18 19 9 49 AM...

Page 24: ...24 7 7 1 2 7 6 3 19 19 0 45 16 17 3 10 19 3 5 11 3 10 3 4 6 7 7 7 21 7 7 7 1 2 27 27 7 6 3 21 13 3 0 30 16 17 3 24 16 17 3 IM VT 4284 indd 24 7 18 19 9 49 AM...

Page 25: ...25 10 21 3 HEAt 3 Add 3 Add 6 7 3 5 11 3 10 3 4 6 7 27 27 7 7 7 23 7 7 6 3 23 23 3 0 30 16 17 3 10 23 3 5 11 3 10 3 IM VT 4284 indd 25 7 18 19 9 49 AM...

Page 26: ...26 4 6 7 7 7 5 1 6 7 1 1 1 1 1 1 1 220 240 50 700 4 info vitek ru 3 STAR PLUS LIMITED 15 38 117209 28 1 www vitek ru 8 800 100 18 30 IM VT 4284 indd 26 7 18 19 9 49 AM...

Page 27: ...27 ICI I VT 4284 1 2 3 4 5 6 7 8 9 10 11 12 13 14 15 16 17 18 19 20 21 22 23 24 25 26 27 30 IM VT 4284 indd 27 7 18 19 9 49 AM...

Page 28: ...28 www vitek ru IM VT 4284 indd 28 7 18 19 9 49 AM...

Page 29: ...29 6 5 5 7 26 7 7 20 30 40 4 6 7 7 27 26 25 1 6 7 7 7 7 7 7 7 26 7 7 7 7 7 IM VT 4284 indd 29 7 18 19 9 49 AM...

Page 30: ...30 2 2 10 9 3 3 10 3 10 3 11 11 3 10 11 11 3 4 00 16 17 10 11 12 13 14 18 15 19 20 21 22 23 3 16 17 16 17 3 24 16 17 IM VT 4284 indd 30 7 18 19 9 49 AM...

Page 31: ...24 24 3 1 00 16 17 10 24 3 3 0 30 30 2 20 15 1 10 1 35 6 35 31 35 30 20 30 35 31 1 30 21 30 15 5 20 35 31 4 30 21 30 15 5 20 45 25 2 30 5 2 30 15 2 4 30 4 1 1 15 6 6 IM VT 4284 indd 31 7 18 19 9 49 A...

Page 32: ...32 7 7 7 7 14 Water Line 7 25 7 Water Line 4 25 180 7 7 7 7 6 3 14 14 24 16 17 3 10 14 3 3 IM VT 4284 indd 32 7 18 19 9 49 AM...

Page 33: ...33 5 11 3 10 3 4 6 26 7 7 7 13 7 7 6 3 13 13 3 0 30 16 17 3 24 16 17 3 10 13 3 5 11 3 10 3 IM VT 4284 indd 33 7 18 19 9 49 AM...

Page 34: ...34 4 6 7 7 7 12 7 7 2 3 7 6 3 12 12 3 0 20 16 17 3 24 16 17 3 10 12 3 HEAT 3 5 11 3 10 3 4 6 7 7 7 18 7 7 4 5 IM VT 4284 indd 34 7 18 19 9 49 AM...

Page 35: ...35 7 6 3 18 18 15 1 00 18 15 16 17 3 24 16 17 3 10 18 3 5 11 3 10 3 4 6 7 7 7 20 7 7 1 2 7 6 3 20 20 15 IM VT 4284 indd 35 7 18 19 9 49 AM...

Page 36: ...36 0 35 20 15 16 17 3 10 20 3 HEAt 3 26 3 10 3 7 7 7 22 7 7 4 5 7 6 3 22 22 15 0 35 22 15 16 17 3 24 16 17 3 IM VT 4284 indd 36 7 18 19 9 49 AM...

Page 37: ...37 10 22 3 HEAt 3 5 11 3 10 3 4 6 7 7 7 19 6 7 7 7 7 7 1 2 7 6 3 19 19 0 45 16 17 3 10 19 3 5 11 3 10 3 IM VT 4284 indd 37 7 18 19 9 49 AM...

Page 38: ...38 4 6 7 7 7 21 7 7 7 1 2 27 27 7 6 3 21 13 3 0 30 16 17 3 24 16 17 3 10 21 3 HEAt 3 Add 3 Add 6 7 3 5 11 3 10 3 4 6 7 27 27 7 IM VT 4284 indd 38 7 18 19 9 49 AM...

Page 39: ...39 7 7 23 7 7 6 3 23 23 3 0 30 16 17 3 10 23 3 5 11 3 10 3 4 6 7 7 7 5 1 6 7 IM VT 4284 indd 39 7 18 19 9 49 AM...

Page 40: ...40 1 1 1 1 1 1 1 220 240 50 700 4 info vitek ru 3 i i i i i i i i i i i i IM VT 4284 indd 40 7 18 19 9 49 AM...

Page 41: ...41 VT 4284 1 2 3 4 5 6 7 8 9 10 11 12 13 14 15 16 17 18 19 20 21 22 23 24 25 26 27 30 IM VT 4284 indd 41 7 18 19 9 49 AM...

Page 42: ...42 www vitek ru IM VT 4284 indd 42 7 18 19 9 49 AM...

Page 43: ...43 6 5 6 5 7 26 7 7 20 30 40 6 4 7 7 27 26 25 1 6 7 7 7 7 7 7 7 26 7 7 7 7 7 2 2 10 9 3 IM VT 4284 indd 43 7 18 19 9 49 AM...

Page 44: ...44 3 10 3 10 3 11 11 3 10 11 11 3 4 00 16 17 10 11 12 13 14 18 15 19 20 21 22 23 3 16 17 16 17 3 24 16 17 24 24 3 1 00 16 17 10 24 3 3 0 IM VT 4284 indd 44 7 18 19 9 49 AM...

Page 45: ...45 30 30 2 20 15 1 10 1 35 6 35 31 35 30 20 30 35 31 1 30 21 30 15 5 20 35 31 4 30 21 30 15 5 20 45 25 2 30 5 2 30 15 2 4 30 4 1 1 15 6 6 7 7 7 7 IM VT 4284 indd 45 7 18 19 9 49 AM...

Page 46: ...46 7 14 7 Water Line 25 7 4 Water Line 25 180 7 7 7 7 6 3 14 14 24 16 17 3 10 14 3 3 5 11 3 10 3 4 6 26 7 7 7 IM VT 4284 indd 46 7 18 19 9 49 AM...

Page 47: ...47 13 7 7 6 3 13 13 3 0 30 16 17 3 24 16 17 3 10 13 3 5 11 3 10 3 4 6 7 7 7 12 7 2 3 7 7 6 3 12 12 3 0 20 16 17 3 24 16 17 IM VT 4284 indd 47 7 18 19 9 49 AM...

Page 48: ...48 3 10 12 3 HEAt 3 5 11 3 10 3 4 6 7 7 7 18 7 4 5 7 7 6 3 18 18 15 1 00 18 15 16 17 3 24 16 17 3 10 18 3 IM VT 4284 indd 48 7 18 19 9 49 AM...

Page 49: ...49 5 11 3 10 3 4 6 7 7 7 20 7 1 2 7 7 6 3 20 20 15 0 35 20 15 16 17 3 10 20 3 HEAt 3 26 3 10 3 7 7 7 22 IM VT 4284 indd 49 7 18 19 9 49 AM...

Page 50: ...50 7 4 5 7 7 6 3 22 22 15 0 35 22 15 16 17 3 24 16 17 3 10 22 3 HEAt 3 5 11 3 10 3 4 6 7 7 7 19 6 7 7 7 7 7 1 2 7 IM VT 4284 indd 50 7 18 19 9 49 AM...

Page 51: ...51 6 3 19 19 0 45 16 17 3 10 19 3 5 11 3 10 3 4 6 7 7 7 21 7 7 7 1 2 27 27 7 6 3 21 13 3 0 30 16 17 3 24 16 17 3 10 21 3 HEAt IM VT 4284 indd 51 7 18 19 9 49 AM...

Page 52: ...52 3 Add 3 Add 6 7 3 5 11 3 10 3 4 6 7 27 7 7 7 7 23 7 7 6 3 23 13 3 0 30 16 17 3 10 23 3 5 11 3 10 3 4 6 7 7 7 IM VT 4284 indd 52 7 18 19 9 49 AM...

Page 53: ...53 5 1 6 7 1 1 1 1 1 1 1 220 240 50 700 4 info vitek ru 3 IM VT 4284 indd 53 7 18 19 9 49 AM...

Page 54: ...54 VT 4284 1 2 3 4 5 6 7 8 9 10 11 12 13 14 15 16 17 18 19 20 21 22 23 24 25 26 27 30 IM VT 4284 indd 54 7 18 19 9 49 AM...

Page 55: ...55 www vitek ru IM VT 4284 indd 55 7 18 19 9 49 AM...

Page 56: ...56 6 6 5 5 7 26 7 7 20 30 40 4 6 7 7 27 26 25 1 6 7 7 7 7 7 7 7 26 7 7 7 7 7 2 2 10 9 IM VT 4284 indd 56 7 18 19 9 49 AM...

Page 57: ...57 3 3 10 3 10 3 11 11 3 10 11 11 4 00 16 17 10 11 12 13 14 18 15 19 20 21 22 23 3 16 17 16 17 3 24 16 17 24 24 3 1 00 16 17 10 24 3 3 0 IM VT 4284 indd 57 7 18 19 9 49 AM...

Page 58: ...58 30 30 2 20 15 1 10 1 35 6 35 31 35 30 20 30 35 31 1 30 21 30 15 5 20 35 31 4 30 21 30 15 5 20 45 25 2 30 5 2 30 15 2 4 30 4 1 1 15 6 7 7 IM VT 4284 indd 58 7 18 19 9 49 AM...

Page 59: ...59 7 7 7 14 7 Water Line 25 7 Water Line 4 25 180 7 7 7 7 6 3 14 14 24 16 17 3 10 14 3 3 5 11 3 10 3 IM VT 4284 indd 59 7 18 19 9 49 AM...

Page 60: ...60 4 6 26 7 7 7 13 7 7 6 3 13 13 3 0 30 16 17 3 24 16 17 3 10 13 3 5 11 3 10 3 4 6 7 7 7 12 7 7 2 3 7 6 3 IM VT 4284 indd 60 7 18 19 9 49 AM...

Page 61: ...61 12 12 3 0 20 16 17 3 24 16 17 3 10 12 3 HEAt 3 5 11 3 10 3 4 6 7 7 7 18 7 7 4 5 7 6 3 18 18 15 1 00 18 15 16 17 3 24 16 17 IM VT 4284 indd 61 7 18 19 9 49 AM...

Page 62: ...62 3 10 18 3 5 11 3 10 3 4 6 7 7 7 20 7 1 2 7 6 3 20 20 15 0 35 20 15 16 17 3 10 20 3 HEAt 3 26 3 10 IM VT 4284 indd 62 7 18 19 9 49 AM...

Page 63: ...63 3 7 7 7 22 7 7 4 5 7 6 3 22 22 15 0 35 22 15 16 17 3 24 16 17 3 10 22 3 HEAt 3 5 11 3 10 3 4 6 7 7 7 19 6 7 7 IM VT 4284 indd 63 7 18 19 9 49 AM...

Page 64: ...64 7 7 7 1 2 7 6 3 19 19 0 45 16 17 3 10 19 3 5 11 3 10 3 4 6 7 7 7 21 7 7 7 1 2 27 27 7 6 3 21 13 3 0 30 16 17 3 24 16 17 3 IM VT 4284 indd 64 7 18 19 9 49 AM...

Page 65: ...65 10 21 3 HEAt 3 Add 3 Add 6 7 3 5 11 3 10 3 4 6 7 27 27 7 7 7 23 7 7 6 3 23 23 3 0 30 16 17 3 10 23 3 5 11 3 10 3 4 6 7 IM VT 4284 indd 65 7 18 19 9 49 AM...

Page 66: ...66 7 7 5 1 6 7 1 1 1 1 1 1 1 220 240 50 700 4 info vitek ru 3 IM VT 4284 indd 66 7 18 19 9 49 AM...

Page 67: ...IM VT 4284 indd 67 7 18 19 9 49 AM...
Page 68: ...late A serial number is an eleven unit number with the first four figures indicating the production date For example serial number 0606 means that the item was manufactured in June the sixth month 200...

Reviews: