4
ENGLISH
– Before switching the unit on, make sure that your
home mains voltage corresponds to the unit oper-
ating voltage.
– Wash the trays for dehydration (7) and the lid (8)
with warm water and a neutral detergent, dry them
thoroughly.
– Clean the unit body (1) with a damp cloth and then
wipe dry.
Attention! Never immerse the unit body (1) into
water or other liquids. Provide that water does not
get into the ventilation openings of the unit body.
USING THE UNIT
Note:
During the first operation some foreign smell and
a small amount of smoke from the heating element is
possible, this is normal.
Products loading
– Wash the products intended for dehydration, dry
them with a paper towel and cut into small pieces.
– Put the foodstuffs on the trays (7) providing space for
hot air circulation between the pieces. Remember
that hot air flow should circulate freely in the trays.
– Install the lower tray (7) on the unit body (1) so the
ledges on the unit do not match the grooves on the
tray.
– Install the trays (7) on one another. You can adjust
the distance between the trays. To install the trays
close to each other insert the ledges of the lower tray
into the grooves of the upper tray. To install the trays
farther from each other slightly turn the upper tray so
its grooves do not match the ledges of the lower tray.
– Cover the trays (7) with the lid (8).
Notes:
Install all the trays even if some of them are empty.
Put the foodstuffs on the lower trays; place the
empty trays on top.
You can use the tray with the smallest openings for
dehydrating berries.
This dehydrator operates on the principle of forced
air convection, so the ingredients located on the
lower trays are exposed to hotter and drier air and
so they are dried faster. For the best results of
dehydration we recommend placing moister food
on the lower trays and interchange the lower and
upper trays periodically. Switch the unit off before
interchanging the trays.
Switching the unit on/off
– Insert the power plug into the mains socket.
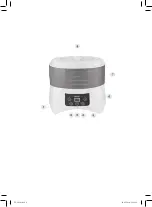
– Switch the unit on by pressing the button (2)
. The
display (5) will show the airflow temperature indica-
tions, the buttons (2)
and (3) «t°» indications will
light up.
– To switch the unit off, press the button (2)
. The
symbol OF will appear on the display (5), the cool air
flow will cool the heater spiral down for 1 minute and
then the unit will be switched off.
– Let the unit and dried foodstuffs cool down.
– Pack the ready products into packages or jars, put
away for storage (see chapter «Storage of food»).
Notes:
Check food readiness every hour. If products are dried
unevenly, you can turn them or interchange the trays
(7) for more even dehydration.
Drying time for every type of product is set
experimentally and depends on the quality and size
of the used food products, temperature and relative
humidity of the room. For further information see
chapter «Temperature and duration of dehydration».
Attention! Maximal operation time is 48 hours.
Switch the unit off after 48 hours of operation and
let it cool down completely (at least 2 hours).
Temperature setting
Hot air flow provides effective food dehydration. This
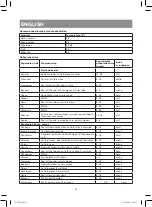
unit allows to set the air flow temperature: +38
°C
,
+48
°C
, +58
°C
, +68
°C
. To set the air flow temperature
follow these recommendations.
– Press and hold the button (3) «t°», the temperature
indications will start flashing on the display (5).
– Use the buttons (6) «-/+» to select the air flow tem-
perature.
– During 5 seconds press the button (3) «t°» to save
the settings, the temperature indications on the dis-
play will light constantly.
Note: Set low temperature if the pieces are thin
and small or if some trays (7) are empty. Set high
temperature for thick and big pieces (see chapter
«Temperature and duration of dehydration»).
Timer setting
You can set the timer that switches the unit off after the
set time runs out. The operation time is set in hours from
1 to 12 hours.
– To set the timer, press the button (4)
, the timer
indications will be flashing on the display.
– Use the buttons «-/+» (6) to set the operation time.
– During 5 seconds press the button (4)
to save
the settings.
– During the unit operation the set temperature and
the remaining operation time in hours will be shown
on the display (5).
Note:
To switch the timer off press the button (2)
twice.
RECOMMENDATIONS
To avoid food intoxication and intestinal diseases strictly
follow the recommendations below.
– Wash your hands carefully before preparing prod-
ucts for dehydration.
– Keep operating surfaces clean.
– Wash the trays (7) and the lid (8) with warm water
and a neutral detergent after every use of the dehy-
drator.
– Do not touch the products with bare hands if you
have cuts, ulcers on your hands or if you have any
skin diseases.
VT-5050.indd 4
12.03.2014 12:19:29
Summary of Contents for VT-5050 W
Page 1: ...1 3 8 14 20 26 31 Food dehydrator VT 5050 W VT 5050 indd 1 12 03 2014 12 19 28...
Page 2: ...VT 5050 indd 2 12 03 2014 12 19 28...
Page 8: ...8 1 2 3 t 4 5 6 7 8 48 48 2 8 8 VT 5050 indd 8 12 03 2014 12 19 29...
Page 9: ...9 7 8 1 1 7 7 1 7 7 8 2 5 2 3 t 2 5 OF 1 7 48 48 2 VT 5050 indd 9 12 03 2014 12 19 29...
Page 13: ...13 15 1 2 1 7 8 1 1 1 5 1 1 220 240 50 60 400 3 38 7 1070 VT 5050 indd 13 12 03 2014 12 19 30...
Page 14: ...14 1 2 3 t 4 5 6 7 8 48 48 2 8 8 VT 5050 indd 14 12 03 2014 12 19 30...
Page 15: ...15 7 8 1 1 7 7 1 7 7 8 2 5 2 3 t 2 5 OF 1 7 48 48 2 VT 5050 indd 15 12 03 2014 12 19 30...
Page 20: ...20 I I 1 2 3 t 4 5 6 7 8 48 48 2 8 8 VT 5050 indd 20 12 03 2014 12 19 30...
Page 22: ...22 7 1 12 4 6 5 4 5 2 7 8 2 7 2 1 2 2 3 7 1 4 7 3 4 7 VT 5050 indd 22 12 03 2014 12 19 31...
Page 26: ...26 1 2 3 t 4 5 6 7 8 48 48 2 8 8 VT 5050 indd 26 12 03 2014 12 19 31...
Page 28: ...28 2 7 8 i i i i 2 7 2 1 2 i i i i 2 3 7 7 3 4 7 i i i 7 VT 5050 indd 28 12 03 2014 12 19 31...

