background image

3

ENGLISH          

THERMOPOT VT-7101

An electric thermopot is intended for boiling water 
and maintaining  the required temperature of water.

DESCRIPTION

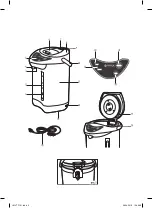
1. 

Minimal water level mark «MIN»

2. 

Water level scale 

3. 

Water dispense ON-button

4. 

Spout for pouring water

5. 

Control panel

6. 

Lid opening button

7. 

Steam release openings

8. 

Removable upper lid

9. 

Lid lock

10. 

Carrying handle

11. 

Body

12. 

Power cord connector

13. 

Rotary base

14. 

Sealing gasket

15. 

Maximal water level mark «FULL»

16. 

Power cord

Control panel

17. 

“keep warm” function indicator

18. 

“boiling” function indicator

19. 

Water dispense button «dispense»

20. 

Reboiling button “reboil”

ATTENTION!
For additional protection it is reasonable to install a 
residual current device (RCD) with nominal opera-
tion current not exceeding 30 mA, to install RCD, 
contact a specialist.

SAFETY MEASURES


Before using the electric thermopot, read this 
instruction manual carefully.


Make sure that the operating voltage of the unit 
corresponds to the voltage of your mains.


The power cord is equipped with a «euro plug»; 
plug  it  into  the  socket  with  reliable  grounding 
contact.


To avoid fire, do not use adapters for plugging 
the unit in.


Do not connect or disconnect the power cord 
with wet hands, this may cause electric shock 
or injuries.


When unplugging the unit, always pull the plug 
but not the cord. 


Never leave the operating unit unattended.


Do not switch the thermopot on if it is empty.


Do not drop or tilt the unit. 


Use the thermopot only for water boiling; it is 
prohibited to heat or boil other liquids in it.


Ensure  that  water  level  in  the  thermopot  is 
not  below  the  «MIN»  mark  and  not  above  the 
«FULL» mark.


Do  not  fill  the  thermopot  with  water  directly 
from the faucet; to fill the thermopot use a suit-
able bowl.


Place  the  thermopot  on  a  flat  dry  and  stable 
surface;  do  not  place  the  thermopot  on  the 
edge of the table.


Do not place the thermopot next to the walls or 
close  to  the  kitchen  furniture.  Place  the  ther-
mopot keeping at least 20 cm gap between the 
thermopot body and the wall or furniture and at 
least 30 cm gap above the thermopot.


Do not use the unit near heat sources or open 
fire.


Do not let the power cord hang from the edge of 
the table and make sure it does not touch hot or 
sharp edges of furniture.


Do not open the lid and do not pour water out 
during boiling.


Do not rotate the unit during water pouring.


Do not apply excessive effort when closing the 
lid. When using the thermopot, make sure that 
the lid is closed tightly. 


Keep  your  hands  away  and  do  not  bend  over 
the  steam  release  openings,  it  may  cause 
burns. Do not block the steam release opening 
with any objects.


Do not touch hot surfaces of the thermopot.


Be  careful  while  carrying  the  thermopot  filled 
with boiling water.


Do not carry the thermopot holding it by the lid 
opening button.


Be careful when pouring out hot water.


Remove  the  lid  before  draining  the  remaining 
hot water from the thermopot flask. 


To avoid risk of electric shock, do not immerse 
the thermopot, the power cord and the power 
plug of the unit into water or other liquids.


Unplug the unit, if you are not using it or before 
cleaning.


Do  not  wash  the  thermopot  in  a  dishwashing 
machine.


Before taking the unit away for long storage or 
before cleaning, unplug it, pour out water and 
let the unit cool down and dry.


For children’s safety reasons do not leave poly-
ethylene bags used as packaging unattended.

IM VT-7101.indd   3

26.04.2018   10:49:59

Summary of Contents for VT-7101

Page 1: ...1 VT 7101 3 7 12 16 Thermopot 20 IM VT 7101 indd 1 26 04 2018 10 49 58...

Page 2: ...IM VT 7101 indd 2 26 04 2018 10 49 59...

Page 3: ...above the FULL mark Do not fill the thermopot with water directly from the faucet to fill the thermopot use a suit able bowl Place the thermopot on a flat dry and stable surface do not place the therm...

Page 4: ...keep ing at least 20 cm gap between the thermopot body and the wall or furniture and at least 30 cm gap above the thermopot Open the lid 8 by pressing the front part of the button 6 and holding it Fi...

Page 5: ...tly damp cloth and then wipe it dry Use neutral detergents to remove dirt do not use metal brushes and abrasive detergents Do not immerse the thermopot and the power cord into water and other liquids...

Page 6: ...atteries if included do not discard the unit and the batteries with usual household waste after the service life expiration apply to spe cialized centers for further recycling The waste generated duri...

Page 7: ...7 VT 7101 1 MIN 2 3 4 5 6 7 8 9 10 11 12 13 14 15 FULL 16 17 keep warm 18 bolling 19 dispense 20 reboll 30 MIN FULL 20 30 IM VT 7101 indd 7 26 04 2018 10 49 59...

Page 8: ...8 www vitek ru 3 20 30 8 6 15 FULL 16 12 16 IM VT 7101 indd 8 26 04 2018 10 49 59...

Page 9: ...dispense 19 4 3 4 dispense 19 16 16 12 8 8 9 6 8 1 8 9 8 9 8 6 15 FULL 16 12 16 5 18 bolling 18 17 20 reboll 18 bolling 17 dispense 19 4 3 4 dispense 19 16 12 8 8 8 8 9 6 8 1 8 9 8 9 IM VT 7101 indd 9...

Page 10: ...10 2 1 FULL 15 16 12 16 5 18 bolling 18 17 FULL 15 1 1 220 240 50 730 4 2 IM VT 7101 indd 10 26 04 2018 10 49 59...

Page 11: ...11 info vitek ru 3 15 38 117209 28 1 IM VT 7101 indd 11 26 04 2018 10 49 59...

Page 12: ...12 VT 7101 1 MIN 2 3 4 5 6 7 8 9 10 11 12 13 14 15 FULL 16 17 keep warm 18 bolling 19 dispense 20 reboll 30 20 30 IM VT 7101 indd 12 26 04 2018 10 49 59...
Page 13: ...13 www vitek ru 3 20 30 6 8 FULL 15 16 12 16 5 18 bolling 18 17 dispense 19 4 3 IM VT 7101 indd 13 26 04 2018 10 50 00...

Page 14: ...dispense 19 16 16 12 8 8 9 6 8 1 9 8 8 9 6 8 FULL 15 16 12 16 5 18 bolling 18 17 reboll 20 bolling 18 17 dispense 19 4 3 4 dispense 19 16 12 8 8 8 8 9 6 8 1 9 8 8 9 IM VT 7101 indd 14 26 04 2018 10 5...

Page 15: ...15 2 1 FULL 15 16 12 16 5 18 bolling 18 17 FULL 15 1 1 220 240 50 730 4 2 info vitek ru 3 i i i i i i i i i i i i IM VT 7101 indd 15 26 04 2018 10 50 00...

Page 16: ...16 VT 7101 1 MIN 2 3 4 5 6 7 8 9 10 11 12 13 14 15 FULL 16 17 keep warm 18 bolling 19 dispense 20 reboll 30 MIN FULL 20 30 IM VT 7101 indd 16 26 04 2018 10 50 00...

Page 17: ...17 www vitek ru 3 20 30 8 6 15 FULL 16 12 16 5 18 bolling 18 17 dispense 19 IM VT 7101 indd 17 26 04 2018 10 50 00...

Page 18: ...4 dispense 19 16 16 12 8 8 9 6 8 1 8 9 8 9 8 6 15 FULL 16 12 16 5 18 bolling 18 17 20 reboll 18 bolling 17 dispense 19 4 3 4 dispense 19 16 12 8 8 8 8 9 6 8 1 8 9 8 9 IM VT 7101 indd 18 26 04 2018 10...

Page 19: ...19 2 1 FULL 15 16 12 16 5 18 bolling 18 17 FULL 15 1 1 220 240 50 730 4 2 info vitek ru 3 2014 30 2014 35 IM VT 7101 indd 19 26 04 2018 10 50 00...

Page 20: ...20 VT 7101 1 MIN 2 3 4 5 6 7 8 9 10 11 12 13 14 15 FULL 16 17 keep warm 18 bolling 19 dispense 20 reboll 30 MIN FULL 20 30 IM VT 7101 indd 20 26 04 2018 10 50 00...

Page 21: ...21 www vitek ru 3 20 30 6 8 FULL 15 16 12 16 5 18 bolling 18 17 dispense 19 4 3 IM VT 7101 indd 21 26 04 2018 10 50 00...

Page 22: ...dispense 19 16 16 12 8 8 9 6 8 1 9 8 8 9 6 8 FULL 15 16 12 16 5 18 bolling 18 17 reboll 20 bolling 18 17 dispense 19 4 3 4 dispense 19 16 12 8 8 8 8 9 6 8 1 9 8 8 9 IM VT 7101 indd 22 26 04 2018 10 5...

Page 23: ...23 2 1 FULL 15 16 12 16 5 18 bolling 18 17 FULL 15 1 1 220 240 50 730 4 2 info vitek ru 3 IM VT 7101 indd 23 26 04 2018 10 50 00...

Page 24: ...te A serial number is an eleven unit number with the first four figures indicating the production date For example serial number 0606 means that the item was manufactured in June the sixth month 2006...

Reviews: