4
ENGLISH
Attention! Do not allow children to play with poly-
ethylene bags or packaging film. Danger of suf-
focation!
•
Close supervision is necessary when children
or disabled persons are near the operating unit.
•
The unit is not intended for usage by physi-
cally or mentally disabled persons (including
children) or by persons lacking experience or
knowledge if they are not under supervision of
a person who is responsible for their safety or
if they are not instructed by this person on the
usage of the unit.
•
Do not leave children unattended to prevent
using the unit as a toy.
•
Never use the unit if the power cord or the
power cord plug is damaged, if the unit works
improperly or after it was dropped.
•
Do not attempt to repair the unit. Do not dis-
assemble the unit by yourself, if any malfunc-
tion is detected or after it was dropped, unplug
the unit and apply to any authorized service
center from the contact address list given in
the warranty certificate and on the website
www.vitek.ru.
•
Transport the unit in the original package only.
•
Keep the unit out of reach of children and dis-
abled persons.
THE UNIT IS INTENDED FOR HOUSEHOLD USE
ONLY, ITS COMMERCIAL USAGE AND USAGE
IN PRODUCTION AREAS AND WORK SPACES IS
PROHIBITED.
BEFORE THE FIRST USE
After unit transportation or storage at low
temperature keep it for at least 3 hours at
room temperature before switching on.
There may be water spots in the thermopot, this
is normal, as the unit has undergone factory qual-
ity control.
•
Unpack the thermopot; remove any advertis-
ing stickers that can prevent the unit operation.
•
Check the unit for damages, do not use it in
case of damages.
•
Make sure that the unit operating voltage corre-
sponds to the voltage of your mains.
•
Place the thermopot on a dry flat surface keep-
ing at least 20 cm gap between the thermopot
body and the wall or furniture and at least 30 cm
gap above the thermopot.
•
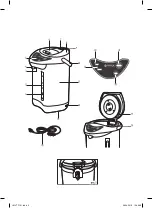
Open the lid (8) by pressing the front part of the
button (6) and holding it.
•
Fill the thermopot with water using a suitable
bowl, do not exceed the maximal water level
mark (15) «FULL».
•
Insert the power cord (16) connector into the
socket (12) on the thermopot body, and plug
the power cord (16) into the mains socket.
•
The boiling mode indicator “boiling” (18) will
light up on the control panel (5).
•
After water starts boiling, the thermopot will
be switched to the keep warm mode, the indi-
cator (18) will go out and the indicator (17) will
light up.
Note: - the thermopot uses a long boiling technol-
ogy which allows to significantly reduce the chlo-
rine level in water.
•
Drain the water; to do this switch the water
pump on by pressing the button (19) “dis-
pense”.
Attention! Be careful when pouring out water to
avoid burns by hot water.
Version 1:
•
place a suitable bowl, for instance, a cup under
the spout for pouring water (4) and press the
water dispense button (3) with a rim of the cup.
Version 2:
•
place a suitable bowl under the spout for pour-
ing water (4) and press the water dispense but-
ton (19) «dispense».
•
Switch the thermopot off, to do this disconnect
the power cord (16) plug from the mains socket
and disconnect the power cord (16) connector
from the socket (12).
•
Open the thermopot lid (8) and wait until it cools
down completely.
•
Before removing the lid (8) close it, press on the
lock (9), take the button (6), lift the lid (8) and
remove it (pic. 1).
•
Carefully tilt the thermopot to drain the remain-
ing water.
•
Set the lid (8) back to its place having prelim-
inary pressed the lock (9); before using the
thermopot make sure that the lid (8) is properly
fixed with the lock (9).
USAGE OF THERMOPOT
•
Open the lid (8) by pressing the button (6) and
holding it.
•
Fill the thermopot with water using a suitable
bowl, do not exceed the maximal water level
mark (15) «FULL».
IM VT-7101.indd 4
26.04.2018 10:49:59
Summary of Contents for VT-7101
Page 1: ...1 VT 7101 3 7 12 16 Thermopot 20 IM VT 7101 indd 1 26 04 2018 10 49 58...
Page 2: ...IM VT 7101 indd 2 26 04 2018 10 49 59...
Page 8: ...8 www vitek ru 3 20 30 8 6 15 FULL 16 12 16 IM VT 7101 indd 8 26 04 2018 10 49 59...
Page 11: ...11 info vitek ru 3 15 38 117209 28 1 IM VT 7101 indd 11 26 04 2018 10 49 59...


