
3
ENGLISH
IRON VT-8347
The iron is intended for ironing clothes, bedding
and for vertical steaming of fabrics.
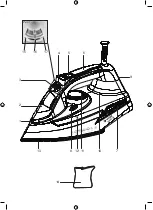
DESCRIPTION
1.
Water spray
2.
Water inlet lid
3.
«Continuous Steam Supply» Switch
4.
Burst of steam button
5.
Water spray button
6.
Handle
7.
Heating element on/off/auto switch-off
indicator
8.
Self-Clean Button
9.
Iron base
10.
Water tank
11.
Temperature control knob
12.
Maximum water level mark
13.
Iron soleplate
14.
Beaker
«Continuous Steam Supply» Switch (3)
15.
Steam Supply is off
16.
Steam Supply is on
17.
Steam Supply is at maximum
ATTENTION!
For additional protection it is reasonable to install
a residual current device (RCD) with nominal
operation current not exceeding 30 mA, to install
RCD, contact a specialist.
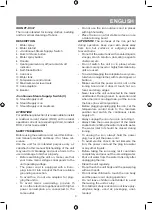
SAFETY MEASURES
Before using the electrical unit, read this instruc-
tion manual carefully and keep it for future ref-
erence.
Use the unit for its intended purpose only, as
specified in this manual. Mishandling of the unit
may lead to its breakage and cause harm to the
user or damage to his/her property.
•
Before switching the unit on, make sure that
your home mains voltage corresponds to the
unit operating voltage.
•
The power cord is equipped with a Euro-
plug; insert it into a socket that has a reliable
grounding connection.
•
To avoid fire, do not use adapters for plug-
ging the unit in.
•
To avoid mains overloading, provide th
at no other electrical appliances with higher
power consumption are connected to the
same outlet.
•
Do not use the iron outdoors and in places
with high humidity.
•
Place the iron on a flat stable surface or use
a stable ironing board.
ATTENTION! The surfaces of the iron get hot
during operation. Keep open skin areas away
from iron hot surfaces or outgoing steam
to avoid burns.
•
Do not fill the water tank with scented liquids,
vinegar, starch solution, descaling reagents,
chemicals etc.
•
Do not switch the unit on in places where
aerosols are sprayed or highly flammable liq-
uids are used.
•
To avoid damaging the soleplate be very care-
ful when ironing clothes with metal zippers or
buttons.
•
Make sure that the power cord is not on the
ironing board and it doesn’t touch hot sur-
faces and sharp edges.
•
Never leave the unit connected to the mains
unattended. During breaks in operation and
when the iron is cooling down, put the iron on
the base (in a vertical position).
•
Before plugging/unplugging the iron, set the
temperature control knob to the minimum
position and switch the continuous steam
supply off.
•
Always unplug the iron if you are not using it.
•
Always take the power plug out of the mains
socket before filling the water tank with water.
•
The water inlet lid should be closed during
ironing.
•
To unplug the iron, always hold the power
plug, never pull the power cord.
•
To avoid electric shock, do not immerse the
iron, the power cord and the plug into water
or any other liquids.
•
Before taking the iron away, let it cool down
completely and pour out the remaining water.
•
Pour out water from the water tank only after
unplugging the iron.
•
Clean the unit regularly.
•
Do not touch the unit body and the power plug
with wet hands.
•
Do not allow children to touch the iron body
and the power cord during operation.
•
Do not leave children unattended to avoid
them using the unit as a toy.
•
For children safety reasons do not leave poly-
ethylene bags, used as packaging, unat-
tended.
Summary of Contents for VT-8347
Page 1: ...VT 8347 Iron 3 8 14 19 25 30...
Page 2: ...6 5 8 9 10 7 11 12 13 15 16 17 4 3 1 2 14 1 2400 W M A X 5...
Page 8: ...8 VT 8347 1 2 3 4 5 6 7 8 9 10 11 12 13 14 3 15 16 17 30...
Page 9: ...9 www vitek ru 13 10 3 3 1 15 Max 17 16 8 4...
Page 10: ...10 5 11 MIN MAX 12 10 10 11 MIN 3 15 2 14 10 2 MAX 12 2 13 10 60 40...
Page 12: ...12 4 4 4 5 11 10 30 4 4 5 13 2 3 15 10 MAX 9 11 7 13 7 11 MIN 8 13 10 3 15 9 13 10 13 30 7...
Page 14: ...14 VT 8347 1 2 3 4 5 6 7 8 9 10 11 12 13 14 3 15 16 17 30...
Page 16: ...16 2 13 10 MAX 60 40 9 11 7 13 7 7 5 10 9 3 15 11 7 13 7 11 MIN...
Page 19: ...19 VT 8347 1 2 3 4 5 6 7 8 9 10 11 12 13 14 3 15 16 17 30 i...
Page 20: ...20 www vitek ru 13 10 3 3 1 15 Max 17 16 8 4 5 11 MIN MAX 12 10...
Page 21: ...21 10 11 MIN 3 15 2 2 14 10 2 MAX 12 2 13 10 60 40 9...
Page 23: ...23 13 2 3 15 10 MAX 9 11 7 13 7 11 MIN 8 13 10 3 15 9 13 10 13 30 7 11 MIN 3 15 2 10 2 9...
Page 24: ...24 1 1 1 1 220 240 50 60 2000 2300 2400 3 info vitek ru 2014 30 2014 35...
Page 25: ...25 VT 8347 1 2 3 4 5 6 7 8 9 10 11 12 13 14 3 15 16 17 30...
Page 27: ...27 2 13 10 60 40 9 11 7 13 7 7 5 10 9 3 15 11 7 13 7 11 MIN 9...
Page 29: ...29 11 MIN 3 15 2 10 2 9 1 1 1 1 220 240 50 60 2000 2300 2400 info vitek ru 3...
Page 35: ......