4
ENGLISH
Attention! Do not allow children to play with
polyethylene bags or packaging film. Danger of
suffocation!
•
This unit is not intended for usage by children.
Place the unit out of reach of children during
operation and cooling down.
•
The unit is not intended to be used by peo-
ple with physical, sensory or mental disabili-
ties (including children) or by persons lacking
experience or knowledge if they are not under
supervision of a person who is responsible for
their safety or if they are not instructed by this
person on the usage of the unit.
•
Do not use the unit if the power plug or the
power cord is damaged. If the power cord is
damaged, it should be replaced by the manu-
facturer, maintenance service or similar quali-
fied personnel to avoid danger.
•
Do not attempt to repair the unit. Do not disas-
semble the unit by yourself, if any malfunction
is detected or after it was dropped, unplug
the unit and apply to any authorized service
center from the contact address list given in
the warranty certificate and on the website
www.vitek.ru.
•
Transport the unit in the original package only.
•
Keep the unit out of reach of children and dis-
abled persons.
THIS UNIT IS INTENDED FOR HOUSEHOLD USE
ONLY. ITS COMMERCIAL USAGE AND USAGE
IN PRODUCTION AREAS AND WORK SPACES IS
PROHIBITED.
BEFORE THE FIRST USE
After unit transportation or storage at low
temperature keep it for at least three hours
at room temperature before switching on.
•
Unpack the iron; remove the protection from
the soleplate (13), if any.
•
Check the unit for damages, do not use the
iron in case of damages.
•
Before switching the iron on, make sure that
your home mains voltage corresponds to the
iron operating voltage.
•
There may be water residue in the tank (10),
this is normal, as the iron has undergone fac-
tory quality control.
Note:
–
While the first switching on the heating ele-
ment of the iron burns, therefore occurrence
of foreign smell and a small amount of smoke
is possible, it is normal.
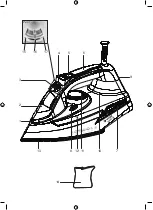
Control knobs, indications and symbols
«Continuous Steam Supply» Switch (3) has 3 pre-
determined positions (fig. 1):
(15) – Steam Supply is off;
Max (17) – Steam Supply is at maximum;
(16) – Steam Supply is on;
(8) – self-clean.
•
Burst of steam button (4) – press the button to
activate the additional steam supply function.
•
Water spray button (5) – press the button to
activate the water spray function for dampen-
ing the fabrics.
•
Temperature control knob (11) – allows to
set the iron soleplate temperature depend-
ing on the type of fabric (see the table
below). The knob is in the position «MIN» –
the iron is off.
•
«MAX» maximum water level mark (12).
WATER SELECTION
You can use tap water to fill the water tank (10).
If tap water is hard, use distilled or demineralized
water, this will prolong service life of the iron.
Note:
–
Do not fill the water tank (10) with scented
liquids, vinegar, starch solution, descaling
reagents, chemical agents etc.
FILLING THE WATER TANK
Before filling the iron with water, make sure that
it is unplugged.
•
Set the temperature control knob (11) to the
position «MIN», and the continuous steam
supply knob (3) to the position (15) – continu-
ous steam supply is off.
•
Open the water inlet lid (2).
•
Open the water inlet lid (2) and pour water into
the water tank (10) using the beaker (14) and
then close the lid (2) tight.
Notes:
–
Do not exceed the «MAX» mark (12).
–
If you need to refill water during ironing,
always switch the iron off at first and unplug it.
–
After you finish ironing, switch the iron off,
wait until it cools down completely, then open
the water inlet lid (2), turn over the iron and
drain the remaining water.
IRONING TEMPERATURE
Before operation, test the heated iron on a piece
of cloth to be sure that the iron soleplate (13) and
the water tank (10) are clean.
Summary of Contents for VT-8347
Page 1: ...VT 8347 Iron 3 8 14 19 25 30...
Page 2: ...6 5 8 9 10 7 11 12 13 15 16 17 4 3 1 2 14 1 2400 W M A X 5...
Page 8: ...8 VT 8347 1 2 3 4 5 6 7 8 9 10 11 12 13 14 3 15 16 17 30...
Page 9: ...9 www vitek ru 13 10 3 3 1 15 Max 17 16 8 4...
Page 10: ...10 5 11 MIN MAX 12 10 10 11 MIN 3 15 2 14 10 2 MAX 12 2 13 10 60 40...
Page 12: ...12 4 4 4 5 11 10 30 4 4 5 13 2 3 15 10 MAX 9 11 7 13 7 11 MIN 8 13 10 3 15 9 13 10 13 30 7...
Page 14: ...14 VT 8347 1 2 3 4 5 6 7 8 9 10 11 12 13 14 3 15 16 17 30...
Page 16: ...16 2 13 10 MAX 60 40 9 11 7 13 7 7 5 10 9 3 15 11 7 13 7 11 MIN...
Page 19: ...19 VT 8347 1 2 3 4 5 6 7 8 9 10 11 12 13 14 3 15 16 17 30 i...
Page 20: ...20 www vitek ru 13 10 3 3 1 15 Max 17 16 8 4 5 11 MIN MAX 12 10...
Page 21: ...21 10 11 MIN 3 15 2 2 14 10 2 MAX 12 2 13 10 60 40 9...
Page 23: ...23 13 2 3 15 10 MAX 9 11 7 13 7 11 MIN 8 13 10 3 15 9 13 10 13 30 7 11 MIN 3 15 2 10 2 9...
Page 24: ...24 1 1 1 1 220 240 50 60 2000 2300 2400 3 info vitek ru 2014 30 2014 35...
Page 25: ...25 VT 8347 1 2 3 4 5 6 7 8 9 10 11 12 13 14 3 15 16 17 30...
Page 27: ...27 2 13 10 60 40 9 11 7 13 7 7 5 10 9 3 15 11 7 13 7 11 MIN 9...
Page 29: ...29 11 MIN 3 15 2 10 2 9 1 1 1 1 220 240 50 60 2000 2300 2400 info vitek ru 3...
Page 35: ......

