5
ENGLISH
•
Always check the recommended ironing tem-
perature indicated on the tag before ironing.
•
If the item label is marked with the symbol
, do not iron the item.
•
If there is no tag with recommended ironing
temperature, but you know the type of fab-
ric, use the following table to determine the
proper temperature.
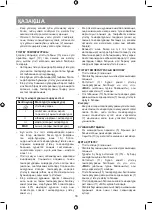
Ironing temperature table
Icons
Fabric type (temperature)
do not iron
•
Synthetics, nylon, acryl, polyester
(low temperature)
••
Silk/wool (medium temperature)
•••
Cotton (high temperature)
МАХ
Linen (high temperature)
•
This table is only valid for smooth materials.
Fabrics of other types (crimped, raised, etc.)
are best ironed at low temperature.
•
Sort items by ironing temperature first: syn-
thetics to synthetics, wool to wool, cotton to
cotton etc.
•
The iron heats up faster than it cools down.
For this reason, it is recommended to iron
the items which require low temperature first
(for instance, synthetic fabrics). After that,
start ironing at higher temperature (silk/wool).
Cotton and linen items should be ironed last.
•
If an item is made of mixed fabrics, the iron
should be set to the lowest temperature (for
instance, if an item is 60% polyester and 40%
cotton, it should be ironed at temperature
used for polyester ironing «•»).
•
If you cannot define the fabric structure, find
a spot that is inconspicuous when the item is
being worn and select the ironing temperature
experimentally (always start with the lowest
temperature and raise it gradually until you get
the desired result).
•
Corduroy and other fabrics that become
glossy quickly should be ironed strictly in
one direction (in the direction of the pile) with
slight pressure.
•
To avoid appearance of glossy spots on syn-
thetic and silk fabrics, iron them backside.
SETTING THE IRONING TEMPERATURE
•
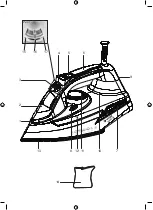
Place the iron on its base (9).
•
Insert the power plug into the mains socket.
•
Turn the control knob (11) to set the required
ironing temperature: «•», «••», «•••» or
«MAX», depending on the type of fabric, the
indicator (7) will light up.
•
Once the temperature of the soleplate (13)
reaches the set point, the indicator (7) will go
out and you can start ironing.
Note:
–
If you are ironing at high temperature but you
need to switch to lower temperature, wait until
the soleplate temperature decreases and the
indicator (7) lights up, and only then you may
start ironing.
WATER SPRAY
•
You can dampen the fabric by pressing the
water spray button (5) several times.
•
Make sure that there is enough water in the
water tank (10).
DRY IRONING
•
Place the iron on its base (9).
•
Insert the power plug into the mains
socket.
•
Set the continuous steam supply knob (3) to
the position (15) – the steam supply is off.
•
Turn the control knob (11) to set the required
ironing temperature: «•», «••», «•••» or
«MAX», depending on the type of fabric, the
indicator (7) will light up.
•
Once the temperature of the soleplate (13)
reaches the set point, the indicator (7) will go
out and you can start ironing.
•
After you finish ironing, set the temperature
control knob (11) to the “MIN” position.
•
Pull the power plug out of the mains socket
and let the iron cool down completely.
STEAM IRONING
While steam ironing it is necessary to set the iron-
ing temperature «•••», «МАХ».
•
Place the iron on its base (9).
•
Set the continuous steam supply knob (3) to
the position (15) – the steam supply is off.
•
Insert the power plug into the mains socket.
•
Make sure that there is enough water in the
water tank (10).
•
Turn the control knob (11) to set the required
ironing temperature: «•••» or «MAX», the
pilot lamp (7) will light up.
•
When the soleplate (13) reaches the set tem-
perature, the indicator (7) will go out, you can
start ironing.
Summary of Contents for VT-8347
Page 1: ...VT 8347 Iron 3 8 14 19 25 30...
Page 2: ...6 5 8 9 10 7 11 12 13 15 16 17 4 3 1 2 14 1 2400 W M A X 5...
Page 8: ...8 VT 8347 1 2 3 4 5 6 7 8 9 10 11 12 13 14 3 15 16 17 30...
Page 9: ...9 www vitek ru 13 10 3 3 1 15 Max 17 16 8 4...
Page 10: ...10 5 11 MIN MAX 12 10 10 11 MIN 3 15 2 14 10 2 MAX 12 2 13 10 60 40...
Page 12: ...12 4 4 4 5 11 10 30 4 4 5 13 2 3 15 10 MAX 9 11 7 13 7 11 MIN 8 13 10 3 15 9 13 10 13 30 7...
Page 14: ...14 VT 8347 1 2 3 4 5 6 7 8 9 10 11 12 13 14 3 15 16 17 30...
Page 16: ...16 2 13 10 MAX 60 40 9 11 7 13 7 7 5 10 9 3 15 11 7 13 7 11 MIN...
Page 19: ...19 VT 8347 1 2 3 4 5 6 7 8 9 10 11 12 13 14 3 15 16 17 30 i...
Page 20: ...20 www vitek ru 13 10 3 3 1 15 Max 17 16 8 4 5 11 MIN MAX 12 10...
Page 21: ...21 10 11 MIN 3 15 2 2 14 10 2 MAX 12 2 13 10 60 40 9...
Page 23: ...23 13 2 3 15 10 MAX 9 11 7 13 7 11 MIN 8 13 10 3 15 9 13 10 13 30 7 11 MIN 3 15 2 10 2 9...
Page 24: ...24 1 1 1 1 220 240 50 60 2000 2300 2400 3 info vitek ru 2014 30 2014 35...
Page 25: ...25 VT 8347 1 2 3 4 5 6 7 8 9 10 11 12 13 14 3 15 16 17 30...
Page 27: ...27 2 13 10 60 40 9 11 7 13 7 7 5 10 9 3 15 11 7 13 7 11 MIN 9...
Page 29: ...29 11 MIN 3 15 2 10 2 9 1 1 1 1 220 240 50 60 2000 2300 2400 info vitek ru 3...
Page 35: ......

