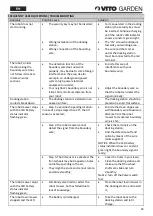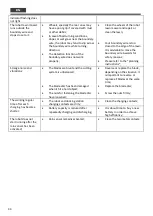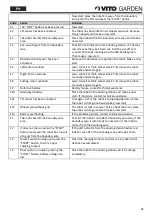
45
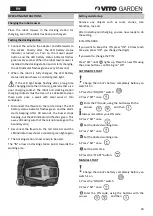
New start: place the robot 1m away from the boundary
wire, enter the PIN and press the "START" button
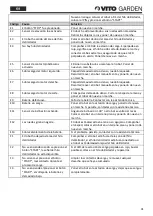
Code
Cause
Solution
E1
The "STOP" button has been pressed.
New start.
E2
Lift sensor has been activated.
The robot has been lifted or its wheels are stuck. Remove
foreign objects and make a new start.
E3
The robot has left the boundary wire
area.
Place the robot within the boundary wire area and make a
new start.
E4
Run out of signal from the boundary
wire.
Check the LED indicator at the docking station. If it flashes
red, it means the wire's been cut. Find the cut-off and
connect both ends, making sure the LED flashes green.
Then make a new start.
E5
Obstacle/touch sensor has been
activated.
Remove the obstacles or reposition the robot. Make a new
start.
E6
Left motor overload.
Lawn too tall or thick, wheel stuck. Trim/move the robot
manually and start again.
E7
Right motor overload.
Lawn too tall or thick, wheel stuck. Trim/move the robot
manually and start again.
E8
Cutting motor overload.
Lawn too tall or thick, wheel stuck. Trim/move the robot
manually and start again.
E9
Defective battery.
Battery failure, contact technical assistance.
E10
Discharged battery.
Place the robot in the docking station and make a new
start. If it persists, contact technical assistance.
E11
Tilt sensor has been activated.
Tilt angle > 30° or the robot is turned upside down. Place
the robot on flat ground and make a new start.
E12
Wheels spin without grip.
The robot is stuck in sand or holes. Check the lawn, place
the robot on flat ground and make a new start.
E13
Battery overheating.
If the problem persists, contact technical assistance.
F1
The robot has left the boundary wire
area.
Check if the robot is outside the boundary wire area, if the
boundary wire is incorrectly connected or if the robot is
too far from the bounding wire.
F2
It does not turn on when the "START"
button is pressed, the robot has run out
of signal from the boundary wire.
If the LED indicator from the docking station flashes red,
look for cut-offs in the bounding wire and repair them.
F3
Doesn't switch on when you press the
"START" button, there is a poor
charging contact.
Clean the charging contacts and remove any debris that
has been accumulated.
F4
Does not turn on when pressing the
"START" button, battery voltage too
low.
Place the robot in the docking station and let it charge
completely.
Summary of Contents for VIRCR1000
Page 1: ...PT EN ROBOT CORTA RELVA ROBOT LAWN MOWER ES FR ROBOT CORTACÉSPED ROBOT TONDEUSE VIRCR1000 ...
Page 61: ...61 FIGURA 1 ...
Page 63: ......
Page 64: ...VIRCR1000_REV00_JAN20 ...

