25
ASSEMBLY INSTRUCTIONS
Connection to the compressed air line
1.
Remove the plastic cap from the compressed air inlet;
2.
Insert and tighten the air hose coupling (4) into the air inlet;
3.
Attach the coupling to the air hose.
Impact sockets
Never insert or change the impact sockets while the
appliance is running. Always disconnect the appliance
from the compressed air supply before doing this.
1.
Fit the impact sockets, making sure it is properly fixed;
2.
To remove, pull out the impact socket.
OPERATING INSTRUCTIONS
Start and stop
Check the working pressure and adjust in accordance with
the technical data (Pmax < 6.3 bar).
1.
To switch the pneumatic tool on, press the "ON/OFF" switch
(3);
2.
To switch off, release the "ON/OFF" switch.
Direction of rotation
Do not change the direction of rotation while the
pneumatic impact wrench is running, it can cause serious
damage to the appliance. Always check the direction of rotation
before you start operating it.
1.
To select the direction of rotation, use the forward/reverse
lever (2).
▪
For clockwise rotation, set the lever to the (F) position;
▪
For counter clockwise rotation, set the lever to the (R)
position.
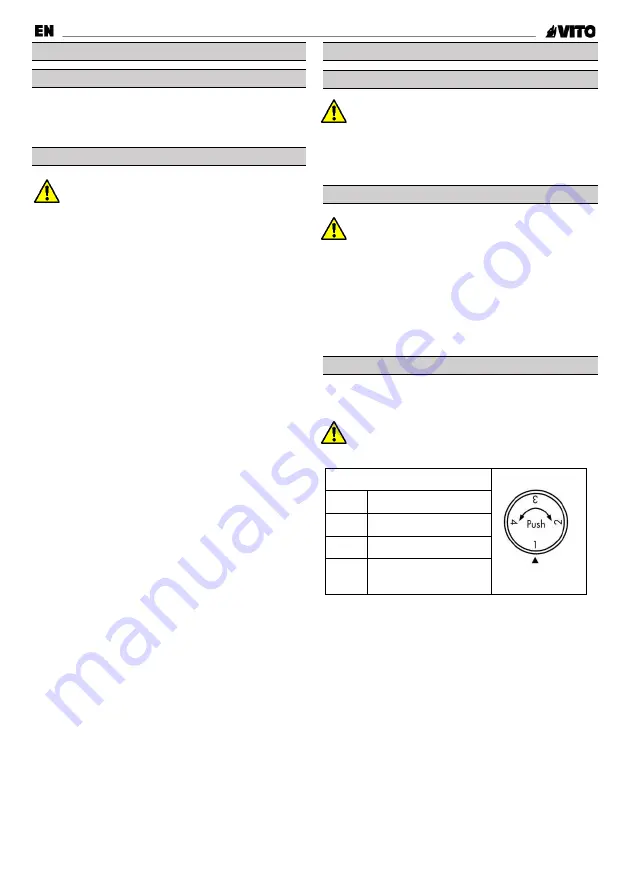
Torque adjustment
Turn the torque control knob (5) to choose the most suitable
torque for the work to be performed.
The ideal operating pressure for the impact wrench is 6.3
bar. At lower pressure the maximum torque will not be
reached.
POSITION
1
LOW, MINIMUM
2
NORMAL
3
STRONG
4
EXTRA STRONG,
MAXIMUM
Summary of Contents for PRO POWER VIKCIP12
Page 4: ...4 DESCRI O DA FERRAMENTA E CONTE DO DA EMBALAGEM KIT CHAVE IMPACTO PNEUM TICA 1 2 VIKCIP12...
Page 20: ...20 APPLIANCE DESCRIPTION AND PACKAGING CONTENT 1 2 SET IMPACT WRENCH VIKCIP12...
Page 37: ......
Page 38: ......
Page 39: ......
Page 40: ...VIKCIP12_REV01_OUT21...


