95x Series Operating Manual - May 17, 2022
Page
29
of
155
o
DC OPTION
. This shows if option NODC or DCNEG is installed in this 95x.
o
AC2 OPTION
. This shows if option AC-2 is installed in this 95x.
o
AC30 OPTION
. This shows if option AC-30 is installed in this 95x.
o
500VA OPTION
. This shows if option 500VA is installed in this 95x.
o
PMT1 OPTION
. This shows if option PMT-1 is installed in this 95x.
o
HSS OPTION
. This shows if option HSS or HSS-2 is installed in this 95x.
o
INTERFACE
. This shows if option UL-2 or GUL-3 is installed in this 95x.
o
MAX DC
. This shows the factory limit on the maximum DC Voltage generated by this unit.
o
MAX AC
. This shows the factory limit on the maximum AC Voltage generated by this unit.
o
MAX GB
. This shows the factory limit on the maximum Ground Bond current generated by this
unit.
o
UPGRADE
. This allows the user to enter a factory supplied code to upgrade their instrument to
enable additional options which were not enabled as originally purchased.
•
When finished reviewing the build information, press the
EXIT
key to return to the main configuration
menu, and then press
EXIT
again (if no additional configuring is to be performed) to exit the main
configuration menu.
SYSTEM CONFIGURATION SETTINGS
There are several system configuration settings available which affect the overall operation. These can be viewed
or set as follows
–
•
Ensure that the display indicates that the 95x is in the base menu state, i.e., the display shows the date
and time. If necessary, press the
STOP
button to abort a menu and return to the base menu state.
•
Press the
CNFG
key.
•
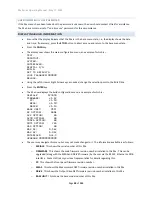
The display now shows the main configuration menu, an example of which is
–
TEST…
PRINTOUT…
SYSTEM…
INTERFACES…
DIGITAL I/O…
BUILD…
SET TO DEFAULTS…
LOCK PASSWORD:000000
RELOCK…
•
Using the Left Arrow or Right Arrow keys as needed, change the selection point to the SYSTEM line.
•
Press the
ENTER
key.
•
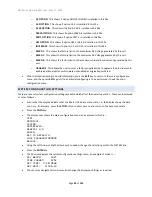
The 95x now displays the system configuration settings menu, an example of which is
–
KEY BEEPS: SOFT
TIME FORMAT: 12hr
SET TIME: 9:18:06am
SET DATE: 9-Feb-10
•
The user may navigate this sub-menu and change the displayed settings as required.


