background image

50

MP-L201 

| Version 1

8. RC-010 getting started

What’s included

RC-010 System Remote

AC/DC Adapter

RC-010 Manual

VITUS

REP

STB

A/AB

SIA-025

RC-010 System Remote

AC/DC Adapter

Summary of Contents for MP-L201

Page 1: ...MP L201 Owner s Manual ...

Page 2: ... MP L201 Menu introduction 22 MP L201 Menu discription of the elements 24 4 operation service Safety notice 26 Mains supply voltage 26 Maintenance 26 Mains fuses 27 Replacing a blown fuse 28 5 warranty Warranty 30 6 specifications MP L201 Specifications 33 All rights reserved No part of this publication may be reproduced stored in or introduced into a retrieval system or transmitted in any form or...

Page 3: ...m Remote operation modes 52 The menu structure 57 RC 010 Discription of the elements in the menu 58 RC 010 The menu structure 59 8 RC 010 examples Examples Setup 60 Example 1 61 Example 2 62 Example 2 1 62 Example 2 2 63 Example 2 3 64 Example 2 4 65 Example 2 5 66 Example 3 67 Example 4 68 Example 5 69 Example 6 70 Example 7 71 8 RC 010 specifications Specifications 72 8 RC 010 controls The funct...

Page 4: ... L201 Product ID Serial __________________________________ Product Build Date __________________________________ Signed __________________________________ All products details specifications and measurements are recorded for your MP L201 and kept by Vitus Audio ...

Page 5: ...sidered to be impossible to ever get working however they have convinced many people and reviewers world wide of the opposite Before any of our new topologies are implemented in our products they are carefully reviewed by our dedicated listening panel This way we can guarantee the correct level of musically performance and robustness Generally we re after super neutral super detailed and super dyn...

Page 6: ...e tell us Important information is presented like this Ignoring this information may cause damage to you or the unit Damage caused to the unit by ignoring this information might invalidate the warranty Introduction to the Masterpiece Series The Vitus Audio Masterpiece Series is a true high end series of products which is build on our true dedication to neutral music reproduction Every detail is ca...

Page 7: ...ack and the amplifier if extra care is not applied Vitus Audio A S cannot be held responsible for any damage that is a consequence of uncareful handling of the unit After unpacking allow 24 hours for the product to reach room temperature before connecting up and switching on This is to allow condensation to dissipate which might otherwise cause damage to the electronics Remember also that condensa...

Page 8: ... the amplifier In the top you will find the remote the power cord and brochures Now remove the side protective foam this will make it easier to grab hold of the MP L201 Two people carefully lift the amplifier out of the box and put it directly onto the floor Store the empty box and the protective foam for later use What s in the box MP L201 RC 010 System Remote Remote Charger MP L201 Manual Vitus ...

Page 9: ... Version 1 1 getting started 1 getting started MP L201 device overview The body of the MP L201 is constructed of anodized aluminium Material anodized aluminium Dimensions H x W x D 130 x 435 x 430 Weight 20 KG 135 mm 435 mm 435 mm 20 mm ...

Page 10: ...t access to the power supply In the top you will find the power cords Now remove the side protective foam this will make it easier to grab hold of the MP PSU Two people carefully lift the amplifier out of the box and put it directly onto the floor Store the empty box and the protective foam for later use What s in the box MP PSU Andromeda Power Cord Foam top Foam Sides 6 pieces Foam bottom Box 10 ...

Page 11: ...vice over view The body of the MP PSU is constructed of anodized aluminium Material anodized aluminium Dimensions H x W x D 130 x 435 x 430 Weight 30 KG 135 mm 435 mm 435 mm 20 mm 11 MP L201 Version 1 1 getting started 1 getting started ...

Page 12: ...t performance possible When you change volume a different number of shunt resistors are used To prevent pop in the output we have chosen to first add the new shunt resistors and then wait a short time before removing the unused shunt resistors at the new volume step This will give a minor fall in volume before settling at the new volume step It takes only very little time to get used to this type ...

Page 13: ...ource CD Player a pre amplifier a power amplifier Always turn off your products in reverse order Power amplifier a pre amplifier a CD Player Not following this procedure may cause damage to any of your products speakers Damage caused to any of your products speakers by not following this procedure will invalidate the warranty ...

Page 14: ... the balanced XLR output This is a true balanced amplifier DO NOT connect the output Figure 3 to any ground source including chassis or signal ground this will damage the amplifier Connecting the MP L201 14 MP L201 Version 1 2 connecting GND Ground Always follow this procedure 1 Turn the MP L201 off 2 Disconnect the mains power supply take the andromeda cable out 3 Remove the PSU Power Cable 4 Mov...

Page 15: ...RCA PSU Right Left Outputs Output 1 2 XLR R L Output 3 4 RCA R L Ground Earth MP PSU rear panel Inputs Power AC Outputs PSU right left Ground XLR out L R XLR out L R Power RCA in DC in RCA out S PDIF XLR in 15 MP L201 Version 1 2 connecting 2 connecting ...

Page 16: ... Left NEUTRIK PUSH NEUTRIK PUSH Denmark Input 1 Input 2 Input 3 MAINS GND Input 4 Input 1 Input 4 Output 1 Output 2 Output 1 Output 2 Output 3 Output 3 Output 4 Input 3 Output 4 Input 5 Input 2 Input 5 Handcrafted in Denmark By Vitus Audio an AVA Group Company NEUTRIK PUSH NEUTRIK PUSH NEUTRIK PUSH NEUTRIK PUSH NEUTRIK PUSH NEUTRIK PUSH PSU Right PSU Left Fuse ...

Page 17: ...nput 4 Output 1 Output 2 Output 1 Output 2 Output 3 Output 3 Output 4 Input 3 Output 4 Input 5 Input 2 Input 5 Handcrafted in Denmark By Vitus Audio an AVA Group Company NEUTRIK PUSH NEUTRIK PUSH NEUTRIK PUSH NEUTRIK PUSH NEUTRIK PUSH NEUTRIK PUSH PSU Right PSU Left RCA in PSU DC in 17 MP L201 Version 1 2 connecting XLR in XLR out RCA out Ground MP L201 Rear panel 2 connecting ...

Page 18: ...tion modes 1 Normal mode This is the mode you use when listening to music 2 Menu mode In this mode you can alter the settings of the MP L201 3 Standby mode In this mode the controls of the MP L201 are deactivated The MP L201 does not shut down in Standby Mode in order to maintain an optimal working temperature Operation modes ...

Page 19: ...MP L201 is cut off The MP PSU itself does not shut down it is in a sleep mode this in order to maintain an optimal working temperature Normal mode In normal mode there are 2 basic functions buttons available on the PSU Front panel 1 STANDBY Puts the PSU in and out of Standby Mode 2 POWER Switches the MP PSU on and off Functions MP PSU front panel ...

Page 20: ...ft front 1 INPUT Selects between the 5 inputs 2 MENU Switches to Menu mode 3 INPUT Selects between the 5 inputs Menu mode You enter menu mode by pushing the MENU button once in Normal mode In the Menu mode there are 3 basic functions buttons 1 Scroll forward in the menu 2 MENU Enter Exit SELECT submenus and selectsettings 3 Scroll backward in the menu Functions MP L201 left front panel ...

Page 21: ...able on the right front 1 Turns volume UP 2 MUTE Mutes the output 3 Turns volume DOWN Menu mode In the text menu it is possible to change the name of the input This is done by using the following buttons from the right front 1 Change selected character 2 MUTE Go to the next character in the display 3 Change selected character Functions MP L201 right front panel 3 operation ...

Page 22: ...al volume step in the menu to a step between 99 0dB and 6dB You can also set the initial volume step to REMEMBER When you set the MP L201 to REMEMBER then it remembers the volume step from when it was put to standby Next time the MP L201 leaves standby it will start in this volume step Bright Change the brightness of the display any step between 0 and 3 Filter optional When you have the optional f...

Page 23: ...es To accommodate easy operation we have included a gain or as some prefer to call it sensitivity setting in our amplifiers it simply sets the volume starting point at a specific volume to match the source The offset value can be set from 12 dB to 12 dB Input sensitivity Devices can have differences in output level You can adjust the sensitivity of each input between 2 Vrms 4 Vrms and 8 Vrms to mi...

Page 24: ...tputs A restart unplugging power supply is needed for changes to take effect INPUTS Change settings for each input INPUT X Change the settings of input X PHASE Turn phase inversion on or off FIXED Lock and unlock the volume by switching between FIX ON FIX OFF SET FIX Set the volume of input X to a fixed dB step Input X is now locked to a dB step and can not be adjusted with the volume control ADJU...

Page 25: ... INPUT 1 VOL STEP V INIT INPUTS With FIX OFF With FIX ON USED NOT USED USED OUT ON OUT OFF BACK 99 dB 12 dB ADJUST BACK 12 dB 12 dB 8 Vmrs 2 Vmrs OFFSET SENS TEXT FIX ON FIX OFF SET FIX FIXED PHASE FILTER LEAVE 0 3 SETUP 99 dB 6 dB BACK REMEMBER OUT 4 OUT 3 OUT 2 OUT 1 INV OFF INV ON 3 operation MP L201 menu structure ...

Page 26: ... Vitus Audio Mains supply voltage Any unit may be set for operation in 100V 115V or 230V AC Units are shipped set for the mains supply voltage according to the destination The voltage setting can be updated later by your dealer if necessary Maintenance Vitus Audio products are designed to run for many years without the need for regular maintenance Our products contain no user serviceable parts exc...

Page 27: ...on replacement then the unit most likely has a malfunction In case of malfunction the unit must be returned to Vitus Audio for repair Fuse type 230V 20 x 5mm 2 A T LBC fuse Time lag fuse 115V 20 x 5mm 4 A T LBC fuse Time lag fuse 100V 20 x 5mm 4 A T LBC fuse Time lag fuse Replacing the fuses with fuses of a type and rating different from the original fuses might result in damage to the unit and in...

Page 28: ...n fuse REMOVE THE POWER CABLE In the following 10 steps we will show you how to replace a blown fuse 4 Remove the blown fuse s 3 Pull out the fuse carrier 2 Open the fuse carrier 1 Take a small flat bladed screwdriver and place it under the fuse carrier 5 Fit new fuses into the fuse carrier ...

Page 29: ...se 29 MP L201 Version 1 4 operation service 6 Positioned the new fuses straight up in the fuse carrier 8 The fuse carrier is in place when you hear CLICK 7 Push the fuse carrier back into the back of the MP L201 4 operation service ...

Page 30: ...ll pay return freight of its choice IMPORTANT A returned product MUST be accompanied by a written description of the defect and a photocopy of the original purchase receipt This receipt must clearly list model and serial number date of purchase the name and address of the purchaser and authorized dealer and the price paid by the purchaser Vitus Audio reserves the right to modify the design of any ...

Page 31: ...easured from the date of shipment of the equipment to the Vitus Audio partner In the event warranty service is needed under these conditions the owner of the equipment must provide a copy of his purchase receipt fulfilling the requirements described under 2 Conditions above The product must be packed in its original box and returned to Vitus Audio or an authorized Vitus Audio repair center by the ...

Page 32: ...oduct In the unlikely event of service required beyond the capabilities of the importer Vitus Audio will fulfill the conditions of the warranty Such products must be returned at the owner s expense to the Vitus Audio factory together with a photocopy of the bill of sale for that product a detailed description of the problem and any other information necessary return shipment In many cases the reta...

Page 33: ...B THD noise 0 01 0 01 VOLUME CONTROL Type Relay controlled fixed resistor network Gain XLR 40dB to 12dB Gain RCA 40dB to 6dB INPUT XLR Analog RCA Analog Available 3 L R 2 L R Sensitivity 2 4 8 VRMS 2 4 8 VRMS Impedance 75Ω 75Ω Slew rate 1000V μs 1000V μs POWER CONSUMPTION Standby 30 WRMS Operation 40 WRMS DIMENSIONS Hight 130 cm With 435 cm Depth 430 cm Weight 25 Kg MP L201 Specifications ...

Page 34: ...Exit SELECT submenus and select settings 3 Scroll backward in the menu Enter the RESET submenu The display now shows RESET NO Press the button The display now shows RESET YES Press the SELECT button The settings of the MP L201 have now been restored The MP L201 now automatically goes into standby mode MP L201 Left front panel INPUT MENU SELECT MUTE M P L INPUT STANDBY POWER MENU LEAVE SETUP BACK D...

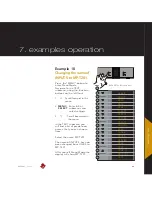
Page 35: ...2 MENU Enter Exit SELECT submenus and select settings 3 Scroll backward in the menu In the V INIT submenu you can adjust the initial volume step This is the volume step the MP L201 starts up in when it leaves standby mode The initial volume step is as a standard set to 40 Set the volume step to 30 using the and the buttons Press SELECT and leave the menu MENU LEAVE SETUP BACK DATA RESET V INIT VOL...

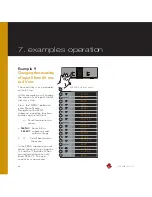
Page 36: ...P L201 to remember the current volume step The MP L201 will start up in this volume step when it leaves standby This volume step however is not remembered when the power cord is removed Then the MP L201 will initiate in the volume step as it is defined in the V INIT sub menu example 9 Go to REMEMBER press SELECT The display now shows VOL INIT The MP L201 will now start up in the current volume ste...

Page 37: ...the function buttons on the left front 1 Scroll forward in the menu 2 MENU Enter Exit SELECT submenus and select settings 3 Scroll backward in the menu Enter the BRIGHTNESS submenu The display now shows 1 Press the button The brightness is now set to 2 Press SELECT to leave the BRIGHTNESS submenu The new brightness level is now saved MP L201 Left front panel INPUT MENU SELECT MUTE M P L INPUT STAN...

Page 38: ...o the FILTER sub menu using the function buttons on the left front 1 Scroll forward in the menu 2 MENU Enter Exit SELECT submenus and select settings 3 Scroll backward in the menu The filter on Input 1 is now enabled A restart unplugging of the power supply is needed for changes to take effect MP L201 Left front panel INPUT MENU SELECT MUTE M P L INPUT STANDBY POWER MENU LEAVE SETUP BACK DATA RESE...

Page 39: ...to the PHASE sub menu using the function buttons on the left front 1 Scroll forward in the menu 2 MENU Enter Exit SELECT submenus and selectsettings 3 Scroll backward in the menu MP L201 Left front panel INPUT MENU SELECT MUTE M P L INPUT STANDBY POWER LEAVE SETUP BACK DATA RESET V INIT BRIGHT FILTER INPUTS INPUT BACK PHASE INV OFF INV ON PHASE SELECT SELECT SELECT SELECT MENU SELECT ...

Page 40: ...Left front panel INPUT MENU SELECT MUTE M P L INPUT STANDBY POWER LEAVE SETUP BACK DATA RESET V INIT BRIGHT FILTER INPUTS INPUT BACK PHASE FIXED SET FIX FIX OFF FIX ON SET FIX ADJUST O O O ADJUST SELECT SELECT SELECT SELECT MENU buttons on the left front 1 Scroll forward in the menu 2 MENU Enter Exit SELECT submenus and selectsettings 3 Scroll backward in the menu Adjust the volume step to 0 0 dB ...

Page 41: ...ng line 5 is 3 dB higher than the signal on the source using line 1 We will reduce the differences in volume between input 1 and input 5 by lowering the offset gain of line 5 with 3 dB Press the MENU button to enter Menu Mode Navigate to the INPUT sub menu using the function buttons on the left front LEAVE SETUP BACK DATA RESET V INIT BRIGHT FILTER INPUTS INPUT BACK PHASE FIXED OFFSET O O O OFFSET...

Page 42: ...uttons on the left front 1 Scroll forward in the menu 2 MENU Enter Exit SELECT submenus and selectsettings 3 Scroll backward in the menu In the SENS submenu you can adjust the sensitivity using the and the buttons When you adjusted the sensitivity press SELECT The new sensitivity is now saved MP L201 Left front panel INPUT MENU SELECT MUTE M P L INPUT STANDBY POWER Figure 12 Example 6 RP 101 LEAVE...

Page 43: ... Scroll backward in the menu In the TEXT submenu you will find a list of predefined names that you can choose from Select the name MP T201 The name of INPUT 5 has now been changed from LINE 5 to MP T201 After you left Menu Mode the display will show MP T201 MP L201 Left front panel INPUT MENU SELECT MUTE M P L INPUT STANDBY POWER Figure 12 Example 6 RP 101 LEAVE SETUP BACK DATA RESET V INIT BRIGHT...

Page 44: ... PI E PICE PIC PICK PICK PICKU PICKU PICKUP TEXT MUTE MUTE MUTE MUTE MUTE MUTE MUTE MENU MP L201 Right front panel INPUT MENU SELECT MUTE M P L INPUT STANDBY POWER Not in the predefined list We continue from the TEXT sub menu in the previous example The display is showing LINE 1 Press MUTE The first character in the display starts blinking Press or until the first character has the value you want ...

Page 45: ...able Input 5 Press the MENU button to enter Menu Mode Navigate to the INPUT sub menu using the function buttons on the left front 1 Scroll forward in the menu 2 MENU Enter Exit SELECT submenus and selectsettings 3 Scroll backward in the menu MP L201 Left front panel INPUT MENU SELECT MUTE M P L INPUT STANDBY POWER Figure 12 Example 6 RP 101 LEAVE SETUP BACK DATA RESET V INIT BRIGHT FILTER INPUTS I...

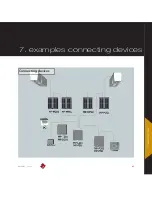
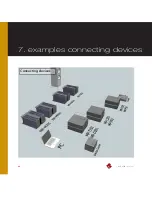
Page 46: ...1 is also connected to a media center and a PC The MP L201 is connected to a MP L201 The MP L is connected to a set of MP M201 The MP M201 are powering the speakers Units Vitus Audio products Masterpiece Series MP T201 MP L201 MP P201 MP L201 MP PSU 2x MP M201 MP MPSU 3rd party products Turntable Media Center Speakers ...

Page 47: ...47 MP L201 Version 1 7 examples connecting devices 7 examples Connecting devices ...

Page 48: ...48 MP L201 Version 1 7 examples connecting devices Connecting devices ...

Page 49: ...n one charge The RC 010 has two hotkeys buttons 1 and 3 With these hotkeys you can jump to another product without scrolling through the list of products The remote automatically forwards volume up and volume down commands to the product under hotkey 2 Shipping mode The RC 010 is put into shipping mode before transport This means that the motion sensor is disabled Shipping mode is disabled by push...

Page 50: ...50 MP L201 Version 1 8 RC 010 getting started What s included RC 010 System Remote AC DC Adapter RC 010 Manual VITUS REP STB A AB SIA 025 RC 010 System Remote AC DC Adapter ...

Page 51: ...51 MP L201 Version 1 8 RC 010 getting started RC 010 System Remote Device overview Material Anodized Aluminium Weight 287 gr VITUS REP STB A AB SIA 025 55 mm 178 mm 21 mm 8 RC 010 getting started ...

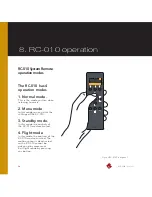
Page 52: ...ode This is the mode you use when listening to music 2 Menu mode In this mode you can alter the settings of the RC 010 3 Standby mode In this mode the controls of the RC 010 are deactivated 4 Flight mode In this mode the controls of the RC 010 are deactivated The motion sensor is deactivated so the RC 010 cannot be woken up by movement Exit flight mode by pressing any button ...

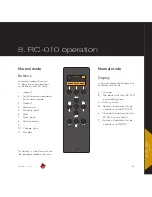
Page 53: ...ass 11 Standby A hotkey is a button that can be programmed by the user Normal mode Display In normal mode the display has 6 information fields a VA logo b The device that the RC 010 is controlling now c Battery status d Hotkey standard set to be a shortcut to the MP T201 e Change the device that the RC 010 has to control f Hotkey standard set to be a shortcut to INPUT2 2 4 8 5 6 7 10 VITUS REP STB...

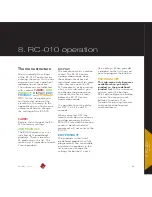
Page 54: ...vious Down 6 Select 7 Next Up 8 Previous Down 9 10 11 only available in the EDIT PRODUCT sub menu 2 4 8 5 6 7 10 VITUS REP STB A AB SIA 025 PRODUCT MP T201 INPUT 2 11 1 9 3 7 a b c d f e DISABLE KEY 1 INPUT 1 KEY 3 INPUT 2 PRODUCT MP T201 INPUT 2 Menu mode Display In the menu mode the screen has 2 different layouts and available The screen layout for the sub menus LEAVE FABRIK ADD PRODUCT and DISP...

Page 55: ...Screen layout for sub menus LEAVE FABRIK ADD PRODUCT and DISPLAY 1 The product that you are editing now 2 The sub menu item that you can enter by pressing button 6 The screen layout for the sub menu EDIT PRODUCT 5 Set hotkey 1 button 1 to a product that you can choose from in the predefined list The predefined list of products is installed standard on the RC 010 Scroll through this list with butto...

Page 56: ...ETE SELECT KEY 1 2 3 4 5 6 8 7 9 Layout 1 Layout 2 Sub menu PROGRAM KEY 1 The name of the product that you added in sub menu item ADD PRODUCT 2 Select a key button that you want to program 6 Hotkey 1 Enter this item by pressing button 1 Scroll through the list of predefined products with button 1 Select a product from the list with button 1 Change the product that you want to edit Scroll through t...

Page 57: ...ed movement for some time You can awake the RC 010 movement or by pressing a key In this sub menu you can change the power down time delay the time it takes before the RC 010 enters power down mode It is possible to set the delay to OFF 1 2 3 4 5 and 10 seconds When you select OFF the remote shuts down as soon as you stop pressing a button With OFF selected the motion sensor is deactivated and mov...

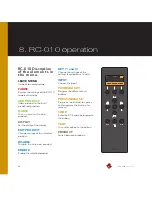
Page 58: ...Give a name to the new product DISPLAY Set the delay of the display EDIT PRODUCT Change settings of the selected product DISABLE Disable the selected product ENABLE Enable the selected product KEY 1 and 3 Change the settings of the hotkeys keys buttons 1 and 3 INPUT Choose the input PROGRAM KEY Program the different keys buttons PRESS RELEASE Program the button for press and program the button for...

Page 59: ...PUT 1 ENABLE DISABLE INPUT 1 2 3 4 5 The same sequence as key 1 The INPUT in the list of possible de vices under button 1 is now updated with the input that you have chosen KEY 3 INPUT 2 2 2 2 6 6 6 6 6 6 5 6 6 6 1 1 1 8 KEY PRESS RELEASE CODE TEXT 6 6 6 8 8 8 8 8 8 8 8 8 7 This sub menu becomes available when you add a product to the predefined product list INPUT 1 2 3 4 5 MP T201 RC 010 The menu...

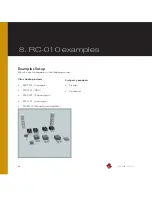
Page 60: ...0 examples Examples Setup We take our startingpoint in the following setup Vitus Audio products MP T201 transport MP L201 DAC MP P201 Phono stage MP L201 Line stage MP M201 Mono Power Amplifier 3 rd party products Pickup Computer ...

Page 61: ...he edit product sub menu VITUS PRODUCT OUTPUT 1 Press and hold button 2 for 3 seconds to enter menu mode VITUS PRODUCT MP T201 INPUT 2 SM 101 6 Switch to the next product SS 010 MP L201 MP L201 VITUS PRODUCT MP T201 INPUT 2 ENABLE DISABLE SM 010 SM 010 ENABLE DISABLE Example 1 Disabling products The RC 010 has all the Vitus Audio products installed as a standard It is convenient to disable make in...

Page 62: ...ample 2 1 Setting the hotkeys with MP M201 selected With the MP M201 selected we will show you how to set hotkey 1 to be MP T201 and hotkey 2 to be MP L201 VITUS PRODUCT 1 Press and hold button 2 for 3 seconds to enter menu mode MP M201 VITUS LEAVE MENU 2 Navigate to the edit product sub menu MP M201 VITUS EDIT PRODUCT 3 Enter the edit product sub menu MP M201 VITUS LEAVE MENU 6 Leave the menu MP ...

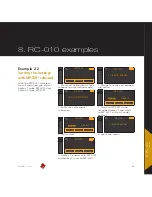
Page 63: ...PRODUCT MP T201 MP L201 7 Hotkey 1 is now set to MP L201 and hotkey 2 is set to MP L201 MP T201 SS 101 4 Scroll to MP L201 in the list under hotkey 1 and scroll to MP L201 in the list under hotkey 2 VITUS PRODUCT MP T201 MP L201 ENABLE DISABLE 5 Press select VITUS PRODUCT MP T201 MP L201 MP T201 ENABLE DISABLE Example 2 2 Setting the hotkeys with MP T201 selected With the MP T201 selected we will ...

Page 64: ...01 VITUS PRODUCT MP T201 MP L201 7 Hotkey 1 is now set to MP T201 and hotkey 2 is set to MP L201 MP L201 SS 101 4 Scroll to MP T201 in the list under hotkey 1 and scroll to MP L201 in the list under hotkey 2 VITUS PRODUCT MP T201 MP L201 ENABLE DISABLE 5 Press select VITUS PRODUCT MP T201 MP L201 MP L201 ENABLE DISABLE Example 2 3 Setting the hotkeys with MP L201 selected With the MP T201 selected...

Page 65: ...P P201 VITUS LEAVE MENU 2 Navigate to the edit product sub menu MP P201 VITUS EDIT PRODUCT 3 Enter the edit product sub menu MP P201 VITUS LEAVE MENU 6 Leave the menu MP P201 VITUS PRODUCT MP T201 MP L201 7 Hotkey 2 is set to MP L201 MP P201 SS 101 4 We leave hotkey 1 as it is and scroll to MP L201 in the list under hotkey 2 VITUS PRODUCT LOAD MP L201 ENABLE DISABLE 5 Press select VITUS PRODUCT LO...

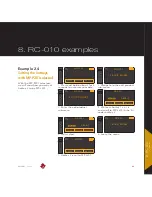
Page 66: ...PRODUCT MP T201 MP P201 7 Hotkey 1 is now set to MP T201 and hotkey 2 is set to MP P201 MP L201 SS 101 4 Scroll to MP DT01 in the list under hotkey 1 and scroll to MP P201 in the list under hotkey 2 VITUS PRODUCT MP T201 MP P201 ENABLE DISABLE 5 Press select VITUS PRODUCT MP T201 MP P201 MP L201 ENABLE DISABLE Example 2 5 Setting the hotkeys with MP L201 selected With the MP L201 selected we will ...

Page 67: ...ress and hold button 2 for 3 seconds to enter menu mode MP L201 In the next example we will show how you can program the buttons of the new product CDPLAYER VITUS PRODUCT 7 Now you can find the new product CDPLAYER in the list of products when you switch between products CDPLAYER VITUS LEAVE MENU 2 Navigate to the add product sub menu MP L201 VITUS ADD PRODUCT 3 Enter the add product sub menu MP L...

Page 68: ...ER VITUS LEAVE MENU 2 Navigate to the program key sub menu CDPLAYER VITUS PROGRAM KEY 3 Enter the program key sub menu CDPLAYER VITUS SELECT KEY 4 Select the button that you want to program We take button 7 CDPLAYER VITUS LEAVE MENU 8 Leave the menu CDPLAYER VITUS PRODUCT KEY 05 RELEASE CODE 00 TEXT 5 Select if the button has to perform its action when you press the button RELEASE or when you pres...

Page 69: ...e menu MP L201 VITUS EDIT PRODUCT 3 Enter the edit product sub menu MP L201 4 Scroll to INPUT 1 in the list under hotkey 1 6 Set KEY 1 to INPUT 3 The item under hotkey 1 has now automatically been updated to INPUT 3 VITUS PRODUCT INPUT 3 SP 102 9 The item under hotkey 1 is now set to INPUT 3 VITUS PRODUCT INPUT 3 SP 102 ENABLE KEY 1 INPUT 3 KEY 3 INPUT 2 7 Select MP L201 and press select MP L201 V...

Page 70: ...T MP T201 MP L201 1 Press and hold button 2 for 3 seconds to enter menu mode MP L201 VITUS PRODUCT OUTPUT MP L201 VITUS FABRIC 2 Navigate to the FABRIC sub menu MP L201 VITUS FABRIC 2 Enter the FABRIC sub menu MP L201 VITUS RESET TO STANDARD 2 Restore the settings of the RC 010 MP L201 VITUS LEAVE MENU 9 Leave the menu MP L201 NO YES 10 The settings of the RC 010 are now restored ...

Page 71: ...ow how to set the delay to 10 seconds VITUS PRODUCT MP T201 MP L201 1 Press and hold button 2 for 3 seconds to enter menu mode MP L201 VITUS DISPLAY 2 Navigate to the DISPLAY sub menu MP L201 VITUS DISP TIME 10 s 4 Set the delay to 10 seconds MP L201 VITUS DISP TIME 5 s 3 Enter the DISPLAY sub menu MP L201 VITUS LEAVE MENU 5 Leave the menu MP L201 The RC 010 will now power down after 10 seconds ...

Page 72: ...L201 Version 1 8 RC 010 specifications Specifications Remote Data communication protocol RC5 Battery Lithium Ion 1000 mAh AC DC Adapter Type FW74010 05 Switchmode Input 100 240 V 50 60 Hz 310 mA Output 5V 2A ...

Page 73: ...roduct Product Product Button 3 MP P201 Input 2 SP 102 Mute Button 4 Volume up Sens up Volume up Button 5 release Previous input Input Previous input Previous Track Button 5 press Fast BackWard Button 6 Mute Mute Mute Play Button 7 release Next input Input Next input Next Track Button 7 press Fast ForWard Button 8 Volume down Sens down Volume down Button 9 release Repeat Button 9 press Repeat Trac...

Page 74: ... Fast FW 52 Load 14 Next input 13 Next input 32 Fast BW 50 Power 62 Prev input 11 Prev input 33 Play 53 Input 11 Input 1 1 Output 53 Stop 54 Input 2 2 Input 1 1 Pause 48 Input 3 3 Input 2 2 Repeat 29 Input 4 4 Input 3 3 Repeat Track 11 Input 5 5 Input 4 4 Goto Track 0 0 Power 62 Input 5 5 Goto Track 1 1 Input 6 6 Goto Track 2 2 Input 7 7 Goto Track 3 3 Input 8 8 Goto Track 4 4 Input 9 9 Goto Track...

Page 75: ...Next input 0x0D Next input 0x20 Fast BW 0x32 Power 0x3E Prev input 0x0B Prev input 0x21 Play 0x35 Input 0x0B Input 1 0x01 Output 0x35 Stop 0x36 Input 2 0x02 Input 1 0x01 Pause 0x30 Input 3 0x03 Input 2 0x02 Repeat 0x1D Input 4 0x04 Input 3 0x03 Repeat Track 0x0B Input 5 0x05 Input 4 0x04 Goto Track 0 0x00 Power 0x3E Input 5 0x05 Goto Track 1 0x01 Input 6 0x06 Goto Track 2 0x02 Input 7 0x07 Goto Tr...

Page 76: ...76 MP L201 Version 1 9 pictures MP L201 Inside view MP L201 Inside view ...

Page 77: ...77 MP L201 Version 1 9 pictures MP PSU Inside view MP PSU Inside view 9 pictures ...

Page 78: ...78 MP L201 Version 1 9 pictures MP L201 Front MP L201 Front view ...

Page 79: ...79 MP L201 Version 1 9 pictures 9 pictures RC 010 Front RC 010 Front view ...

Page 80: ...Handcrafted in Denmark v i t u s a u d i o AVA Group A S Vitus Audio Sandgaardsvej 31 DK 7400 Herning Denmark Phone 45 9626 8046 Fax 45 9626 8045 e mail info vitusaudio com web site www vitusaudio com ...

Reviews: