Wiring Diagrams
Wiring Diagrams
Tech Settings
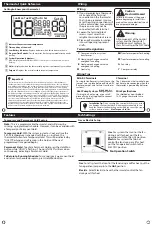
Typical 1H/1C System: 1 Transformer
Typical 1H/1C System: 2 Transformer
Typical 1H/1C Heat Pump System
COMPRESSOR
RELAY
FAN RELAY
COOL CHANGE
OVER VALVE
HEAT CHANGE
OVER VALVE
O
B
C
R
L2
L1
(HOT)
RC
RH
Y
C
W
G
Power supply
Factory-installed jumper. Remove only when installing on 2-transformer systems
Use either O or B terminals for changeover valve
Use a small piece of wire (not supplied) to connect W and Y terminals
Set fan operation setting to Electric
Optional 24 VAC common connection when thermostat is used in battery power mode
Typical Heat-Only System
Typical Heat Only System With Fan
Typical Cool-Only System
HEAT RELAY
RC
RH
Y
C
W
G
C
R
L2
L1
(HOT)
FAN RELAY
HEAT RELAY
RC
RH
Y
C
W
G
C
R
L2
L1
(HOT)
FAN RELAY
COMPRESSOR
RELAY
C
R
L2
L1
(HOT)
RC
RH
Y
C
W
G
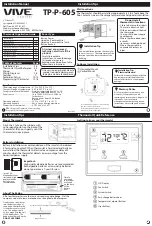
This thermostat has a technician setup menu for easy installer
configuration. To setup the thermostat for your particular application:
Swing Setting Tip
Temperature swing, sometimes called differential or cycle rate, can be customized
for this individual application. For most applications choose a swing setting that is
as long as possible without making the occupants uncomfortable.
Technician Setup Menu
1. To enter all other steps press and hold and buttons
together for 3 seconds. This 3 second delay is designed so that
homeowners do not accidentally access the installer settings.
2. Use and buttons to set.
3. Press the Program button to advance to the next step.
4. Press the time button to go back to the previous stop.
5. Press the Hold/Run button to exit.
Tech Settings
COMPRESSOR
RELAY
FAN RELAY
HEAT RELAY
RC
RH
Y
C
W
G
C
R
L2
L1
(HOT)
RC
RH
Y
C
W
G
COMPRESSOR
RELAY
HEAT RELAY
FAN RELAY
L2
L1
(HOT)
L2
L1
(HOT)
C
R
C
R
REMOVE JUMPER
The Technician Setup Menu
LCD Will Show
The compressor short cycle delay
protects the compressor from
short cycling. This feature will not
allow the compressor to be turned
on for 5 minutes after it was last
turned off.
Selecting “ON” will not allow
the compressor to be turned on
for 5 minutes after the last time
the compressor was switched
off. Select “OFF” to remove this
delay.
0
This feature allows the installer
to change the calibration of the
room temperature display. For
example, if the thermostat reads
70˚ degrees and you would like it
to read 72˚ then 2.
Room
Temperature
Calibration
You can adjust the room
temperature display to read
4˚above or below the factory
calibrated reading.
Tech Settings
Adjustment Options
Compressor
Short Cycle
Delay
Default
0N
Cd
0
Next Step
Prev Step
CAL
Next Step
Prev Step
0.5
The swing setting often called
“cycle rate”, “differential” or “
anticipation” is adjustable. A
smaller swing setting will cause
more frequent cycles and a larger
swing setting will cause fewer
cycles.
Cooling
Swing
The cooling swing setting is
adjustable from 0.2˚ to 2˚. For
example: A swing setting of
0.5˚ will turn the cooling on at
approximately 0.5˚ above the
setpoint and turn the cooling
off at approximately 0.5˚ below
the setpoint.
05
Next Step
Prev Step
The swing setting often called
“cycle rate”, “differential” or “antic-
ipation” is adjustable. A smaller
swing setting will cause more
frequent cycles and a larger swing
setting will cause fewer cycles.
The heating swing setting is
adjustable from 0.2˚ to 2˚. For
example: A swing setting of
0.5˚ will turn the heating on at
approximately 0.5˚ below the
setpoint and turn the heating
off at approximately 0.5˚ above
the setpoint.
Heating
Swing
0.4
04
Next Step
Prev Step
This feature allows you to set a
maximum heat setpoint value. The
setpoint temperature cannot be
raised above this value.
Heating
Setpoint
Limit
90
Use the and key to
select the maximum heat
setpoint.
Next Step
Prev Step
HE L
dFHE
Select F for Fahenheit temperature
read out or select C for Celsius
read out.
F for Fahrenheit
C for Celsius
F or C
F
F
FC
Next Step
Prev Step
This feature allows you to set a
minimum cool setpoint value. The
setpoint temperature cannot be
lowered below this value.
Cooling
Setpoint
Limit
44
Use the and key to
select the minimum cool
setpoint.
Next Step
Prev Step
CO L
LCD Will Show
Tech Settings
Adjustment Options
Default
You can configure this thermo-
stat to have 7 Day or 5+1+1
programming.
Program
Options
5d
Use the and key to
select
7d
for 7 Day or
5d
for
5+1+1 programmable.
Next Step
Prev Step
This feature will start heating early
to bring the building temperature
to its programmed setpoint by the
beginning of the WAKE, OCCUPIED
time period.
Morning
Recovery
ON
Use the or key to
turn on or off.
MORN RECOV


