13
Connection
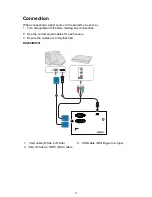
Connecting a computer
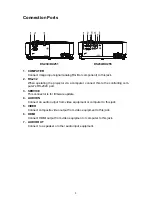
The projector provides two VGA input sockets that allow you to connect them to both
IBM
®
compatibles and Macintosh
®
computers. A Mac adapter is needed if you are
connecting legacy version Macintosh computers.
To connect the projector to a notebook or desktop computer:
• Using a VGA cable
1. Take a VGA cable and connect one end to the D-Sub output socket of the
computer.
2. Connect the other end of the VGA cable to the
COMPUTER
signal input socket on
the projector.
• Using an HDMI cable
1. Take an HDMI cable and connect one end to the
HDMI
jack of the computer.
2. Connect the other end of the cable to the HDMI jack on the projector.
Important
•
Many notebooks do not turn on their external video ports when connected to a
projector. Usually a key combo like FN + F3 or CRT/LCD key turns the external display
on/off. Locate a function key labeled CRT/LCD or a function key with a monitor symbol
on the notebook. Press FN and the labeled function key simultaneously. Refer to your
notebook's documentation to find your notebook's key combination.
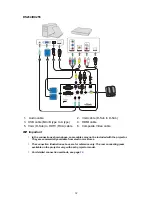
Connecting Video source devices
• Using an HDMI cable
1. Take an HDMI cable and connect one end to the
HDMI
jack of the computer.
2. Connect the other end of the cable to the HDMI jack on the projector.
• Using a VGA (D-Sub) to HDTV (RCA) cable
1. Take a VGA (D-Sub) to HDTV (RCA) cable and connect the end with 3 RCA type
connectors to the Component Video output sockets of the Video source device.
Match the color of the plugs to the color of the sockets; green to green, blue to
blue, and red to red.
2. Connect the other end of the cable (with a D-Sub type connector) to the
COM-
PUTER
socket on the projector.
Important
•
If the selected video image is not displayed after the projector is turned on and the
correct video source has been selected, check that the Video source device is turned on
and operating correctly. Also check that the signal cables have been connected
correctly.


