background image

2

If you do not understand these directions, or if you have any doubts about 

the safety of the installation, please call a qualified technician. Check 
carefully to make sure there are no missing or defective parts. Improper 
installation may cause damage or serious injury. Do not use this product 
for any purpose that is not explicitly specified in this manual and do not 
exceed weight capacity. We cannot be liable for damage or injury caused by 
improper mounting, incorrect assembly or inappropriate use.

WARNING: IMPORTANT SAFETY INFORMATION

READ AND FOLLOW ALL SAFETY REQUIREMENTS

PREPARATION

1.  After carefully removing the machine from the packing carton, remove 

all protective film and clean the honey extractor thoroughly with mild 
soap and water BEFORE first use.

2.  The honey extractor should be placed on a dry, flat stable surface.

KEEP THIS MANUAL IN A SAFE AND DRY PLACE FOR FUTURE REFERENCE

CAUTION: 

SHARP EDGES

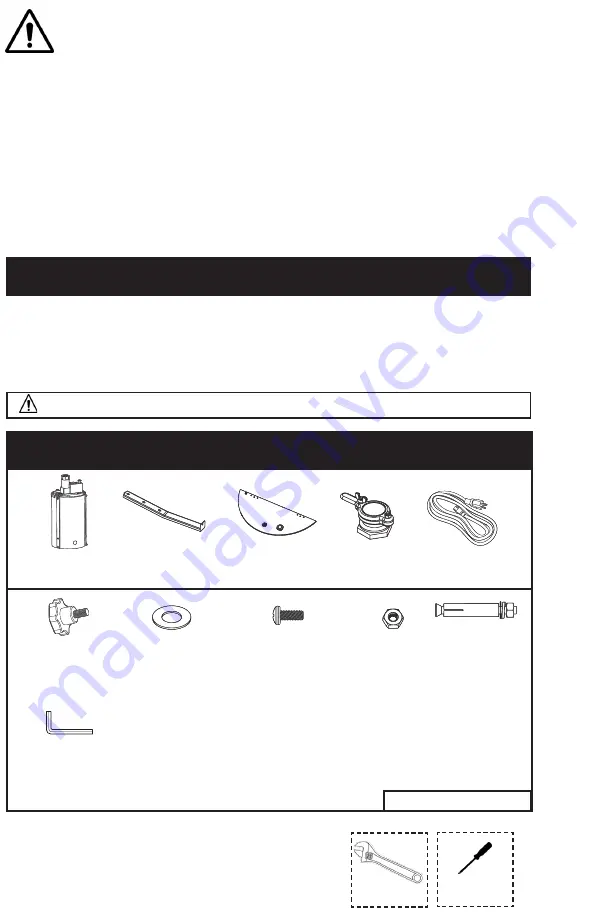
PACKAGE CONTENTS

(x1)

Drum

(x3)

 Leg

(x2)

Lid

(x1)

Honey Gate

(x1)

Power Cable

S-A 

(x3)

M8 Plastic 

Knob

S-B 

(x3)

M8 Washer

S-E 

(x3)

Concrete 

Anchor

S-C 

(x8)

M4x12 Screw

S-D 

(x8)

M4 Nut

TOOLS NEEDED

Phillips 

Screwdriver

Adjustable 

Wrench

NOTE: Not all hardware will be used.

T-A 

(x1)

3mm Allen 

Wrench

Summary of Contents for BEE-V004E

Page 1: ...obile device or follow the link for helpful videos and specifications related to this product Instruction Manual https vivo us com products bee v004e SKU BEE V004E help vivo us com www vivo us com 309 278 5303 Chat live with an agent GET IN TOUCH Monday Friday from 7 00am 7 00pm CST ...

Page 2: ...e WARNING IMPORTANT SAFETY INFORMATION READ AND FOLLOW ALL SAFETY REQUIREMENTS PREPARATION 1 After carefully removing the machine from the packing carton remove all protective film and clean the honey extractor thoroughly with mild soap and water BEFORE first use 2 The honey extractor should be placed on a dry flat stable surface KEEP THIS MANUAL IN A SAFE AND DRY PLACE FOR FUTURE REFERENCE CAUTIO...

Page 3: ... the lower leg supports on Drum A ASSEMBLY STEPS STEP 2 Mount Legs B to Drum A using the previously removed hardware in the lower holes and M8 Plastic Knobs S A with M8 Washers S B in the upper holes A A B S A S B Cap Nut Washer Cap Nut Washer ...

Page 4: ...e crossbar of Drum A and secure using M4x12 Screws S C and M4 Nuts S D NOTE Lids C must be installed properly and in the down position to engage the safety switches and allow the motor to turn on Each Lid C has a built in safety latch that will cut power the moment it is opened Inside Drum C S C S D ...

Page 5: ...5 STEP 5 STEP 6 Optional For added security Concrete Anchors S E can be use to secure the extractor to the floor S E Plug Power Cable E into the motor on Drum A A E ...

Page 6: ...ce any possible shaking Close both lids to engage safety switches Flip the power switch to the on I position making sure the emergency stop button is not engaged and turn the dial until the basket is spinning at the desired speed The front lid has a built in safety switch that will cut power the moment it is opened and power will not be restored until lid is closed Turn the dial back to 0 when fra...

Page 7: ...EANING Disassemble extractor see Disassembly instructions Using mild dish soap and warm water scrub drum and basket clean Completely rinse the parts and dry with a soft cloth Reassemble the extractor when dry CARE When not in use store the extractor in a dry place Although stainless steel is highly resistant to rust and corrosion light surface rust can form in wet conditions If surface rust forms ...

Page 8: ...ensure you have a fully functioning product FOR MORE VIVO PRODUCTS CHECK OUT OUR WEBSITE AT www vivo us com Love your new VIVO setup and want to share Tag us in your photo vivo_us help vivo us com AVG RESPONSE TIME within office hrs 1HR 8M 23 within 15m 38 within 30m 61 within 1hr 83 within 2hr 92 within 3hr AVG RESOLUTION TIME within office hrs 15 M www vivo us com Chat live with an agent AVG RES...

Reviews: