background image

3

ASSEMBLY STEPS

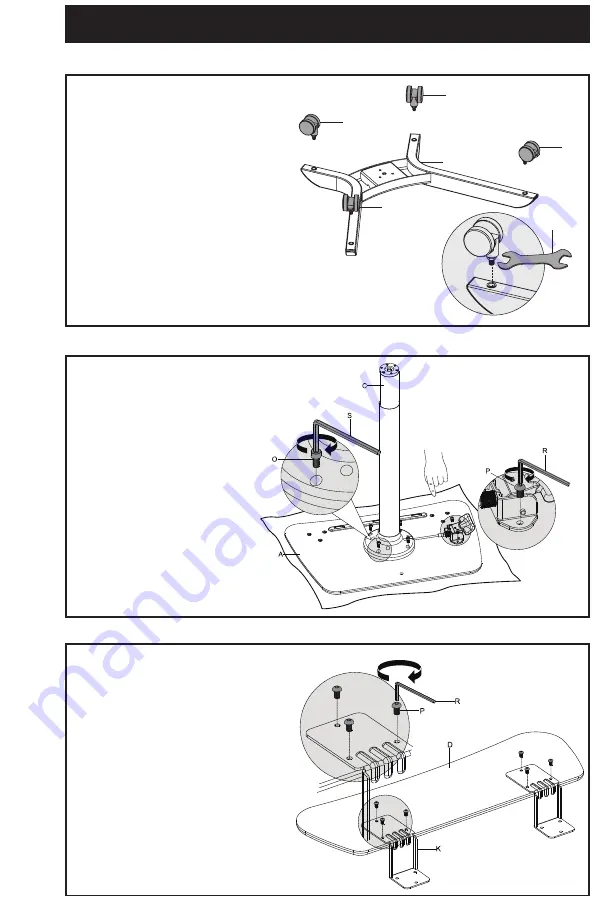
STEP 1

Screw the casters 

(F, G) into the base 

(B).  Adjust casters to sit level on the 

floor if needed, then tighten the nut 

on each stem against the base using 

the wrench

 (T).

STEP 2

Assemble the pole with handle

(C) to the 

desktop

 (A) using four M6x12 cheesehead 

bolts 

(O) for the pole and two M6x12 

panhead bolts 

(P) for the handle.  

Tighten bolts with Allen wrenches 

(R, S).

STEP 3

Assemble keyboard shelf brackets


(K) to keyboard shelf (D) using 

M6x12 panhead bolts 

(P) and tighten 

with the 4mm Allen wrench 

(R).

G

F

G

F

B

T

Summary of Contents for CART-PC02HB

Page 1: ...vice or follow the link for helpful videos and specifications related to this product Instruction Manual https vivo us com products cart pc02hb SKU CART PC02HB help vivo us com www vivo us 309 278 5303 Chat live with an agent GET IN TOUCH Monday Friday from 7 00am 7 00pm CST ...

Page 2: ...N OCCUR FROM TIPOVER TO HELP PREVENT TIPOVER NEVER ALLOW CHILDREN TO CLIMB STAND HANG OR PLAY ON ANY PART OF CART USE TIPOVER RESTRAINT OR ANCHOR CART TO WALL USE OF TIPOVER RESTRAINTS MAY ONLY REDUCE BUT NOT ELIMINATE RISK OF TIPOVER WARNING CHOKING HAZARD SMALL PARTS NOT FOR CHILDREN UNDER 3 YEARS ADULT SUPERVISION IS REQUIRED DO NOT EXCEED WEIGHT CAPACITY Failure to do so may result in serious ...

Page 3: ...the base using the wrench T STEP 2 Assemble the pole with handle C to the desktop A using four M6x12 cheesehead bolts O for the pole and two M6x12 panhead bolts P for the handle Tighten bolts with Allen wrenches R S STEP 3 Assemble keyboard shelf brackets K to keyboard shelf D using M6x12 panhead bolts P and tighten with the 4mm Allen wrench R G F G F B T ...

Page 4: ...ith the 4mm Allen wrench R Loosen the screw on the lower shelf bracket H using a Phillips screwdriver Slide the bracket onto the bottom of the pole then place the pole into the base STEP 5 Secure the base to the pole using M6x12 cheesehead bolts N and tighten with the 5mm Allen wrench S STEP 6 ...

Page 5: ...ed CPU holder to left or right side of lower shelf bracket H using two M6x8 flathead bolts Q with a Phillips screwdriver If needed adjust the handle by turning the knob on the back of the handle as shown The handle should have a firm feeling with little or no slop STEP 9 STEP 8 Assemble CPU holder and CPU holder mount using previously removed knobs ...

Page 6: ...h a Phillips screwdriver Slide CPU holder and shelf assembly down so the bumpers are resting on the base and tighten the screw on the shelf bracket using a Phillips screwdriver STEP 11 Thread straps of the CPU holder through slots on the CPU holder mount and turn ends of straps to form a T locking the straps into the slots ...

Page 7: ... and mouse STEP 12 Loosen knobs on CPU holder adjust holder width to fit CPU tower then tighten Unlock buckles on straps and extend straps Place CPU tower in holder pull straps tight around CPU tower then lock the buckles To prevent movement press levers on the locking casters down Pull levers up to allow movement ...

Page 8: ...sure you have a fully functioning product FOR MORE VIVO PRODUCTS CHECK OUT OUR WEBSITE AT www vivo us com help vivo us com AVG RESPONSE TIME within office hrs 1HR 8M 23 within 15m 38 within 30m 61 within 1hr 83 within 2hr 92 within 3hr Love your new VIVO setup and want to share Tag us in your photo vivo_us AVG RESOLUTION TIME within office hrs 15 M www vivo us com Chat live with an agent AVG RESOL...

Reviews: