background image

6

7

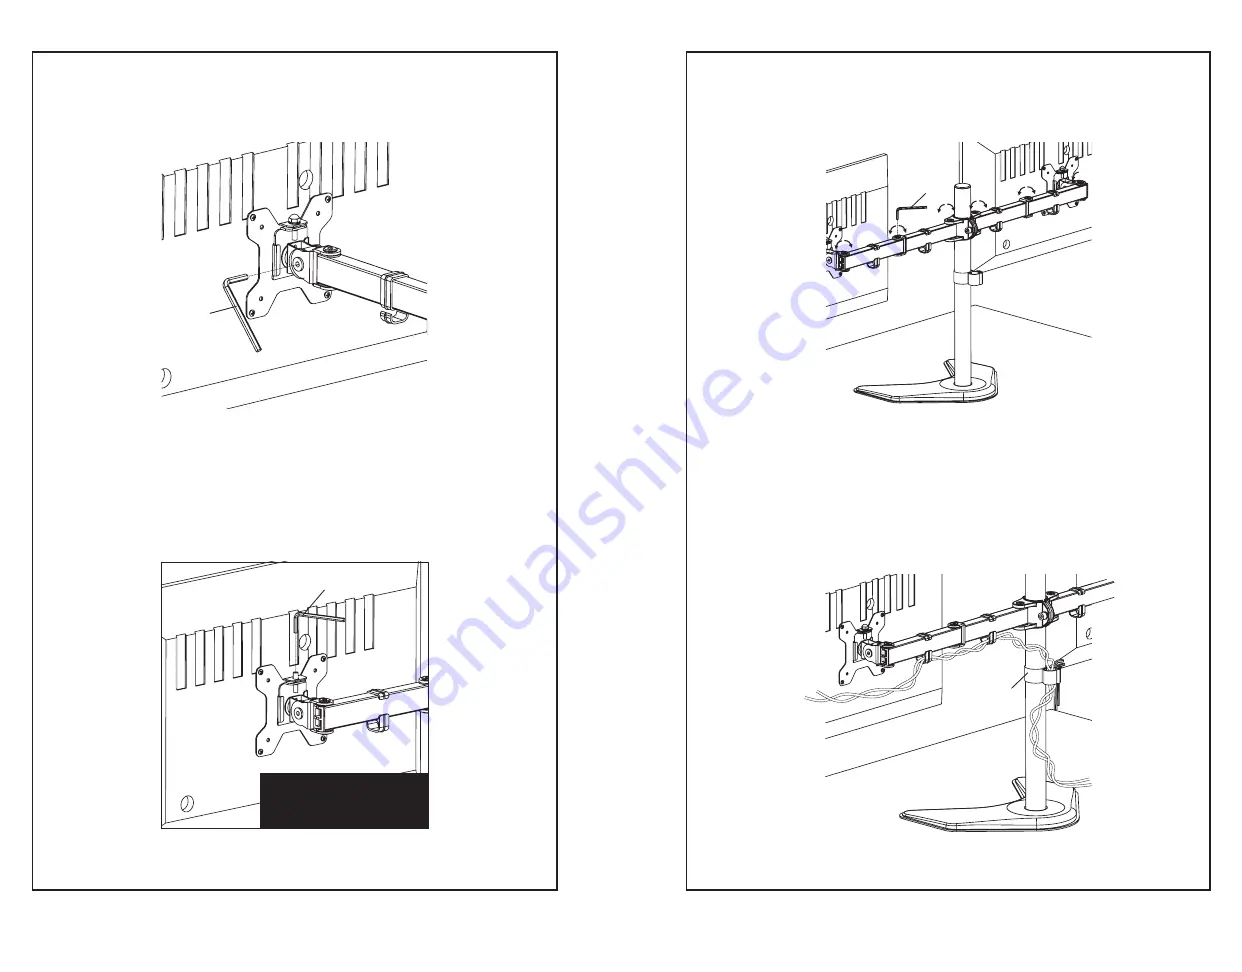
STEP 5

STEP 6

Tighten the bolt with the supplied Allen Key

 (m) 

to fix the tilt angle. If one monitor is lower, remove the 

Nut 

(f)

 and turn the bolt counter-clockwise with supplied Allen key 

(m)

 to raise the monitor. Install the 

Nut 

(f)

 after the adjustment.

Use the supplied Allen Key 

(m)

 to make the necessary adjustments. Manage the wires and store the 

Allen keys 

(m)

 in Wire Clip 

(l1)

 for future use.

m


Fix the tilt angle


m

Ignore this step if 

monitors are level

m

l1

Summary of Contents for STAND-V102K

Page 1: ... code with your mobile device or follow the link for helpful videos and specifications related to this product Instruction Manual https vivo us com products stand v102k help vivo us com www vivo us com 1 800 371 5654 SKU STAND V102K ...

Page 2: ...mmet Base Plate j x1 Spring Washer i x1 M10 Washer f x2 Nut b x1 Weighted Base g x1 M10 Bolt h x1 Support Plate o x8 M4x12 n x1 Wrench m x1 Allen Key l2 x4 Wire Clip r x1 Soft Pad q x4 M4 Spacer OPTION 2 Existing Grommet Base If the existing grommet hole comes with a plastic protector remove it to ensure a flat surface before installing the desk mount Install the Grommet Base Plate k to the Pole a...

Page 3: ...nitor Attach VESA Plate d to monitor using M4x12 Thumb Screws o Please note the screws only need to be finger tight OPTION B Curved Back TV Attach VESA Plates d to monitor using screws p with M4 Spacers q Do not over tighten STEP 4 Slide the monitor onto the head of Swivel Arm c Install the security Nut f Make sure the security nut is installed before you rotate the monitor c m l1 l2 o q p f ...

Page 4: ...f and turn the bolt counter clockwise with supplied Allen key m to raise the monitor Install the Nut f after the adjustment Use the supplied Allen Key m to make the necessary adjustments Manage the wires and store the Allen keys m in Wire Clip l1 for future use m Fix the tilt angle m Ignore this step if monitors are level m l1 ...
Page 5: ...ase contact us We are happy to replace parts to ensure you have a fully functioning product For more VIVO products check out our website at www vivo us com Love your new VIVO setup and want to share Tag us in your photo vivo_us help vivo us com www vivo us com 1 800 371 5654 ...

Reviews: