background image


Instruction Manual 

Ice Maker & Shaver ZBS-20A


Thank you for choosing our ice maker 

Please read this Instruction Manual carefully before using this product so as to ensure proper use.   

After reading this manual, please keep it in a safe place and refer to it when necessary.   


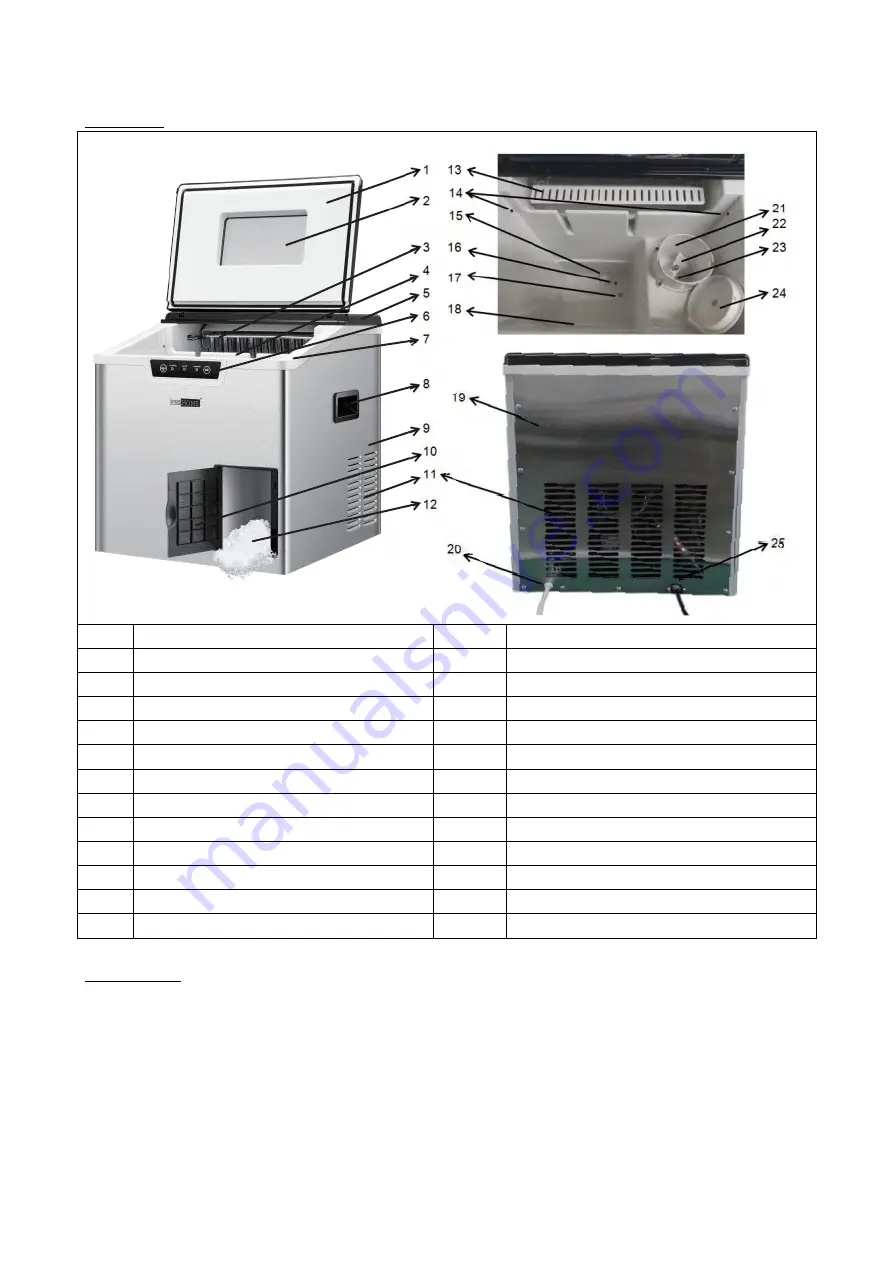
Description 


Front top lid 

14 

Ice full sensor 

Viewing window 

15 

Water buoy 

Evaporator 

16 

Water suction hole 

Ice basket 

17 

Drain plug 

Back top lid 

18 

Max water filling line 

Control Panel 

19 

Back cover 

Middle Frame 

20 

Water Inlet Hole 

Handle 

21 

Shaved ice bowl 

Housing 

22 

Shaving paddle 

10 

Decoration door 

23 

Knife 

11 

Fan Cover 

24 

Bowl cap 

12 

Shaved ice outlet 

25 

Power Cord and Plug 

13 

Ice shovel 


Specifications 

Daily Ice Output

15-20kg/24h 

Ice Storage Capacity

3kgs 

Water Reservoir Capacity

3L 

Refrigerant

R600a / R290 

Ice Shape

Bullet 

Dimension

378*398*420mm 


Summary of Contents for VH835

Page 1: ... our ice maker Please read this Instruction Manual carefully before using this product so as to ensure proper use After reading this manual please keep it in a safe place and refer to it when necessary USER S MANUAL SKU VH835 2 in 1 Countertop Ice Maker Shaver Machine ...

Page 2: ...trol Panel 19 Back cover 7 Middle Frame 20 Water Inlet Hole 8 Handle 21 Shaved ice bowl 9 Housing 22 Shaving paddle 10 Decoration door 23 Knife 11 Fan Cover 24 Bowl cap 12 Shaved ice outlet 25 Power Cord and Plug 13 Ice shovel Specifications Daily Ice Output 15 20kg 24h Ice Storage Capacity 3kgs Water Reservoir Capacity 3L Refrigerant R600a R290 Ice Shape Bullet Dimension 378 398 420mm ...

Page 3: ... other heat source 4 Before using the Ice maker for the first time please wait 2 hours after positioning it and keep the front lid open for at least 2 hours 5 Ensure that the voltage indicated on the ice maker corresponds with the voltage in your home 6 Purified water is not allowed to be used in this unit spring water is recommended 7 Please always keep the viewing window closed during ice making...

Page 4: ...insert the water pipe into the socket at back of the unit as below Step 3 Connect to the power Step 4 Press button to turn unit on The ice maker begins to work Note For the first three cycles the ice may be small and irregular in size or even no ice Step 5 If indicator lights up please take out the basket then add water as per step 1 then press to restart the ice maker Step 6 If indicator lights u...

Page 5: ...to accelerate the defrosting process other than those recommended by the manufacturer 3 To ensure the cleanliness of the ice cubes water in the water reservoir is suggested to be replaced every 24 hours 5 If the compressor stops for any reason such as water shortage too much Ice power off etc Do not start the system right away wait 3 minutes and then re start the Ice maker 6 Always use fresh water...

Page 6: ...to disconnection of the power cord or the off power button has been pushed off during an ice making cycle small ice chips may formed and lodge in the automatic shovel causing it to jam If this occurs the ice chips may be removed by disconnecting the power cord and gently pushing the shovel to the rear of the cabinet and removing the ice chips then restarting 2 Please restart the ice maker by press...

Reviews: