ENGLISH
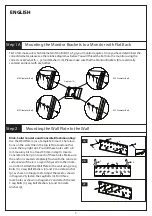
Mounting the Monitor Brackets to a Monitor with Flat Back
Mounting the Wall Plate to the Wall
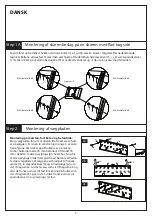
Step 1A
Step 2
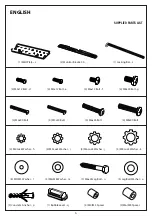
First of all, make sure which diameter of the Bolt (d, e, f, g) your monitor requires. Once you have determined the
correct diameter, please see the relative diagram as below. You will thread the Bolt into the monitor using the
correct Lock Washer (h, i , j, k) and Washer (l, m). Please make sure that the Monitor Brackets (b) are vertically
centered and level with each other.
7
M4 Diameter Bolt
M6 Diameter Bolt
M5 Diameter Bolt
M8 Diameter Bolt
Diagram 1A
d
h
l
e
i
l
f
j
m
g
k
m
Brick, Solid Concrete and Concrete Block mounting:
Use the Wall Plate (a) as a template to mark 3 hole loca-
tions on the wall. One in the top left slot and another
one in the top right slot. Pre-drill these holes with a 8
mm masonry bit to at least 50 mm in depth. Insert a
Concrete Anchor (p) into each of these holes. Make sure
the anchor is seated completely flush with the concrete
surface even if there is a layer of drywall or other mate-
rial in front. Attach the Wall Plate to the wall using 2 Lag
Bolts (n), 2 Lag Bolt Washers (o) and 2 Concrete Anchor
(p), as shown in Diagram 2A. Adjust the level as shown
in Diagram 2b, fasten the Lag Bolts (n). Drill three
more holes as shown in Diagram 2c and attach the rest
3 Lag Bolts (n), Lag Bolt Washers (o) and Concrete
Anchor (p).
2a
1
2
2
2b
2c
n
o
p
a

