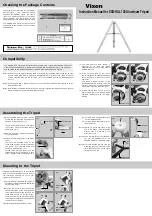
Allen Wrench
(1)
(2)
(3)
Assembling the Tripod
Extension Clamp
Leg Bracket
(1)
-2
(1)
-2
Cap
Metal
Peg
(post)
Leg Bracket
(3)
-1
Metal Peg
(post)
Metal Peg
(post)
Screwdriver
(3)
-2
(3)
-3
(3)
-2
(3)
-3
(2)
(1)
-1
(2)
Compatibility
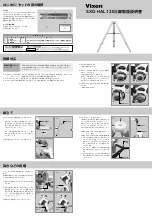
Instruction Manual for SXG-HAL130 Aluminum Tripod
The SXG-HAL130 tripods are compatible with the SXW, SXD, SXP, GP2 and GPD2 equatorial
mounts as well as the SKYPOD, HF2 fork mount and PORTA II altazimuth mounts. The tripod may
also be used with the relevant half pillars for the SXG, SX2, SX and SKYPOD mounts.
(2)
-1
(3)
(1)
(2)
-2
(2)
-1
(3)
(1)
(2)
-2
Checking the Package Contents
Thank you for your purchase of a Vixen SXG-
HAL130 tripod. This instruction manual
describes the SXG-HAL tripod. Be sure to
refer to an operation manual of your Vixen
mount together with this manual to fully
understand how to use the SXG-HAL130 tripod.
The SXG-HAL130 tripod contains the parts
listed below. Make sure that your box contains
all these parts.
Mounting to the Tripod
Azimuth
Adjustment Knob
Azimuth
Adjustment Knob
Fixing
Bolt
Azimuth
Adjustment
Knob
(2)
-1
(1)
(1)
(2)
-2
(3)
②
①
③
Note1:
Note2:
Note3:
With the use of an optional GP60 to 45AD, sold separately, the SXG-HAL130 tripod can be used
with the old GP, GPE, GPD, GPX and old SP equatorial mount as well as the old HF fork mount
and the old model GP2 and GP half pillar. (It is not compatible with the old SPDX equatorial
mount.)
An optional PORTA II adapter allows you to use the original PORTA model together with the
SXG-HAL130 tripod.
Both the GP2 and GPD2 equatorial mounts, with the original mounting base, need an optional
GP60 to 45AD to mount onto the SXG-HAL130 tripod.
Instruction Manual for SXG-HAL130 Aluminum Tripod
GP
SX
Contents
Quantity
①
②
③
SXG-HAL130 Aluminum Tripod
Metal Peg (Post)
Instruction Manual (this sheet)
1
1
1
Note1:
Note2:
Note3:
SX: For SXW, SXD and SXP equatorial
mounts, SXG half pillar
GP: For GP2, GPD2 equatorial mounts,
HF2 fork mount
Stand the SXG-HAL130 tripod on level
ground and pull the tripod legs apart until
each leg is fully extended. (1)-1
Loosen the extension clamp on the tripod
leg so that a height of the tripod leg can
be adjusted. (1)-2
Remove the cap on the mount fixing bolt
on the tripod head.
Attach the metal peg (post) on the tripod
head.
There are two threaded holes on the
tripod head on which to attach the metal
peg (post). One is marked as SX and
another is marked as GP. (3)-1
Thread the metal peg (post) into the
threaded hole that corresponds to your
mount. Tighten it with a screwdriver.(3)-2
Loosen the azimuth adjustment screws in
advance by turning the azimuth adjustment
knobs on the mount.
Position the mount so that the azimuth
adjustment screws of the mounting base
come above the metal peg (post) on the
tripod head as shown in the figure (2)-1.
Place the mount on the tripod and tighten
the fixing bolt underneath the tripod head
to hold the mount in place.
Tighten the azimuth adjustment screw.
Tighten the metal peg (post) to the
end of the thread. This connection
must be secure, or damage to your
mount may occur.
The metal peg (post) is not needed if
you use the SXG-HAL130 for the
SKYPOD or PORTA II altazimuth mount.
It is recommended that you store the
metal peg (post) on the center of the
leg bracket as shown on the figure
(3)-3, when not in use.
(1)
(2)
(3)
The new mounting base (45mm in
diameter) of the GP2 and GPD2
equatorial mounts fits the tripod head of
the SXG-HAL130.
If the mounting base of your mount
comes equipped with a GP45 to 60AD as
shown in figure (2)-1, remove it to use the
45mm size.
The GP45 to 60AD is fixed on the
mounting base with 3 setscrews at certain
intervals. Loosen all the setscrews with a
2.5mm Allen wrench to remove it. (2)-2
If the mounting base of your mount is
60mm in diameter, use a GP60 to 45AD,
available separately, with the SXG-
HAL130.
The SXW equatorial mount is as an example
here. For mounting different mounts, refer to
the instruction manuals for your mount
together with this manual.
(1)
(2)
(3)


