background image

English - 14

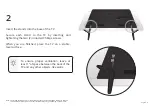
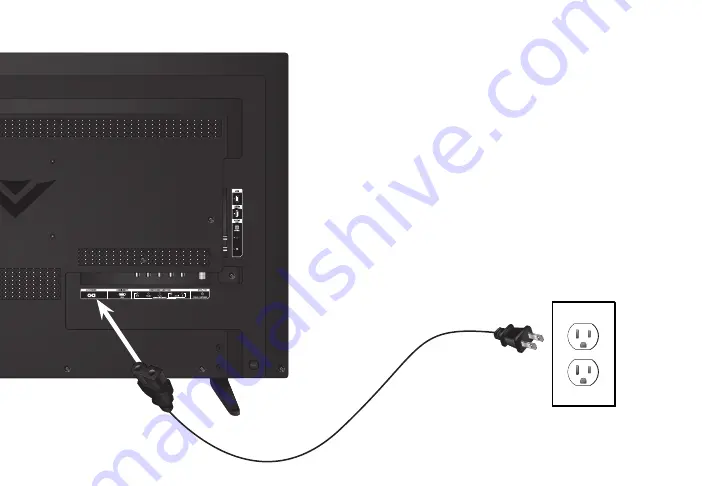
Connect one end of the power cable to the back 

of  the  display.  The  flat  edge  of  the  connector 

faces the outer edge of the display.

Plug the other end of the power cord into 

an electrical outlet. The display powers on 

automatically.

2

Summary of Contents for & D48n-E0

Page 1: ...INSTALLATION GUIDE VIZIO Please read this guide before using the product D32hn E0 D39hn E0 D48n E0 ...

Page 2: ... been dropped Unplug the power cord before cleaning your TV When moving your TV from an area of low temperature to an area of high temperature condensation may form in the housing Wait before turning on your TV to avoid causing fire electric shock or component damage A distance of at least three feet should be maintained between your TV and any heat source such as a radiator heater oven amplifier ...

Page 3: ...ur TV is dropped or damaged in any way The performance of your TV changes substantially This apparatus shall not be exposed to dripping or splashing and no objects filled with liquids such as vases shall be placed on the apparatus The mains plug or appliance coupler is used as the disconnect device the disconnect device shall remain readily operable CAUTION These servicing instructions are for use...

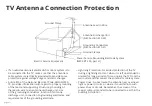
Page 4: ...r grounding of the mast and supporting structure grounding of the lead in wire to an antenna discharge unit size of the grounding conductors location of antenna discharge unit connection to grounding electrodes and requirements of the grounding electrode TV Antenna Connection Protection Lightning Protection For added protection of the TV during a lightning storm or when it is left unattended or un...

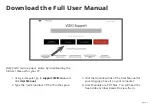
Page 5: ...nual for your TV 1 Using a computer go to support VIZIO com and click User Manual 2 Type the model number of the TV in the space 3 Click the Download link of the User Manual for your language Save it on your computer 4 User Manuals are PDF files You will need the free Adobe Acrobat Reader to view them ...

Page 6: ...ts 7 Remote Control 8 Inserting and replacing batteries 9 Installing the TV Stands 10 First Time Setup 12 Connecting an Audio Device 16 Wall Mounting the TV 18 Help Topics 21 Legal Information 22 Regulatory Information 23 Warranty Information 24 ...

Page 7: ...glish 7 Package Contents VIZIO LED HDTV Multi Language Installation Guide Power Cable Remote w Batteries TV Stands 4 x Phillips Screws INPUT EXIT GUIDE BACK 1 4 7 WIDE MENU OK VOL VOL CH CH 3 6 9 2 5 8 0 ...

Page 8: ...nel or passcode entered using the number pad 7 Back Go to the previous on screen menu 8 Guide Display the info window 9 Volume Up Down Increase or decrease the loudness of the audio 10 V Button Displays USB multimedia menu 11 Channel Up Down Change the channel 12 Mute Turn the audio on or off 13 Last Return to the last viewed channel 14 Number Pad Manually enter a channel 15 Wide Change the displa...

Page 9: ...included Be sure to align the and signs on the batteries and remote 3 Replace the battery cover When needed VIZIO recommends replacing the batteries that came with this remote with two new Duracell AAA alkaline batteries WARNING keep the remote control batteries away from children It may cause choking and or lead to a fire or chemical burn if mishandled Do not dispose of batteries in fire Replace ...

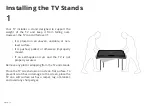
Page 10: ... on an uneven unstable or non level surface It is pushed pulled or otherwise improperly moved If an earthquake occurs and the TV is not properly secured Remove any plastic wrapping from the TV and stands Place the TV screen down on a clean flat surface To prevent scratches or damage to the screen place the TV on a soft surface such as a carpet rug or blanket and avoid any sharp edges ...

Page 11: ...s When you are finished place the TV on a stable level surface To ensure proper ventilation leave at least 1 of space between the back of the TV and any other objects like walls Note The image shown here is for illustrative purposes only and may be subject to change The actual number of ports and their locations may vary depending on the model ...

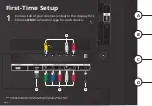
Page 12: ...he display first Choose ONE connection type for each device 1 B A A C D B C D English 12 Note The image shown here is for illustrative purposes only and may be subject to change The actual number of ports and their locations may vary depending on the model ...

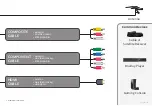
Page 13: ...ion Antenna COMPOSITE CABLE ANALOG SD VIDEO 480i STEREO AUDIO COMPONENT CABLE ANALOG HD VIDEO 1080p STEREO AUDIO HDMI CABLE DIGITAL HD VIDEO 1080p HD AUDIO Gaming Console Cable or Satellite Receiver Blu Ray Player Common Devices ...

Page 14: ...one end of the power cable to the back of the display The flat edge of the connector faces the outer edge of the display Plug the other end of the power cord into an electrical outlet The display powers on automatically 2 ...

Page 15: ...me Use and press OK Follow the on screen instructions to complete the first time setup 3 Choose your mode Select Store Demo for in store display Select Home Use for in home use Seleccione Home Use por Modo de Casa o Store Demo por Demostración de Tienda Choisissez Home Use pour Mode Domicile ou Store Demo pour la Démo en Magasin Store Demo Home Use ...

Page 16: ...o device such as a receiver or sound bar Note The image shown here is for illustrative purposes only and may be subject to change The actual number of ports and their locations may vary depending on the model Connecting an Audio Device B C C B A A ...

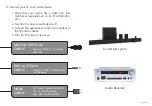
Page 17: ...he TV and your audio device off 3 Connect the appropriate cable not included to the TV and the device 4 Turn the TV and your device on RCA to 3 5mm CABLE ANALOG STEREO CONNECTION 2 0 CHANNEL HDMI CABLE CFC 2 WAY COMMUNICATION 2 0 5 1 DIGITAL AUDIO PCM DTS DOLBY DIGITAL Sound bar sytem Audio Receiver DIGITAL OPTICAL CABLE DOLBY DIGITAL 5 1 CHANNEL PCM DTS ...

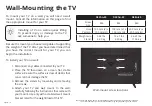
Page 18: ...nds by loosening and removing the screws 4 Attach your TV and wall mount to the wall carefully following the instructions that came with your mount Use only with a UL listed wall mount bracket rated for the weight load of this TV Wall Mounting the TV D32hn E0 D39hn E0 D48n E0 Screw Size M4 M4 M6 Hole Pattern 100 mm V x 100 mm H 100 mm V x 100 mm H 200 mm V x 200 mm H Weight w o Stand 9 48 lbs 4 30...

Page 19: ...STRATION Why register Customized Support Get assistance quickly with your information on hand News and Offers Take advantage of the latest news and special offers from VIZIO Safety and Satisfaction Stay up to date with important product updates and notifications ...

Page 20: ... 9 am to 6 pm CST Phone 877 698 4946 toll free You can also contact our popular support team at Live chat support available Find help with New product setup Connecting your devices Technical problems Product updates and more Award Winning Customer Care At Your Convenience NEED HELP Go to support vizio com ...

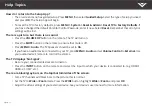
Page 21: ...to ensure that mute is off Press MENU Audio The TV Speakers should be set to On If you have an audio device connected to your TV press MENU Audio and set Volume Control to External Use your audio device s remote to control the volume The TV displays No Signal Be sure your connected devices are turned on Press the INPUT button on the remote and select the input to which your device is connected to ...

Page 22: ...stoms and export control laws in the United States US The products may also be subject to the customs and export control laws and regulations of the country in which the products are manufactured and or received Information in this Installation Guide is subject to change without notice To review the most updated version of this Installation Guide and the associated User Manual go to http www vizio...

Page 23: ...ence caused by unauthorized modification to this equipment It is the responsibilities of the user to correct such interference FCC Warning Changes or modifications not expressly approved by the party responsible for compliance with the FCC Rules could void the user s authority to operate this equipment Caution Always use an AC DC power adapter that is properly grounded Use the AC cords listed belo...

Page 24: ...cal Support will provide instructions for packing and shipping the product to the VIZIO service center ALL USER DATA AND DOWNLOADED APPLICATIONS STORED ON A PRODUCT WILL BE DELETED IN THE COURSE OF SOME IN HOME AND ALL SHIP IN WARRANTY SERVICE If this occurs your product will be restored to its original state You will be responsible for restoring all applicable user data and downloaded application...

Page 25: ...NT OF ALL PARTIES TO ANY SUCH ARBITRATION OR PROCEEDING Exceptions to Binding Arbitration Agreement and Class Action Waiver IF YOU DO NOT WISH TO BE BOUND BY THE BINDING ARBITRATION AGREEMENT AND CLASS ACTION WAIVER THEN 1 you must notify VIZIO in writing within sixty 60 days of the date that you purchased the product 2 your written notification must be mailed to VIZIO at 39 Tesla Irvine CA 92618 ...

Page 26: ...this occurs your product will be restored to its original state You will be responsible for restoring all applicable user data and downloaded applications Recovery and reinstallation of user data and downloaded applications is not covered under this warranty In order to protect your personal information VIZIO recommends that you always clear all personal information from the product before it is s...

Page 27: ... other terms will remain in effect This warranty applies to the maximum extent not prohibited by law Changes to Warranty This warranty may change without notice but any change will not affect your original warranty Check www vizio mx for the most current version INFORMATION EXCLUSIVELY FOR MEXICO To make a warranty claim or to obtain parts components supplies and accessories you may contact the im...

Page 28: ... 2016 VIZIO INC ALL RIGHTS RESERVED 160523OC US NC ...

Reviews: