background image

VIZIO M221NV User Manual 

Version 5/13/2010 

21 

www.VIZIO.com


Chapter 6 Connecting Equipment 

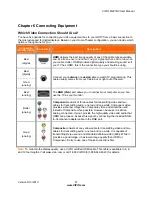
Which Video Connection Should I Use? 

You have five options for connecting your video equipment box to your HDTV from a basic connection to 
the most advanced for digital displays. Based on your Home Theater configuration, you can decide which 
option is the right one for you.  

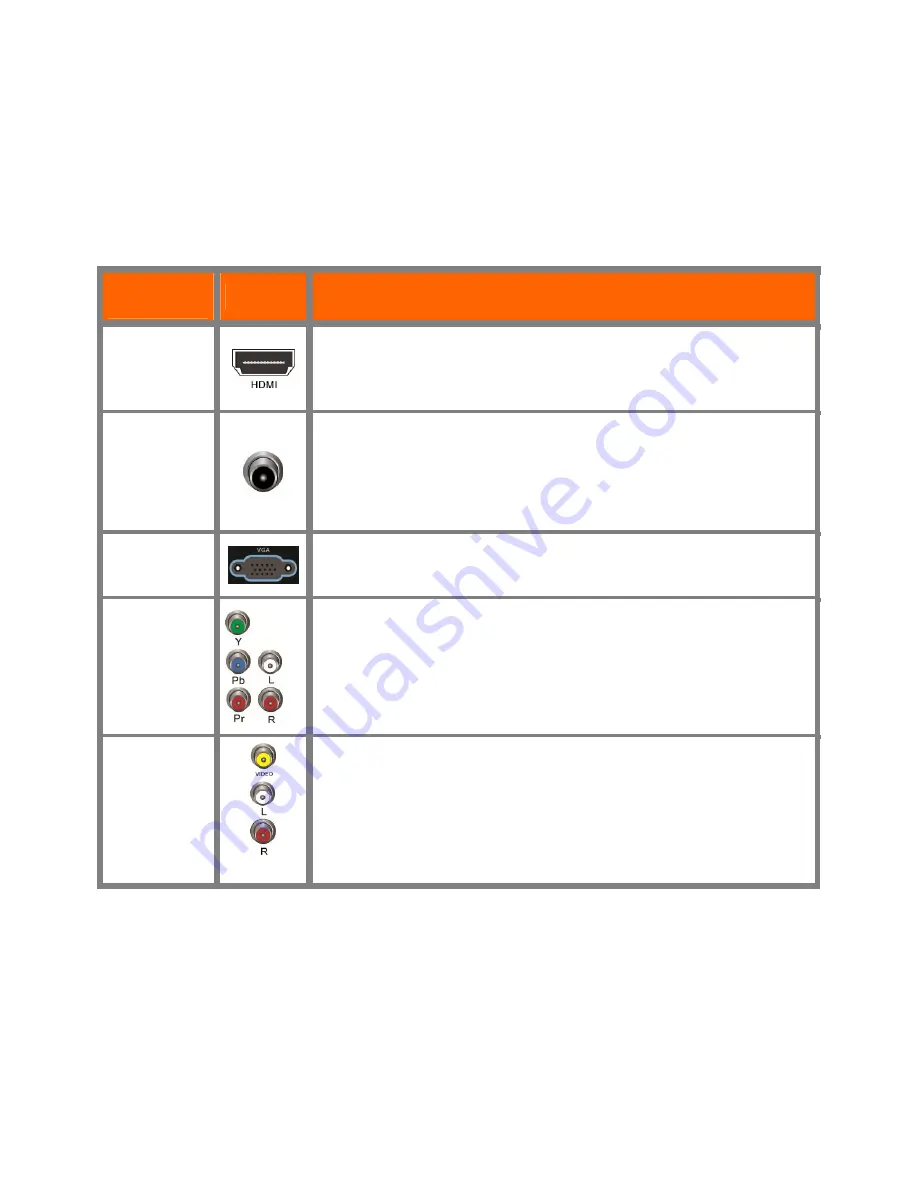
Connection 

Quality (type) 

Connector 

Description 

Best 

(digital) 


HDMI

 delivers the best image quality of any of the cable types available 

and it’s all done over one cable. You get a great picture and cut down on 
your cable clutter. HDMI provides digital quality and amazing sound so if 
your TV has HDMI, this is the connection type you should be using. 

Best 

(digital) 

- - - - - - - - - - - 

Good 

(analog) 


Connect your 

antenna

 or 

coaxial

 cable to watch TV programming. This 

cable usually comes from your Cable box or right out of the wall.  

Best 

(analog) 


The 

RGB (VGA)

 port allows you to connect your computer so you can 

use the TV as your monitor. 

Better 

(analog) 


Component

 consists of three cables for transmitting video and two 

cables for transmitting audio: one red and one white. Component video 
provides a sharper image than Composite video and should be used 
instead of Composite when possible. However, because it is still an 
analog connection, it won’t provide the high-quality video and audio that 
HDMI can produce. Access this signal by connecting the included RGB-
to-Component adapter cable to the RGB port. 

Good 

(analog) 


Composite

 consists of one yellow cable for transmitting video and two 

cables for transmitting audio: one red and one white. It is capable of 
transmitting stereo sound and standard definition video (480i). While it 
provides a good image, it has lower image quality than HDMI or 
Component. So try to use one of those connections first. 

Note:

 To maintain the display quality, use a VIZIO certified HDMI cable. This cable is available in 6, 8, 

and 12 foot lengths. Visit www.vizio.com or call 1-888-VIZIOCE (1-888-849-4623) for details. 

Summary of Contents for M221NV Razor LED

Page 1: ......

Page 2: ...al number located on the back of your HDTV for easy reference when obtaining warranty support Serial _____________________ Purchase Date _____________________ VIZIO is a registered trademark of VIZIO...

Page 3: ...for ventilation To ensure reliable operation of your HDTV and to protect it from overheating be sure these openings are not blocked or covered Do not place your HDTV in a bookcase or cabinet unless pr...

Page 4: ...Do not try to repair your HDTV yourself 24 Avoid using dropped or damaged appliances If your HDTV is dropped and the housing is damaged the internal components may function abnormally Unplug the powe...

Page 5: ...structure grounding of the lead in wire to an antenna discharge unit size of the grounding conductors location of antenna discharge unit connection to grounding electrodes and requirements of the gro...

Page 6: ...should continue to work as before to receive low power Class A or translator television stations and with cable and satellite TV services gaming consoles VCRs DVD players and similar products For addi...

Page 7: ...onnecting to the Internet 18 Select Input Source 18 Watching a TV Program 18 Viewing Digital TV Program Information 19 Exploring VIZIO Internet Apps VIA 20 CHAPTER 6 CONNECTING EQUIPMENT 21 Which Vide...

Page 8: ...ings Menu 37 Input Source 37 Picture 38 Audio 40 Tuner 41 Name Input 42 Parental Controls 43 Menu Language 45 Time Local Settings 45 CEC 45 Network Menu 46 Wired Connection 46 Manual Setup 46 Wireless...

Page 9: ...control VR12 AA batteries for the remote control 2 AC DC power adapter Detachable base Video Adapter cable RGB to Component Audio adapter cable Wall Mount Bracket Safety Strap This user manual Quick...

Page 10: ...et cable from your Internet connection to the Ethernet port on your HDTV A wired connection may provide a more consistent connection depending on the conditions in your home environment See Network Me...

Page 11: ...remote control batteries and power cord from the foam end caps 2 Remove the two top foam end caps 3 Remove the stand base from packaging 4 Remove the TV from the box and lay it face down on a clean pa...

Page 12: ...ce your HDTV face down on a soft flat surface to prevent damage to the screen c Remove the neck stand cover by sliding it up d Remove the three 3 screws holding the stand neck and then remove the neck...

Page 13: ...he Jag wheel up and down to turn the volume up and down To open the Quick Menu press the Jag wheel for two seconds scroll the wheel up and down to highlight an option and then press in the wheel again...

Page 14: ...a or digital cable source For digital TV stations in your area visit www antennaweb org For Cable and Satellite Set Top Boxes we recommend that you use a HDMI cable connection for high definition imag...

Page 15: ...e Point the remote control directly at this sensor for the best response to the remote signal Do not place any obstacles between the remote control and the remote control sensor The effective range of...

Page 16: ...enu They will also be used as value settings when the slide bar is shown on the screen and option settings to turn a feature off or on BACK Press to return to a previous OSD menu Press repeatedly to c...

Page 17: ...he button sequence 2 8 DASH 2 VIA Functions Use these buttons on your remote control to control the VIZIO Internet Apps VIA functions on your HDTV See Using VIA on page 31 for more information about t...

Page 18: ...on your HDTV and then plug the power cord into an AC wall socket 3 Gather the devices your want to connect to your HDTV Don t connect them yet We will help you do that in the Setup App 4 Turn on your...

Page 19: ...annel 3 or channel 4 matching the channel which has been selected on the back of the VCR Cable Box External TV Tuner or Satellite Receiver Refer to Owner or User s Manual of such equipment for details...

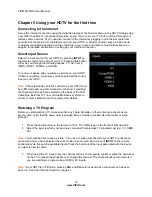
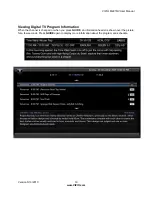
Page 20: ...ww VIZIO com Viewing Digital TV Program Information When the channel is changed or when you press GUIDE an information header is shown over the picture for a few seconds Press GUIDE again to display m...

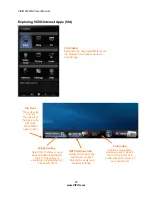
Page 21: ...the Apps in the VIA Dock Press OK to open an App Widget Gallery Select this to discover more Apps and download them to the TV This gallery is constantly being updated so check back often Profile App C...

Page 22: ...RGB VGA port allows you to connect your computer so you can use the TV as your monitor Better analog Component consists of three cables for transmitting video and two cables for transmitting audio on...

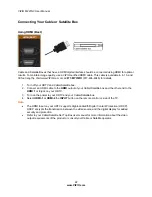
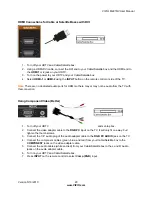
Page 23: ...ct an HDMI cable to the HDMI output of your Cable Satellite box and the other end to the HDMI 1 or 2 jack on your HDTV 3 Turn on the power to your HDTV and your Cable Satellite box 4 Select HDMI 1 or...

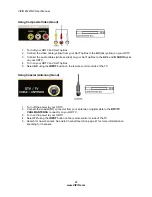
Page 24: ...e may or may not be audio from the TV with this connection Using Component Video Better 1 Turn off your HDTV and set top box 2 Connect the video adapter cable to the RGB PC input on the TV It will onl...

Page 25: ...rn on your HDTV and Set Top Box 5 Select AV using the INPUT button on the remote control or side of the TV Using Coaxial Antenna Good 1 Turn off the power to your HDTV 2 Connect the coaxial RF connect...

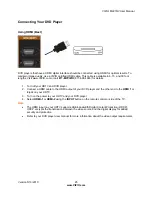
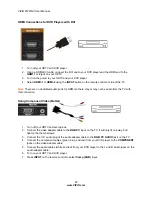
Page 26: ...off your HDTV and DVD player 2 Connect a HDMI cable to the HDMI output of your DVD player and the other end to the HDMI 1 or 2 jack on your HDTV 3 Turn on the power to your HDTV and your DVD player 4...

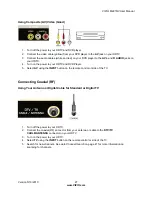
Page 27: ...be audio from the TV with this connection Using Component Video Better 1 Turn off your HDTV and set top box 2 Connect the video adapter cable to the RGB PC input on the TV It will only fit one way Fu...

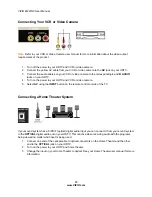
Page 28: ...your HDTV and DVD Player 5 Select AV using the INPUT button on the remote control or side of the TV Connecting Coaxial RF Using Your Antenna or Digital Cable for Standard or Digital TV 1 Turn off the...

Page 29: ...our HDTV and VCR or video camera 5 Select AV using the INPUT button on the remote control or side of the TV Connecting a Home Theater System If your sound system has a S PDIF optical digital audio inp...

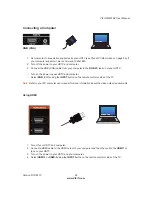
Page 30: ...he RGB PC jack on of your HDTV Turn on the power to your HDTV and computer Select RGB VGA using the INPUT button on the remote control or side of the TV Note Refer to your PC computer user manual for...

Page 31: ...nnection 1 Connect one end of an Ethernet cable not supplied to the Ethernet jack on your TV 2 Connect the other end of the Ethernet cable to your home network usually your router Your home network mu...

Page 32: ...ired networking using an Ethernet cable or with wireless networking if you have a wireless Internet connection See the Network Menu on page 46 for detailed information on setting up your Internet conn...

Page 33: ...screen size for the video playing on the TV while the HDTV Settings App or any other App is open on the left side of the TV As you press the blue button you will see the image change RED Press to exit...

Page 34: ...ve the App to the desired location on the VIA Dock 5 Press the Yellow button to drop the App in place Using Profiles The Profile App allows you to set up a user profile that you can customize to have...

Page 35: ...to select the Profile App and then press OK Press to select Profile Settings and then press OK 6 Modify the required fields to change the profile using your remote 7 Press to select Done Removing a Pr...

Page 36: ...everal menu options The main menu options may vary depending on your selected input source Note Some of the main menu options may have additional submenus for example the TV Rating submenu for Parenta...

Page 37: ...he center of the image is not stretched Stretch Mode When watching a standard broadcast with black bars on the sides the image will stretch to fill the TV screen People will appear wider than they rea...

Page 38: ...Broadcaster or Custom If Custom is selected you can customize the way Closed Caption is displayed The options available are Text Size Make CC text larger or smaller Color Choose a text color for CC di...

Page 39: ...flesh tones and adjust for a realistic appearance In most cases the default middle position is correct If people s faces look too orange try reducing the level of color first Sharpness The sharpness...

Page 40: ...el APL and the overall picture will look too light This feature will lower the APL to counteract this effect Choose from Off Low Medium Strong or Extend Film Mode Choose from Off or Auto When set to O...

Page 41: ...elect the options in the Advanced Audio sub menu press A new menu will be displayed showing the advanced functions available for fine tuning of the audio SRS TruSurround HD When watching TV or a movie...

Page 42: ...above 0 will boost the frequency and values below 0 will attenuate the frequency Note The Equalizer adjustment will only be available when SRS TSHD is set to Off Tuner When you first turned on your HD...

Page 43: ...on the remote control Analog MTS This feature allows you to select the different languages the broadcaster is transmitting the audio with the program you are watching This signal is usually Spanish C...

Page 44: ...d or backward to highlight a menu option then press the wheel to select The remote control buttons do not control the LOCK menu To access or navigate the UNLOCK menu you can use the Arrow and OK butto...

Page 45: ...e not available G General audience 8 ans General not recommended for young children 13 ans Not suitable for children under 13 years of age 16 ans Not suitable for under 16 years of age 18 ans Adults o...

Page 46: ...e connected via HDMI For example if a CEC supported Blu ray DVD player is connected to your HDTV through HDMI 2 and that player is powered on your HDTV will automatically change to the HDMI 2 input Si...

Page 47: ...Server and the Alternate DNS Server Warning unless you are an advanced user and are comfortable with wired and wireless networks do not adjust these settings Test Connection Select this option to test...

Page 48: ...r manual for your wireless router or contract the manufacturer or either your router or your Internet Service Provider if they provided the router for you Help Menu System Info Display the technical i...

Page 49: ...as expected contact the VIZIO for assistance by calling 877 MYVIZIO 877 698 4946 or e mail us at techsupport VIZIO com TV Display Troubleshooting Issue Solution No Signal is shown on display Press IN...

Page 50: ...able from the back of your television for 30 seconds Reinsert the power cable and power on the television Side Control buttons do not work Press only one button at a time Perform a power cycle by Remo...

Page 51: ...an cause image noise or fuzz If you are using an antenna the signal strength of the channel may be low Make sure your antenna is connected securely to the TV and move the antenna around the room or cl...

Page 52: ...ax etc Insure audio cables are tightly inserted into inputs Try another device Use another device input VIZIO Internet Apps Troubleshooting Issue Solution The installed apps are not working correctly...

Page 53: ...correct password and or passphrase to connect to a secured network Check the network connectivity with other devices such as a laptop or desktop computer If these devices also cannot connect please re...

Page 54: ...riod contact our Support Department at the number below Customer support and quality service are integral parts of VIZIO s commitment to service excellence For technical assistance contact our VIZIO T...

Page 55: ...tallation If this equipment does cause harmful interference to radio or television reception which can be determined by turning the equipment off and on the user is encouraged to try to correct the in...

Page 56: ...Features HDMI v1 3 3D Comb filter Dynamic contrast ration technology Dolby digital for ATSC QAM Signal compatibility 480I SDTV 480P EDTV 720P HDTV 1080I HDTV 1080P FHDTV Channel skip add Favorite cha...

Page 57: ...hic card s user guide for questions on how to set this timing mode See the table below for the factory preset resolutions Mode No Resolution Refresh Rate Hz Horizontal Frequency KHz Vertical Frequency...

Page 58: ...to have the 1920x1080 resolution display through this connection using the following timing 138 5MHz The following parameters are often the values required by the software or programs to set up the di...

Page 59: ...kmanship Items not covered include but are not limited to cosmetic damage normal wear and tear misuse signal issues power surges and damages from shipping acts of God any sort of customer misuse insta...

Page 60: ...DVI 23 26 Ethernet 13 30 HDMI 22 25 Home Theater 28 RGB 29 VGA 29 Connecting Equipment Cable 22 DVD 25 Rear Panel Connections 13 Satellite Box 22 VCR 28 Video Camera 28 Contents 8 Contrast 38 Controls...

Page 61: ...7 Picture Settings 39 RGB 21 Safety Instructions 2 Satellite Box Connecting 22 Search for channels 41 Setting Up 9 Settings Menu Audio 40 42 CEC 45 Menu Language 45 Parental Controls Menu 43 Setup Wiz...

Page 62: ......

Reviews: