background image

12

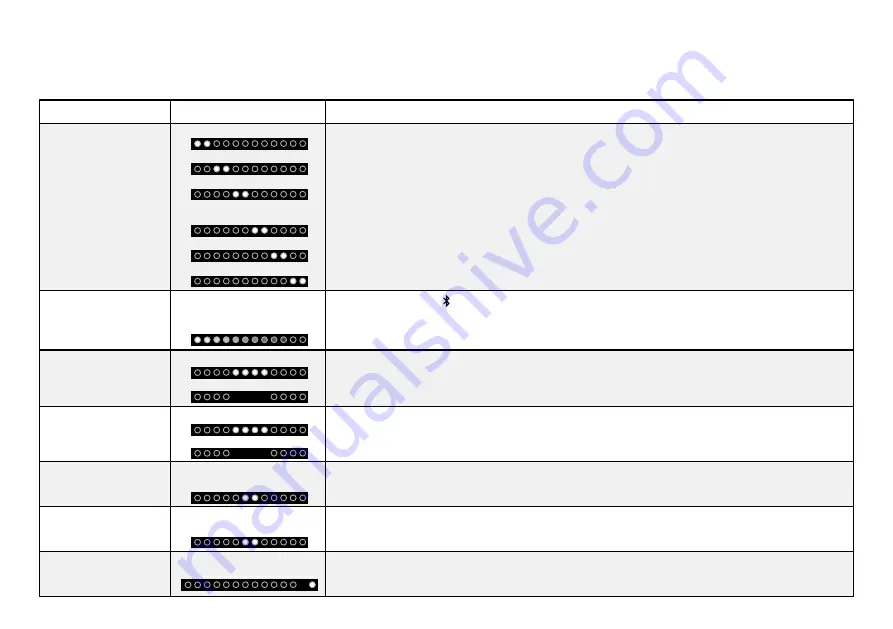
The LED Indicators give visual feedback when you press buttons on the remote control.

LED INDICATORS

Function

LED Behavior

Description

Input

Press the 

INPUT

 button on the remote to cycle through each available input: 

• 

Analog Audio In - AUX (1)

• 

Analog Audio In - AUX (2)

• 

Coaxial In- Digital (3)

• 

Digital Optical Audio In - Optical (4)

• 

Bluetooth

• 

USB Device - USB

Bluetooth 

Pairing

(When searching for device)


Flash from Left to Right  

and back continuously.

Press and hold the 


button on the remote. The Sound Stand will be discoverable for 15 

minutes.  You can now search for the Sound Stand (VIZIO S2121w) using your Bluetooth 

Device. The Sound Stand will power down if no device is found.

Note:

 Set your Bluetooth device into pairing mode prior to the Sound Stand.

DTS TruVolume  

On/Off

TruVolume On:

TruVolume Off:

Press the 

TVOL

 button to enable/disable TruVolume. When enabled (On), TruVolume 

provides a consistent and comfortable volume level for a more enjoyable listening 

experience.

DTS TruSurround  

On/Off

TruSurround On:

TruSurround Off:

Press the 

TSHD

 button to enable/disable DTS TruSurround. When enabled (On), all inputs will 

produce virtual surround sound. When disabled (Off), all sources will playback in 2.1 stereo.

Treble Levels

Two center LEDs indicate 

Treble level 0.

Press the 

TREBLE

 button then press the 

Next/Previous

 button to increase/decrease the 

treble level. The LED indicators will move to the right with increasing levels and to the left with 

decreasing levels.

Bass Levels

Two center LEDs indicate 

Bass level 0.

Press the 

BASS

 button then press the 

Next/Previous

 button to increase/decrease the bass 

level. The LED indicators will move to the right with increasing levels and to the left with 

decreasing levels.

Dolby Digital

Dolby Digital Indicator.

Dolby Digital is only available on either the 

Coaxial In

 or 

Digital Optical Audio In

 inputs. 

When a Dolby Digital signal is detected, the Dolby Digital LED indicator will light up for 5 

seconds before fading away.

Analog Audio In - AUX (1)

Analog Audio In - AUX (2)

Coaxial In - Digital (3)

Digital Optical Audio In - 

Optical (4)

USB Device - USB

Bluetooth

Summary of Contents for S2121w-D0

Page 1: ...QUICK START GUIDE Model S2121w D0 VIZIO...

Page 2: ...s before operating your Unit Keep these instructions in a safe place for future reference Read these instructions Keep these instructions Heed all warnings Follow all instructions Do not use this appa...

Page 3: ...1 PACKAGE CONTENTS This Quick Start Guide Remote Control with Batteries High Definition Sound Stand Coaxial Audio Cable Digital Optical Cable Stereo RCA to 3 5mm Audio Cable Power Cable...

Page 4: ...2 CONTROLS CONNECTIONS Front of Sound Stand LED Indicators 12 LED indicators will give visual feedback when you press buttons on the remote control...

Page 5: ...3 Power Port Service USB Port Service Port USB In OPTICAL 4 Digital Optical Audio In DIGITAL 3 Coaxial In AUX 1 Analog Audio In AUX 2 Analog Audio In 120V 60Hz 60W Back of Sound Stand 120V 60Hz 60W...

Page 6: ...4 Side of Sound Stand Input Power Volume Up Down Bluetooth Input Hold to force pair See Bluetooth Pairing for more information...

Page 7: ...ce VIZIO recommends that you first place your TV alongside the Sound Stand so that you have access to the connection ports 1 Important The Sound Stand is designed to hold TVs up to 55 in size with a w...

Page 8: ...R GOOD When using either of the Digital Inputs if there is no audio A try setting the TV output to PCM or B Connect directly to your Blu ray other source some TVs do not pass through digital audio Bac...

Page 9: ...7 Connect the power cable to the sound stand Plug the power cable into a power outlet 3 120V 60Hz 60W 120V 60Hz 60W...

Page 10: ...er your TV on top of the Sound Stand Be sure that your TV s base fits completely on top of the Sound Stand and does not hang off the edges 4 Note Do not place any items other than the TV on the Sound...

Page 11: ...9 5 Remove the battery cover by gently sliding it away from the remote 6 Insert the included batteries and gently slide the battery cover back into place Top Top...

Page 12: ...n press the Input button to switch between audio sources For example if you connected your TV to Input 1 set the Sound Stand to Input 1 Hardware setup is complete Power Input 7 Auto detect function on...

Page 13: ...input source Enter Play Pause Press to select an option Press to play or pause Next Press to skip to the next track Changes Treble and Bass levels Treble Press to enter treble adjustment mode Bass Pr...

Page 14: ...listening experience DTS TruSurround On Off TruSurround On TruSurround Off Press the TSHD button to enable disable DTS TruSurround When enabled On all inputs will produce virtual surround sound When d...

Page 15: ...n the Display Panel on the front of the Sound Stand will light sequentially from left to right and back again Once the device is paired the LED Indicators will stop flashing 2 You can now search for t...

Page 16: ...ared to a wired connection Try the following if your sound quality is less than optimal If you hear any break up or disconnect while streaming music from your device move the source device closer to t...

Page 17: ...the Sound Stand Optical Coaxial and 3 5mm cables transmit audio only If connecting a video device you will need a separate video connection from the device to your TV Game Console Network Media Playe...

Page 18: ...te Disable VIZIO TV Remote Enable disable the use of a VIZIO TV remote control to power on and adjust the volume of the Sound Stand To enable disable this function Press and Hold the Power and Volume...

Page 19: ...design The VIZIO LED HDTV is shattering the mold in a way only VIZIO can with high quality design and picture at the best value With a stunningly slim outer frame design and LED backlight for rich co...

Page 20: ...ices Technical Problems Product Updates And More SUPPORT VIZIO COM You can also contact our award winning support team at Phone Email 877 878 4946 TOLL FREE techsupport VIZIO com Hours Of Operation Mo...

Page 21: ...ting is set to FIXED or STANDARD not VARIABLE Consult your TV s user manual for more detailed information If using Bluetooth ensure that the volume on your source device is turned up and that the devi...

Page 22: ...ons VIZIO s one year limited warranty only covers defects in materials and workmanship This warranty does not cover for example cosmetic damage normal wear and tear improper operation improper voltage...

Page 23: ...uirements for exposure to radio waves This device is designed and manufactured not to exceed the emission limits for exposure to radio frequency RF energy set by the Federal Communications Commission...

Page 24: ...2014 VIZIO INC ALL RIGHTS RESERVED 140404OC US NC...

Reviews:

Related manuals for S2121w-D0