background image

English - ii

Your Unit is designed and manufactured to operate within defined design limits, and misuse may result in electric shock or fire. To prevent your Unit 

from being damaged, the following rules should be observed for its installation, use, and maintenance. Please read the following safety instructions 

before operating your Unit. Keep these instructions in a safe place for future reference.
•  Read these instructions.
•  Keep these instructions.
•  Heed all warnings.
•  Follow all instructions.
•  Do not use this apparatus near water.
•  Clean only with a dry cloth.
•  Do not block any ventilation openings. Install in accordance with the manufacturer’s instructions.
•  Do not install near any heat sources such as radiators, heat registers, stoves, or other apparatus (including amplifiers) that produce heat.
•  Do not defeat the safety purpose of the polarized or grounding-type plug. A polarized plug has two blades with one wider than the other. A 

grounding type plug has two blades and a third grounding prong. The wide blade or the third prong are provided for your safety. If the provided 

plug does not fit into your outlet, consult an electrician for replacement of the obsolete outlet.

•  Protect the power cord from being walked on or pinched, particularly at plugs, convenience receptacles, and the point where they exit from the 

apparatus.

•  Only use attachments/accessories specified by the manufacturer.
•  Use only with the cart, stand, tripod, bracket, or table specified by the manufacturer, or sold with the apparatus. When a cart is used, 

use caution when moving the cart/apparatus combination to avoid injury from tip-over.

•  Unplug this apparatus during lightning storms or when unused for long periods of time.
•  Refer all servicing to qualified service personnel. Servicing is required when the apparatus has been damaged in any way, such as when the power 

supply cord or plug is damaged, liquid has been spilled or objects have fallen into the apparatus, the apparatus has been exposed to rain or 

moisture, does not operate normally, or has been dropped.

•  To reduce the risk of electric shock or component damage, switch off the power before connecting other components to your Unit.
•  Unplug the power cord before cleaning your Unit. A damp cloth is sufficient for cleaning. Do not use a liquid or a spray cleaner on your Unit. Do not 

use abrasive cleaners.

•  Always use the accessories recommended by the manufacturer to insure compatibility.
•  When moving your Unit from an area of low temperature to an area of high temperature, condensation may form in the housing. Wait before 

turning on your Unit to avoid causing fire, electric shock, or component damage.

•  Slots and openings in the back and bottom of the cabinet are provided for ventilation. To ensure reliable operation of your Unit and to protect it 

from overheating, be sure these openings are not blocked or covered. Do not place your Unit in a bookcase or cabinet unless proper ventilation is 

provided.

•  Never push any object into the slots and openings on your Unit enclosure. Do not place any objects on the top of your Unit. Doing so could short 

circuit parts causing a fire or electric shock. Never spill liquids on your Unit.

•  Never use the subwoofer in the upright, vertical position without installing the legs
•  Do not block the subwoofer ports. Allow for 1-2 inches of space around all sides for ventilation.
•  WARNING: Exposure to loud sounds can damage your hearing causing hearing loss and tinnitus (ringing or buzzing in the ears). With continued 

IMPORTANT SAFETY INSTRUCTIONS

Summary of Contents for SB3651-E6

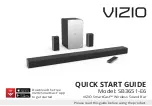
Page 1: ...QUICK START GUIDE Model SB3651 E6 VIZIO SmartCast Wireless Sound Bar Please read this guide before using the product Download the Free VIZIO SmartCast App to get started...

Page 2: ...when unused for long periods of time Refer all servicing to qualified service personnel Servicing is required when the apparatus has been damaged in any way such as when the power supply cord or plug...

Page 3: ...ot be used for an extended period of time unplug the power cord To reduce risk of electric shock do not touch the connector with wet hands Insert the remote control batteries in accordance with instru...

Page 4: ...to Cast Audio 24 Selecting a SmartCast device 25 Creating an Audio Group 26 Bluetooth Audio Pairing 28 Using Bluetooth mode 29 Advanced Setup 30 Connecting with HDMI 31 Advanced Setup HDMI 32 Re Link...

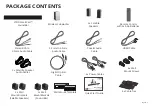
Page 5: ...is guide before using the product Download the Free VIZIO SmartCast App to get started VIZIO SmartCast Sound Bar Remote Control with 2x AAA Batteries Wireless Subwoofer 2 x Satellite Speakers Stereo R...

Page 6: ...n Chine Hecho en China Avis Risque de choc electrique ne pas ouvrir PRECAUCI N RIESGO DE DESCARGA EL CTRICA NO ABRIR 39 Tesla Irvine CA 92618 WWW VIZIO COM B S N LABEL 36 Sound Bar 5 1 System Model No...

Page 7: ...ltimedia Interface and the HDMI Logo are trademarks or registered trademarks of HDMI Licensing LLC in the United States and other countries FCC ID XN6 SB3651E6 This device complies with Part 15 of the...

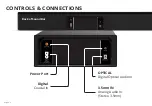
Page 8: ...Sound Bar Input Press to change the audio source Power Press to turn sound bar on or off Volume Increase or decrease the loudness of the audio Bluetooth Input Hold to pair See Bluetooth Pairing for m...

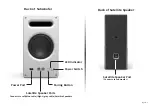
Page 9: ...bwoofer Back of Satellite Speaker Power Switch Power Port Satellite Speaker Ports Connects to Left blue cable Right gray cable Satellite Speakers LED Indicator Pairing Button Satellite Speaker Port Co...

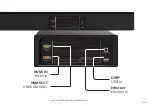
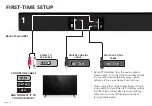
Page 10: ...io outputs shown above To connect the Sound Bar directly to your other devices Blu Ray player game system etc see your device s user manual When using either of the Digital Inputs if there is no audio...

Page 11: ...LC in the United States and other countries FCC ID XN6 SB3651E6 B BEST HDMI ARC CABLE HDMI cables send Video Out and receive Audio from the TV Display See the Connecting with HDMI section for more inf...

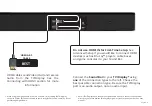
Page 12: ...E6 Made In China Fabriqu en Chine Hecho en China Avis Risque de choc electrique ne pas ouvrir PRECAUCI N RIESGO DE DESCARGA EL CTRICA NO ABRIR 39 Tesla Irvine CA 92618 WWW VIZIO COM B 2 Connect the po...

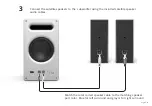
Page 13: ...the satellite speakers to the subwoofer using the included satellite speaker audio cables 3 Match the color coded speaker cable to the matching speaker port color Blue for left surround and gray is f...

Page 14: ...t a power cable to the subwoofer Plug the power cable into a power outlet Press the power button to turn on the subwsoofer The LED indicator will illuminate The subwoofer should automatically power on...

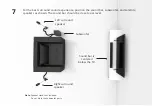
Page 15: ...ft surround speaker Right surround speaker For the best surround sound experience position the sound bar subwoofer and satellite speakers as shown The sound bar should be close to ear level 7 Note Spe...

Page 16: ...INPUT button to switch between audio sources For example if you connected your TV to AUX set the sound bar to AUX Input Power Top Top Tip Pressing the INPUT button will stop the auto detect function...

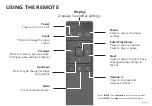
Page 17: ...ute unmute Power Press to turn on or off Enter Play Pause Press to select an option Press to play or pause Next Press to skip to the next track Changes audio settings in Menu Display Displays Sound Ba...

Page 18: ...and to the bottom with decreasing levels Center Levels Two center LEDs indicate Dialogue is centered Press the Next Previous button to increase decrease the presence of dialog in the center channel T...

Page 19: ...d Movie mode will produce 5 1 surround sound Music will produce 3 1 surround sound When disabled Off the satellite speakers will be disabled Note If EQ mode is set to Direct and Surround is set to Off...

Page 20: ...ink Press the Next Previous and Play buttons to select and confirm enabling or disabling Link Mode on your sound bar Link Mode allows the VIZIO SmartCast App to reconnect the sound bar to Wi Fi or pai...

Page 21: ...ablet as your VIZIO SmartCast Remote Download the VIZIO SmartCast app on your compatible smartphone or tablet and follow the on screen instructions to pair your device with a VIZIO SmartCast Sound Bar...

Page 22: ...pported device article iOS iOS 9 0 or later Devices supported iPhone iPad Minimum Recommended Requirements Subject to change To use the Bluetooth LE functionality you must have Android 5 1 or later ht...

Page 23: ...tap on the button in the top left corner The side menu is displayed Tap Setup a new Device from the list of options Android Device Pairing After opening the VIZIO SmartCast App 1 Select Get Started a...

Page 24: ...r favorite app 1 Ensure your mobile device is on the same Wi Fi network as your VIZIO SmartCast sound bar and open a Chromecast enabled app such as Pandora 2 Choose something you want to listen to and...

Page 25: ...SmartCast devices allowing you to seamlessly access and cast your content wherever you are To select a different SmartCast device 1 On the Home screen of the VIZIO SmartCast app tap This Device to re...

Page 26: ...ble sound bars appears 4 Check or uncheck the box next to each sound bar to add or remove it from the group Name the group then tap Save Group to finalize With Chromecast built in the multi room playb...

Page 27: ...D symbol are trademarks of Dolby Laboratories For DTS patents see http patents dts com Contains Transmitter Module FCC ID PPQ WCBN4515R IC 4419A WCBN4515R Contains Transmitter Module FCC ID NKR SWA52...

Page 28: ...r will light sequentially from bottom to top and back again Once the device is paired the LED Indicators will stop flashing 2 You can now search for the sound bar VIZIO SB3651 using your Bluetooth dev...

Page 29: ...d music may lose some integrity when compared to a wired connection Try the following if your sound quality is less than optimal If you hear any break up or disconnect while streaming music from your...

Page 30: ...and the HDMI Logo are trademarks or registered trademarks of HDMI Licensing LLC in the United States and other countries FCC ID XN6 SB3651E6 S N LABEL 36 Sound Bar 5 1 System Model No Num ro de Mod le...

Page 31: ...er the sound bar with the TV What is HDMI Audio Return Channel ARC Using HDMI ARC your TV can send audio to the sound bar using an HDMI cable You will need to connect your sound bar to your TV s HDMI...

Page 32: ...nsmitter Module FCC ID PPQ WCBN4515R IC 4419A WCBN4515R Contains Transmitter Module FCC ID NKR SWA52 IC 4441A SWA52 The terms HDMI and HDMI High Definition Multimedia Interface and the HDMI Logo are t...

Page 33: ...TV speakers when programming your sound bar 1 2 First confirm that the power LED is illuminated Press and hold the pairing button on the back of the subwoofer for 5 seconds The LED on the back of the...

Page 34: ...on and adjust the volume of the sound bar To enable disable this function Press and Hold the Power and Volume Up buttons for 5 seconds Energy Star Ecomode When the Energy Star setting is enabled the...

Page 35: ...button to put the sound bar into learning mode While the sound bar is in learning mode press the Volume Up button on the TV remote control All of the LED Indicators on the sound bar will flash two tim...

Page 36: ...nse from Dolby Laboratories Dolby Dolby Audio and the double D symbol are trademarks of Dolby Laboratories For DTS patents see http patents dts com Contains Transmitter Module FCC ID PPQ WCBN4515R IC...

Page 37: ...appropriate to your home s construction If in doubt consult a professional installer 3 If you are unfamiliar with power tools or the layout of electrical wiring in the walls of your home consult a pro...

Page 38: ...grooves WALL MOUNTING THE SATELLITE SPEAKERS Be sure your screws are attached to wood studs or drywall anchors for drywall or concrete anchors for brick concrete walls Wall mounting hardware is not in...

Page 39: ...VIZIO Safety and Satisfaction Stay up to date with important product updates and notifications Take a moment to register your product VIZIO COM PRODUCT REGISTRATION Why register Customized Support Get...

Page 40: ...tes and more Award Winning Customer Care At Your Convenience NEED HELP Go to support vizio com Se habla Espa ol Nous parlons Fran ais Hours of Operation Monday Friday 7 am to 11 pm CST Saturday Sunday...

Page 41: ...format is present Set the source to output PCM Your TV may be set to variable audio output Confirm that the audio output setting is set to FIXED or STANDARD not VARIABLE Consult your TV s user manual...

Page 42: ...t the time of warranty service How to Get Service Before obtaining warranty service you may visit www vizio com for additional help and troubleshooting To obtain warranty service contact VIZIO Technic...

Page 43: ...SOCIATION AND CONDUCTED BY A SINGLE ARBITRATOR APPOINTED BY THE AMERICAN ARBITRATION ASSOCIATION IN ACCORDANCE WITH ITS COMMERCIAL ARBITRATION RULES AND ITS SUPPLEMENTARY PROCEDURES FOR CONSUMER RELAT...

Page 44: ...E FOR LOSS OF USE LOSS OF INFORMATION OR DATA COMMERCIAL LOSS LOST REVENUE OR LOST PROFITS OR OTHER INDIRECT SPECIAL INCIDENTAL OR CONSEQUENTIAL DAMAGES EVEN IF VIZIO HAS BEEN ADVISED OF THE POSSIBILI...

Page 45: ...Full Range Driver for Each Subwoofer One 5 2 Full Range Driver Conexiones One 3 5mm Stereo Audio One Optical Toslink One USB Supports WAV format only HDMI In HDMI Out Arc Bluetooth 802 11 a b g n ac W...

Page 46: ...a gain permitted for devices in the band 5725 5825 MHz shall comply with the e i r p limits specified for point to point and non point to point operation as appropriate 4 Users should also be advised...

Page 47: ...may be subject to future updates modifications or discontinuation without notice VIZIO has no control over third party applications or content and assumes no responsibility for the availability or in...

Page 48: ...o qualify for ENERGY STAR rating We want to help you save energy For DTS patents see http patents dts com Manufactured under license from DTS Licensing Limited DTS the Symbol DTS and the Symbol togeth...

Page 49: ...2017 VIZIO INC ALL RIGHTS RESERVED 170120AD US...

Reviews: