background image

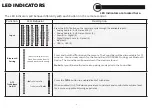
Function

LED Behavior

Description

DTS 

TruSurround 

On/Off

Press the 

TSHD button to enable/disable DTS TruSurround. When enabled (On), 

all inputs will produce virtual surround sound. When disabled (Off), all sources will 

playback in stereo.

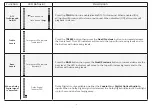
Treble 
Levels

Press the 

TREBLE button then press the Next/Previous button to increase/decrease 

the treble level. The LED indicators will move to the top with increasing levels and to 

the bottom with decreasing levels.

Bass

Levels

Press the 

BASS button then press the Next/Previous button to increase/decrease the 

bass level. The LED indicators will move to the top with increasing levels and to the 

bottom with decreasing levels.

When a Dolby 

Digital signal 

is detected.

Dolby Digital is only available on either the 

Coaxial In or Digital Optical Audio In 

inputs. When a Dolby Digital signal is detected, the Dolby Digital indicator LED will light 

up for 3 seconds before fading away.

Two center LEDs indicate 

Treble level 0.

Two center LEDs indicate 

Bass level 0.

13

Dolby Digital  

Indicator LED

TruSurround On

TruSurround Off

Summary of Contents for SB3820 C6 Series

Page 1: ...QUICK START GUIDE Model SB3820x C6 VIZIO ...

Page 2: ...iers that produce heat Do not defeat the safety purpose of the polarized or grounding type plug A polarized plug has two blades with one wider than the other A grounding type plug has two blades and a third grounding prong The wide blade or the third prong are provided for your safety If the provided plug does not fit into your outlet consult an electrician for replacement of the obsolete outlet P...

Page 3: ...s 5 First Time Setup 7 Using the Remote 11 LED Indicators 12 Bluetooth Pairing 14 Using Bluetooth mode 15 Advanced Setup 16 Connecting a Subwoofer 17 Using Button Combinations 18 Wall Mounting the Sound Bar 19 One Year Limited Warranty 26 Legal Compliance 27 ...

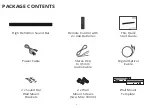
Page 4: ...art Guide Remote Control with 2 x AAA Batteries High Definition Sound Bar 2 x Sound Bar Wall Mount Brackets Wall Mount Template 2 x Wall Mount Screws Size M4 x 10mm Digital Optical Cable Stereo RCA to 3 5mm Audio Cable Power Cable 4 ...

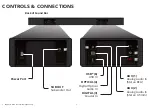
Page 5: ...Port SUB OUT Subwoofer Out OPTICAL 4 Digital Optical Audio In DIGITAL 3 Coaxial In AUX 1 Analog Audio In Stereo RCA AUX 2 Analog Audio In Stereo 3 5mm USB 6 USB In Supports WAV file format playback only 5 CONTROLS CONNECTIONS ...

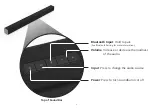
Page 6: ...nd Bar Input Press to change the audio source Power Press to turn soundbar on or off Volume Increase or decrease the loudness of the audio Bluetooth Input Hold to pair See Bluetooth Pairing for more information 6 ...

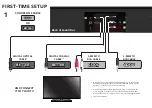
Page 7: ...using either of the Digital Inputs if there is no audio A try setting the TV output to PCM or B Connect directly to your Blu ray other source some TVs do not pass through digital audio Cable not included Back of Sound Bar AND CONNECT IT TO YOUR TV 3 5MM TO RCA CABLE GOOD 3 5MM TO RCA CABLE GOOD DIGITAL COAXIAL CABLE BETTER DIGITAL OPTICAL CABLE BETTER 1 CHOOSE ONE CABLE BETTER GOOD OR ...

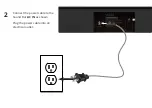
Page 8: ...Connect the power cable to the Sound Bar AC IN as shown Plug the power cable into an electrical outlet 2 ...

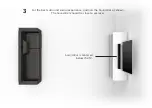
Page 9: ...Sound Bar is centered below the TV For the best surround sound experience position the Sound Bar as shown The Sound Bar should be close to ear level 3 ...

Page 10: ...irs through inputs until an audio source is detected You can press the INPUT button to switch between audio sources For example if you connected your TV to Input 1 set the Sound Bar to Input 1 Power Input Top Top Tip Pressing the INPUT button will stop the auto detect function Auto detect function only occurs once when the Sound Bar is first powered on To enable this feature again you must do a Fa...

Page 11: ...onds to enable Auto Input detect mode Enter Play Pause Press to select an option Press to play or pause Next Press to skip to the next track Changes Treble and Bass levels Treble Press to enter treble adjustment mode Bass Press to enter bass adjustment mode TruVolume Press to enable disable TruVolume TruSurround HD Press to enable disable TruSurround HD Bluetooth Press to enter Bluetooth input To ...

Page 12: ...able for 15 minutes You can now search for the Sound Bar VIZIO SB3820 using your Bluetooth Device The sound bar will power down if no device is found Note Set your Bluetooth device into pairing mode prior to the Sound Bar DTS TruVolume On Off Press the TVOL button to enable disable TruVolume When enabled On TruVolume provides a consistent and comfortable volume level for a more enjoyable listening...

Page 13: ... with decreasing levels Bass Levels Press the BASS button then press the Next Previous button to increase decrease the bass level The LED indicators will move to the top with increasing levels and to the bottom with decreasing levels When a Dolby Digital signal is detected Dolby Digital is only available on either the Coaxial In or Digital Optical Audio In inputs When a Dolby Digital signal is det...

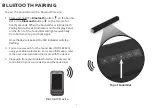
Page 14: ...Panel on the front of the Sound Bar will light sequentially from bottom to top and back again Once the device is paired the LED Indicators will stop flashing 2 You can now search for the Sound Bar VIZIO SB3820 using your Bluetooth device For more information refer to the user documentation that came with the device 3 Play audio from your Bluetooth device Volume can be controlled on your source dev...

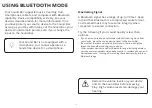
Page 15: ...ion Try the following if your sound quality is less than optimal If you hear any break up or disconnect while streaming music from your device move the source device closer to the Sound Bar Be sure that there are no solid obstructions in the line of sight be tween the Sound Bar and the source device Other wireless devices can affect Bluetooth range including wireless security cameras wireless vide...

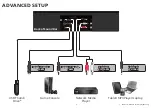
Page 16: ...Supports WAV file format playback only DIGITAL OPTICAL CABLE DIGITAL COAXIAL CABLE 3 5MM TO RCA CABLE 3 5MM TO RCA CABLE Back of Sound Bar Game Console Network Media Player Tablet MP3 Player Laptop USB Thumb Drive 16 ...

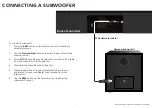
Page 17: ...onnect an RCA cable from the Sound Bar to the Subwoofer 4 Power On the Sound Bar and Subwoofer 5 Manually adjust the SUB gain Volume and phase to your preference See your subwoofer s user manual for more information 6 Use the BASS button on the remote control to adjust the subwoofer s output Optional Subwoofer RCA Subwoofer Cable RCA subwoofer cable and subwoofer not included Back of Sound Bar 17 ...

Page 18: ...st the volume of the sound bar To enable disable this function Press and Hold the Power and Volume Up buttons for 5 seconds Note This function is enabled by default Energy Star When the Energy Star setting is enabled the sound bar will automatically power down after a period of inactivity When disabled the sound bar will remain powered on until you turn it off To enable disable this function Press...

Page 19: ... the two wall mount screws into the wall mount screw holes and then tighten them with a Phillips screwdriver 1 2 Place the included wall mounting template against the wall under your TV Mark the four bracket holes using a pencil Wall Mount Screw Holes 19 ...

Page 20: ...rack ets to the wall are not included Choose the screw type and length appropriate to your home s construction If in doubt consult a professional installer 30 95 in 78 60 cm Wall Mount Screw Screw Size M4 x 10 3 If you are unfamiliar with power tools or the layout of electrical wiring in the walls of your home consult a professional installer 20 ...

Page 21: ...ckaged in a sleek new design Experience more vibrant colors more pronounced darks more premium apps and truly epic entertainment at an unbeatable value on the all new beautifully redesigned E Series Available at VIZIO com Product sold separately VIZIO RECOMMENDS 21 ...

Page 22: ...inition resolutions the E Series HDMI cable provides picture perfect HD video 3D and superior audio all at up to 18 Gbps This all in one cable also supports advanced 7 1 surround sound and Audio Return Channel eliminating the need for additional cables Available at VIZIO com Product sold separately VIZIO RECOMMENDS 22 ...

Page 23: ...rted format is present Set the source to output PCM Your TV may be set to variable audio output Confirm that the audio output setting is set to FIXED or STANDARD not VARIABLE Consult your TV s user manual for more detailed information If using Bluetooth ensure that the volume on your source device is turned up and that the device is not muted I hear buzzing or humming Ensure all cables and wires a...

Page 24: ...EGISTER YOUR VIZIO PRODUCT NOW Customized Support Get assistance quickly with your information on hand News Offers Take advantage of the latest news and special offers from VIZIO Safety Satisfaction Stay up to date with important product updates and notifications Why Register ...

Page 25: ...vices Technical Problems Product Updates And More SUPPORT VIZIO COM You can also contact our award winning support team at Phone Email 877 878 4946 TOLL FREE techsupport VIZIO com Hours Of Operation Monday Friday 7 am to 11 pm CST Saturday Sunday 9 am to 6 pm CST Live Chat Support Available ...

Page 26: ...ns and Exclusions VIZIO s one year limited warranty only covers defects in materials and workmanship This warranty does not cover for example cosmetic damage normal wear and tear improper operation improper voltage supply or power surges signal issues damages from shipping acts of God any type of customer misuse modifications or adjustments as well as installation and set up issues or any repairs ...

Page 27: ...ontrolled environment IC Statement 1 This device complies with Industry Canada licence exempt RSS standard s Operation is subject to the following two conditions 1 this device may not cause interference and 2 this device must accept any interference including interference that may cause undesired operation of the device 2 Changes or modifications not expressly approved by the party responsible for...

Page 28: ... 2015 VIZIO INC ALL RIGHTS RESERVED 150616OC US NC ...

Reviews: