background image

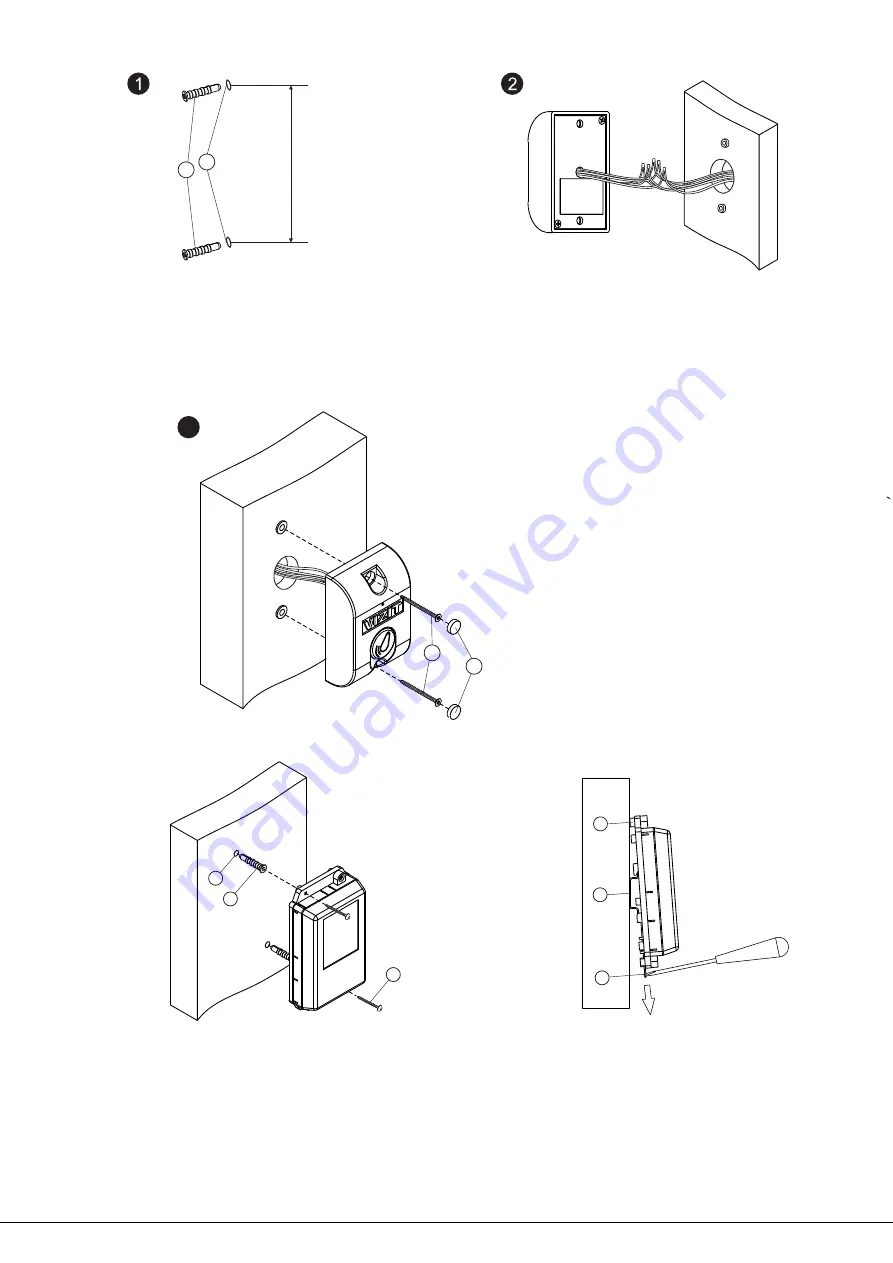
- Make measurements on a wall with center

to center distance 60 mm.
Drill 2 holes (1) with diameter 6 mm and
depth 30 mm.

- Drive anchors (2) in the holes.

2

60 mm

1

- Connect the Reader’s RD-3 wires

to wires of the control unit KTM600M
and button EXIT-300M following the
diagrams given in the section

.

EXAMPLES

OF WIRING DIAGRAMS

READER RD-3

INSTALLATION

3

- Attach the Reader RD-3 to the wall and

fasten two screws

in the anchors.

- Drive in gags

Anchors, screws and gags are supplied
with VIZIT-KTM600R

3.5х30 (3)

(4).

.

3

4

- Drill in a wall 2 holes (1) with diameter 6 mm

and depth 30 mm

- Drive anchors (2) in the holes

Attach the control unit to the wall and fasten

screws

25

in the anchors

Anchors and screws are supplied with

VIZIT-KTM600R

.

.

-

2

3.5х

(3)

.

.

CONTROL UNIT KTM600M

INSTALLATION

1
2

3

-
- DI -

35

1-2

-

Bosses on the control unit’s base

rail with width

mm and

thickness

mm

Holder for fixing

N

1

2

3

1

2

3

KTM600M mounting on a

rail

DIN-

KTM600M mounting on a wall

www.vizit.eu

VIZIT-КТМ600R

2/6

OPERATING INSTRUCTION

Summary of Contents for KTM600M

Page 1: ...on are available upon request C RF c tains the the a with up to 2680 keys or key up to 28 keys the 1 key 1 s or 7 s and and 300M The product does not contain voltage above Do not make any connections or repair when the power is on Take care not to spill any liquids or chemically active substances on the product Switch the power off before cleaning the product Clean by wiping with dry soft cloth Do...

Page 2: ...wo screws in the anchors Drive in gags Anchors screws and gags are supplied with VIZIT KTM600R 3 5х30 3 4 3 4 Drill in a wall 2 holes 1 with diameter 6 mm and depth 30 mm Drive anchors 2 in the holes Attach the control unit to the wall and fasten screws 25 in the anchors Anchors and screws are supplied with VIZIT KTM600R 2 3 5х 3 CONTROL UNIT KTM600M INSTALLATION 1 2 3 DI 35 1 2 Bosses on the cont...

Page 3: ...romagnetic lock The lock will release when voltage is off Set the jumper to position in case of an electromechanical lock The lock will release when voltage is on jumper unlocked state duration 1 or 7 seconds 1 2 WARNING unit IMPORTANT DO NOT use electromagnetic locks with impedance less than 20 Ohms and not provided with a 2 Do not mount the power supply near heating equipment built in degaussing...

Page 4: ...E OP RG RG RG E RD RD BIP BIP OP OP 19w 14 4v EU 12V 1 5A Power upply s unit Button for exit required for keys memorizing erasing Q1 ML Q2 TIME C2 R1 LOCK EL 7S 1S D4 MEMORY CHIP MEMORY CHIP PROGRAM PRG КТМ600М Q1 ML Q2 TIME C2 R1 LOCK EL 7S 1S D4 MEMORY CHIP MEMORY CHIP PROGRAM PRG КТМ600М Electromechanical lock 12 1А V max Note Power supply unit 19w 14 4v EU 12V 1 5A BPD 18 12 1 1 may be used in...

Page 5: ...morizing ACCESS GUARD keys memorizing erasing Erasing of all data The Control unit each key code in the next free memory cell numbering them from No1 up to No for ACCESS keys and from No1 up to No for GUARD keys Enumerate ACCESS keys beforehand and them one by one to the reader during memorizing useful for key management in case of a lost key Turn the power off Remove the lid and take the jumper o...

Page 6: ...ove the lid and take the jumper off Turn the power on Along beep sound Press the EXIT button Twenty short beeps sound LED he system wait for confirmation To confirm press the EXIT button for 2 seconds the long beep sound Turn the power off restore the jumper to its place and the lid In 30 50 seconds of idle the system returns to ACCESS mode One of the following operatin modes is available ACCESS m...

Reviews: