


Eccellenza Pod
Operation Manual
30
Maintenance
To keep the equipment running efficiently and at peak performance, the following maintenance
procedures must be performed at their specified intervals. It is recommended that equipment maintenance
be scheduled at a time that would be the least disruptive to your customers. Whenever possible, replace
the components requiring maintenance with new or refurbished ones, and then refurbish the older
components at your shop.
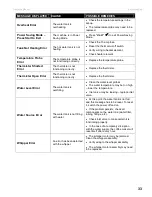
Daily
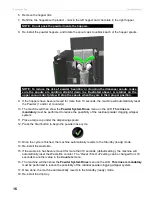
Empty the Drip Tray
– empty the contents of the drip tray and rinse the tray and grill under clean
running water.
Empty the Waste Bin
– empty the contents of the waste bin.
Refill the Powder Hoppers
– top off the powder hoppers.
Perform a Whipper Rinse Cycle
– this should be done immediately after refilling the powder hoppers
to flush any product that may have fallen into the whipper.
Wipe Exterior and Countertop
– using the clean towel, wipe any coffee grounds and spills from the
exterior of the machine and the countertop.
Weekly
Wipe Interior Walls and Door
- using the clean towel, wipe any spills from the interior of the machine
and the front door.
Perform a Whipper Rinse Cycle
– this should be done immediately after refilling the powder hoppers
to flush any product that may have fallen into the whipper.
Wipe Exterior and Countertop
– using the clean towel, wipe any coffee grounds and spills from the
exterior of the machine and the countertop.
WARNING:
Never use ammonia based cleaners on any machine
surface as the surface will become discolored and/or damaged
permanently. Use only mild cleaning products, such as dish soap.


